Queue music into Rhythmbox from Nautilus

Jack Wallen
Sep 26, 2010
Updated • Dec 4, 2012
Linux, Music
|
2

Nautilus is one versatile file manager. The ability to add actions (with the help of Nautilus Actions) makes Nautils' ability seemingly endless. I have covered adding actions to Nautilus before (see my article "Add actions to extend Nautilus functionality"). That article covered an earlier version of Nautilus Actions. Now that this tool has matured quite a bit, I thought it wise to revisit the topic and show you yet another way you can take advantage of this ability to make Nautilus do more to manage your files.

In this instance I am going to show you how to use the Nautilus Actions tool to directly add music to your Rhythmbox Play Queue. Although the action will not initiate the playing of the music, it's a very easy way to fill up your play queue.

A few notes

First and foremost, in order for this to work (outside of making sure you have everything installed) the music you will add from Nautilus must already be in your Rhythmbox library. This action takes advantage of the Rhythmbox command line tool rhythmbox-client which can not actually add music to the library. We can, however, create an action that will both enqueue the music AND begin playing the music. That is exactly what we are going to do.

A piece to install

In case you don't already have Nautilus Actions installed, you will need to do so. This is very simple to do if you follow these steps:

  1. Open up your Add/Remove Software Utility.
  2. Search for "nautilus" (no quotes).
  3. Mark Nautilus Actions for installation.
  4. Okay any dependencies that might be necessary.
  5. Click Apply to install.

Once the installation is complete, you can then close the Add/Remove Software Tool and get ready to work.

Creating the action

Figure 1

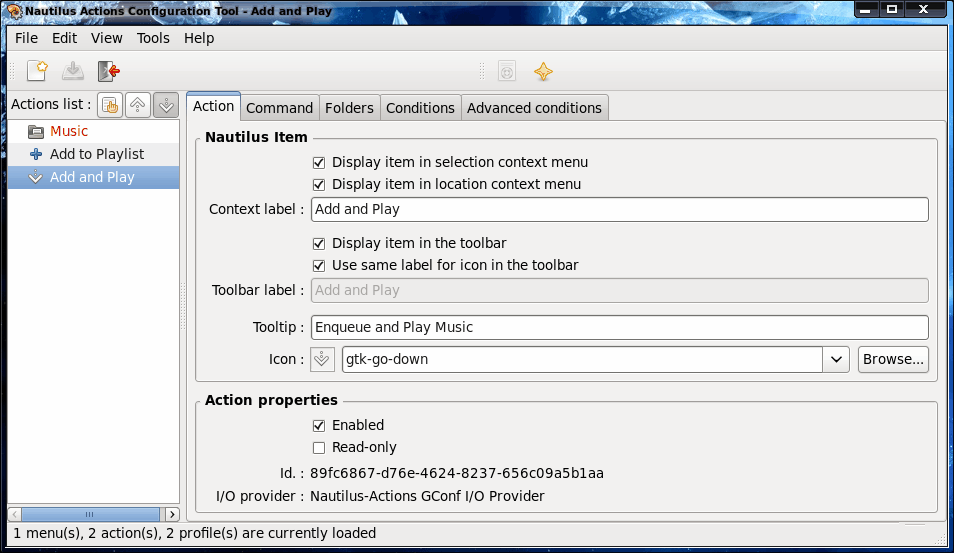
The first step is to start up the Nautilus Actions Configuration Tool. To do this click System > Preferences > Nautilus Actions Which will open up the tool in question. When you first open up this tool it will be empty of actions. To create an action click File > New Action. This will open the New Action tabs (see Figure 1) where you will begin to create what you need.

Now, let's take a look at what you need to configure in order to enable an action to both add to and play from your Rhythmbox play list. We'll look at this tab by tab.

Action

Under the action tab, you need to do the following:

  • Check "Display item in selection context menu"
  • Check "Display item in location context menu"
  • Enter "Add and Play" (no quotes) in the Context label section.
  • Check "Display item in the toolbar"
  • Enter "Enqueue and Play Music" in the Tooltip section.
  • Select an icon to be displayed from the drop down.
  • Check "Enabled" under Action properties.

Command

Under the Command section of the command tab, you need to do the following:

  • Enter /usr/bin/rhythmbox-client in the Path section.
  • Enter --enqueue %M --play in the Parameters section.

Conditions

Under the Conditions tab, you need to do the following:

  • Enter *.mp3; *.flacc; *.acc; *.ogg in the Filenames section. NOTE: You can add as many file types as you need here.
  • Enter audio/* in the Mimetypes section.
  • Check "Both".
  • Check "Appears if selection has multiple files or folders"
Figure 2

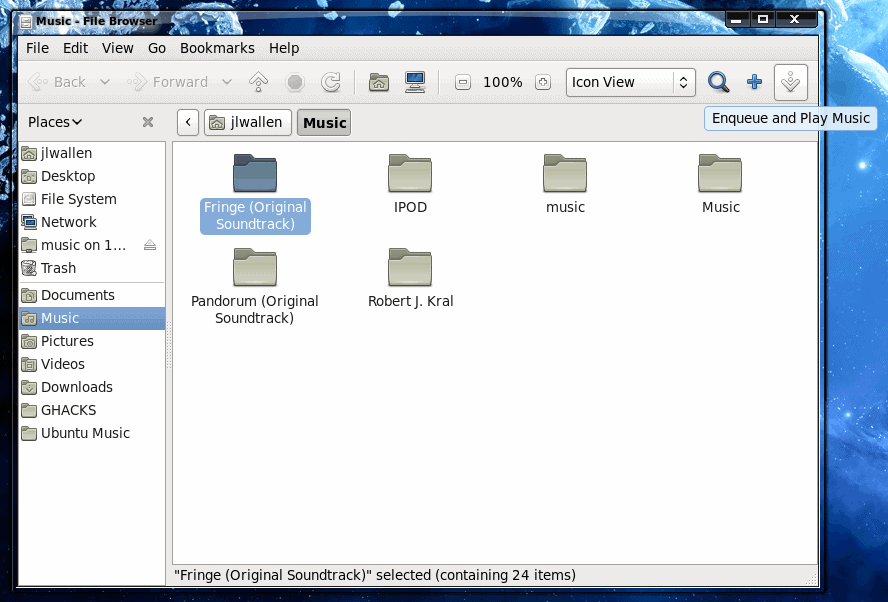
That's it. Now you have to save the action by clicking the Save button (or clicking File > Save). The final step is to restart nautilus with the command nautilus -q. After you restart Nautilus open up Nautilus to your ~/Music folder (or where ever you house your collection) and notice the new icons (see Figure 2) in the upper right corner of the Nautilus window. In my sample I have created two actions: One that only adds music and the other that adds and then plays music. Select the folder you want to add and then press the icon for your action and the music will be added to the queue and Rhytmbox will start playing.

Final thoughts

It's amazing how flexible Nautilus is. Even just a file manager can be so much more than that in the world of Linux. And what's best...you can create so many different actions with Nautilus to perfectly suit your needs.

Advertisement

Tutorials & Tips


Previous Post: «
Next Post: «

Comments

  1. Jaron said on June 27, 2011 at 11:11 am
    Reply

    The easier way is to use Foobar 2000 – add files, right click – Convert – Convert to a Single File and choose desired format and options.

    1. kktkkr said on June 27, 2011 at 7:12 pm
      Reply

      I personally like this method as it is the fastest way to combine files. You can also use a DSP to remove silence, which may come in handy.
      The only complaint I have is that there is no easy way to manually control the volume of each track in the output.

      Bear in mind that for encoding to MP3 in Audacity/foobar2000 you will need a compiled(?) version of LAME encoder.

    2. max said on December 8, 2016 at 11:27 pm
      Reply

      There is no option to convert to a single file in the Foobar. (I selected Mp3 output).

  2. jaomadn said on June 27, 2011 at 1:36 pm
    Reply

    If the process is to merge the multiple mp3 used mp3wrap command line package to wrap multiple mp3 files and use sound or audio converter to any format you like. or use ffmpeg and mp3wrap for full auto merge and convert using search, identify format, merge and convert script.

    1. Paul C said on February 2, 2018 at 3:51 pm
      Reply

      I know this is old, but I came here today looking for a solution to stop my mp3 player playing audiobook chapters/tracks out of order and others might too! (tried all the other renaming ways etc but no luck.)

      I found a way to merge multiple files in Audacity (which is brilliant and free btw):

      file menu – import – select all files you want to merge
      select menu – select all
      track menu – align tracks end to end
      file menu – export – export as mp3

      NB: do not ‘open’ the files as it will create a new window for each. Do not ‘export’ without staggering them first otherwise it will merge the files on top of each other rather than end to end and will just sound like white noise.

      1. John, UK said on July 30, 2018 at 3:25 pm
        Reply

        Thank you for this. I was looking to do exactly the same, and it works just as described. One small point, you can also “drag and click” a group of audio files into Audacity as an alternative to the “import” option. It worked with my mp3, so presumably also with other formats.

      2. Emanuel said on October 7, 2018 at 4:38 pm
        Reply

        file menu – import – select all files you want to merge
        select menu – select all
        track menu – align tracks end to end
        file menu – export – export as mp3

        Worked Perfectly!

        Thank you!

      3. Nyks said on June 20, 2019 at 9:49 am
        Reply

        Thanks a lot!

        > select menu – select all
        The “Select all” now is in another menu (maybe a change in Audacity):
        Edit / Select / Select all

  3. Roman ShaRP said on June 27, 2011 at 2:03 pm
    Reply

    1) You should know that there are 2 types of wavs a) uncompressed wav b) so-called RIFF-wav. The difference between second and mp3 is only in header.

    I discovered this long time ago. The only (alas) program I know which is capable of adding/stripping RIFF header and making RIFF-wavs from mp3s is cd grabber CDEX. I still have it installed solely for RIFF job I occasionally need.

    Some audio tracks in video are RIFF-wavs, I don’t know if it makes difference for VirtualDub, but it is big difference in size between uncompressed and compressed wavs.

    2) As for me, the easiest way to split-join mp3s (and without re-encoding) is famous Mp3directcut . I made joining of 2 files of the same bitrate literally in no time. Of course, if there are different bitrates, I probably had to re-encode.

    1. jarri scheil said on November 21, 2017 at 3:46 am
      Reply

      Except for the hijacking of your search engine:

      Don’t forget to Click

      You will not be able to proceed until you check a box to set myquickconverter.com as your New Tab page or default search.

  4. Roman ShaRP said on June 27, 2011 at 2:14 pm
    Reply

    Oh, I should tell where is joining in Mp3DirectCut:

    File -> Batch processing -> Check “Join to file” and enter file name.

  5. Arbie said on July 18, 2011 at 5:30 am
    Reply

    Is there an easier way? Well there are certainly other ways. One way that is more “visual” and versatile is to import all the tracks and use the time shift tool (the double headed arrow) to move the files into the proper places. You can visually see the overlaps and adjust the fade out and fade in (if you are going to do that) with the envelope control or the fade out and fade in the effects dropdown. When satisfied with your efforts select “export as mp3” or “export as wave” as desired and your project will mixdown to a stereo file in your desired format.

  6. seoras said on March 23, 2016 at 11:26 am
    Reply

    All much more cumbersome than Insert>Append as used in an older audio editor, the name of which escapes me.

    1. Patrick said on February 8, 2017 at 8:02 am
      Reply

      Cooledit Pro, I think (now : Adobe Audition)

      I haven’t thought about about this one ;)

  7. Shabalala said on February 27, 2018 at 1:28 pm
    Reply

    The above info is from Paul C incomplete and confusing. Here is a more comprehensible method for Audacity 2.1.3 as of Feb 2018:

    Merge multiple files in Audacity:

    File – Import / Audio – select all files you want to merge
    Open (you have no choice here)
    Edit / Select -> All
    Tracks / Align Tracks -> Align end to end
    File / Export Audio – set file name and select file type you want (mp3)
    Click OK to accept message that tells you that all tracks will be merged into two channels
    Done!

    1. Miki said on April 5, 2018 at 4:13 pm
      Reply

      @Shabalala Great idea, tanks a lot.

    2. Brian said on April 14, 2018 at 7:14 pm
      Reply

      Totally. Every time i come to this page I ignore everything and come right to this comment.

    3. Bess said on September 19, 2019 at 2:42 am
      Reply

      Perfect! Thank you Shabalala. Cheers, Bess

  8. Quaternion said on June 12, 2018 at 11:34 pm
    Reply

    What Brian said. Thanks @Shabalala.

  9. K Gangadhara Rao said on October 19, 2018 at 5:03 am
    Reply

    There is no option ‘Align End to End’ in the Older version of Audacity. What to do?

  10. PJ said on December 21, 2018 at 4:41 am
    Reply

    <3 comments for this reason: THE CORRECT ANSWER – thank you @Shabalala

  11. steve gershwin said on January 7, 2019 at 9:54 pm
    Reply

    Hey all, I tried align end to end and also copy/pasting track 2 onto the end of track 1. Both of these options leave a noticeable gap/click. Anybody have any ideas? I have version 2.2.1

  12. Paul TW said on October 30, 2019 at 6:05 pm
    Reply

    It is simpler to do this:

    Use File > Open so that the files appear in their own windows.

    Click on one of the files and Ctrl A to select all of it then Ctrl C (to Copy)

    Switch to the other open file in its own window and place your cursor where you want to merge the file and Ctrl P (to Paste)

    All done!

  13. daveclark966 said on January 26, 2020 at 4:04 am
    Reply

    Avdshare Video Converter is the top one MP3 Merger which can easily merge more than one MP3 into one entire MP3 file without any quality loss. Besides, this powerful MP3 Merger also supports to change the merged MP3 format to another one, like MP3 to WAV, AAC, WMA, AIFF, FLAC, OGG, etc.

  14. Deryacenter said on February 27, 2020 at 12:34 am
    Reply

    This page exists primarily to make it easier to search for alternatives to an application that you do not know under which section has been added. Use the links in the template at the top to view the main sections as separate pages.

  15. Jerry Smit said on June 29, 2020 at 5:37 am
    Reply

    Am I the only one think Audacity is a little complicated to use? I have used several merging tools to combine my MP3 and WAV files. Some online tools like Clideo are slow to upload and download files. Then I tried Joyoshare Video Joiner. It supports multiple video and audio formats. Most important of all, it is very easy to use. Just several clicks! Then it finishes the merging. You can relax that Joyoshare can merge audios with zero quality loss.

Leave a Reply

Check the box to consent to your data being stored in line with the guidelines set out in our privacy policy

We love comments and welcome thoughtful and civilized discussion. Rudeness and personal attacks will not be tolerated. Please stay on-topic.
Please note that your comment may not appear immediately after you post it.