Add actions to extend Nautilus functionality

GNOME's file manager, Nautilus, (as you would expect) is much more than just a plain file manager. There are so many configuration options and ways to extend the default GNOME file manager. One way to extend Nautilus is by adding actions. A Nautilus action is a way to add new features that can do pretty much whatever you need it to do. These actions tend to act upon files (either single files or batch files). Actions can call user-created scripts or work with built in utilities.
In this tutorial I am going to introduce you to Nautilus actions by way of the shred command. When this action is used a file is deleted beyond recovery (thanks to the shred command). Once you see how this shred action is created, you can then take that and build upon it to the limits of your imagination.
Shred
Before we begin with the action, let me explain a bit about the shred command. Shred does one thing - it overwrites a file to hide its contents and then (optionally) deletes the file. (Of course, for our action, we will be using shred to delete the file.) But why not just delete the file? Simple. A file that has been deleted using the standard means can, with enough work, be recovered. If there is a file you do not want to be able to be recovered, using shred is your best bet.
The basic usage of shred is:
shred [OPTION] file
Now for this action we will be employing a few options:
- f: Change permissions to allow writing (if needed).
- u: Remove the file after overwriting.
- z: Add a final overwrite of zeros to hide shredding.
There will also be one Nautilus Action parameter used:
M: This option sends a space-separated list of the selected file(s) and/or folder(s) to the command used.
Nautilus Action Editor

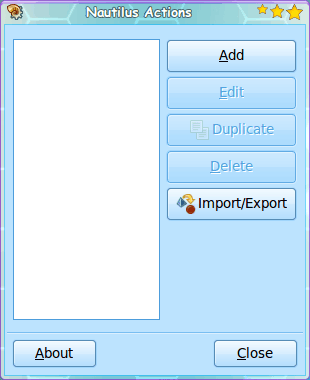
To open the tool go to the Preferences sub-menu of the System menu and select Nautilus Actions Configuration. When this new window opens (see Figure 1) . From this window click the Add button to create a new action.
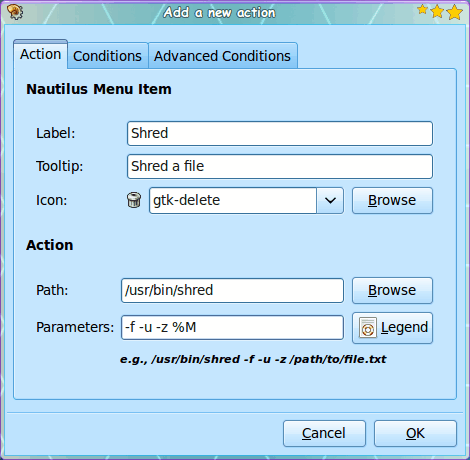
The new window that opens will be (for the most part) self explanatory (for our shred example). But this is the information you will fill in:
- Label: Shred
- Tooltip: Shred a file
- Icon: gtk-delete
- Path: /usr/bin/shred
- Parameters: -f -u -z %M

Figure 2 shows the completed window ready to be OK'd. Once you have completed that information, and clicked OK, you will be back at the Nautilus Actions Configuration window. The only difference will be your new action will be listed in the left pane. You can now close out that window.
Using your new action
All actions are listed in the file manager context menu. In other words, when you right click a file or folder within a Nautilus window, your actions will show up in that menu (see Figure 3).
If I were to now right click on a file (or folder) and select the Shred entry that file would then be shredded. Recovering that shredded file would be quite difficult (if not impossible).
These actions will also show up in the Nautilus Edit menu as well. And remember, you can select multiple files/folders (use the <Ctrl> key when selecting multiple files/folders) and shred them all simultaneously.
Final thoughts
These Nautilus Actions can extend your GNOME file manager as far as you can imagine. Give this feature a try and see if you can come up with a cool action to share with your fellow Ghacks readers.
Advertisement


Cool tip but in Ubuntu 9.10 I don’t see the Nautilus Actions Configuration menu item. I also do not see a way to add it in the Menu preferences. Is this limited to 10.04?
Tried this in LinuxMint 8 but it won’t shred folders, only files.
Anyone know a way around this?
That’s cool! I imagine that one can also add a function to convert an MP3 file to FLAC or OGG, using the same steps you describe and the appropriate command? This is so handy :o)
Thanks for your useful post!
Well, just found the Nautilus script to convert audio :) See this link:
http://ubuntuforums.org/showthread.php?t=888940
Thanks for your post!!
Cheers
Chris