How to change network names on Windows 11

Windows 11 names networks automatically when they are discovered for the first time. Ethernet connections that connect using cables get generic network names, such as Network 4, which may be problematic for identification. Wireless networks get the SSID as the name by default; sometimes, you may want to change that name as well to improve identification or change a name that you may consider inappropriate.
Windows 11 includes options to change network names. Everything that is required to do that is available already, installation of software programs or applications is not required.
This guide provides you with the means to change network names on Windows 11 using different methods. Pick the one that you prefer or need to use, if you are in a corporate environment.
Tip: check out our network name changing guide for Windows 10 here.
Change the network name on Windows 11
The very first thing that you need to do is make sure you have the current name of the network adapter that you want to change.
Network names in Settings

One option that you have is to use the Settings application for that.
- Select Start > Settings.
- Open Network & Internet.
- Open Ethernet or Wi-fi depending on the network name that you want to change.
- The name is displayed at the top (see screenshot above).
Network names in Control Panel

Alternatively, you may also open the classic Control Panel and look up the information using it.
- Open Start.
- Type Control Panel and open the result.
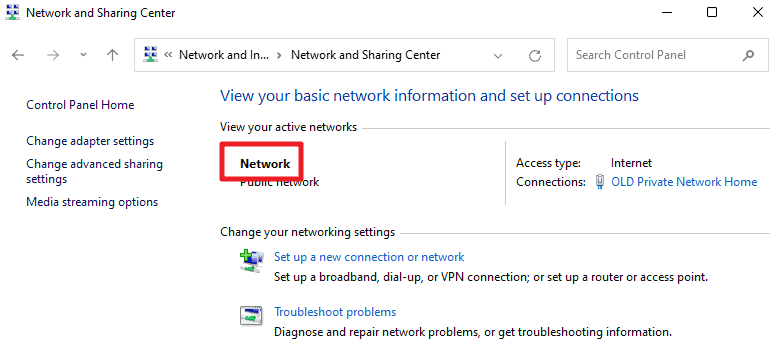
- Go to Network and Internet > Network and Sharing Center.
- Windows 11 displays the active networks on the page that opens, including their names.
Changing the name of a network in Windows 11
Windows 11 administrators have several options when it comes to changing the name of a network:
- Edit the network name in the Registry.
- Edit network names using Local Security Policy.
Edit the network name in the Registry

The Registry option is not as straightforward as the PowerShell option. Still, it may be used in scripts and has its uses because of that.
- Open the Start Menu of the device.
- Type regedit.exe and select the "run as administrator" option to load the Windows 11 Registry Editor.
- Go to HKEY_LOCAL_MACHINE\SOFTWARE\Microsoft\Windows NT\CurrentVersion\NetworkList\Profiles
- Expand the profiles listing.
- You need to go through each now to find the profile with the correct name.
- Double-click on ProfileName when you have found the right profile and type the new name that you want to assign to it.
The change is active immediately, but only on the device. Repeat the process for other profiles that you want to change the name of.
Change profile names using Local Security Policy

Please note that Local Security Policy is only available in professional and Enterprise editions of Windows 11.
- Open the Start Menu.
- Type secpol.msc to open Local Security Policy on the device. You can check out our master list of Windows msc files here.
- Activate Network List Manager Policies.
- Double-click on the network that you want to change the name of.
- Type the new name under Name on the window that opens.
- Click ok.
Changing Connection names in Windows 11
Using PowerShell

You may run a single command to list the connection status of all network adapters.
- Select Start.
- Type PowerShell and run Windows PowerShell.
- Run the command netsh interface ipv4 show interfaces.
Windows 11 lists all connections, including the current names of the adapters.
Edit connection names in PowerShell

One of the best options that administrators have is to edit the name of a connection using PowerShell. Best, because it requires just a single command to do so.
Here is how it works:
- Open Start.
- Type PowerShell.
- Select Run as administrator next to Windows PowerShell to start an elevated PowerShell command line window.
The base command is Rename-NetAdapter -Name "Current name" -NewName "New Name that you specify". All you have to do is look up the name of the current adapter and replace "Current name with it, and specify a new name in "New Name that you specify. Here is an example: Rename-NetAdapter -Name "Private Network Home" -NewName "OLD Private Network Home"
Repeat the process for any other name that you want to change.
Now You: have you changed network profile names in the past?


I use a portable freeware “Network Profile Name Changer”
https://www.sordum.org/14327/network-profile-name-changer-v1-2/
Thanks Martin, for your articel.
Its not much changed sins your october 2018 articel maybe a littel bit handier with Windows 11.
I have a VPN connectiong will there be any suppries there?
I ask this because in the pictures above I cant see (Like in Windows 10 where I have in the network & internet tap the sub branches – status, eternet, dial-up, vpn and proxy) a special branch for the VPN?