Stop Windows 11 Update Notifications & Automatic Installation
Almost everyone out there is frustrated with the automatic Windows updates. While updates are important to ensure the smooth functioning of your system, they can get annoying at times. Microsoft started cumulatively installing updates since Windows 10. However, some users found that some updates caused problems rather than improve the system. This article will look at how you can stop automatic updates for Windows 11.
Disabling Automatic Updates
Pausing Auto Updates
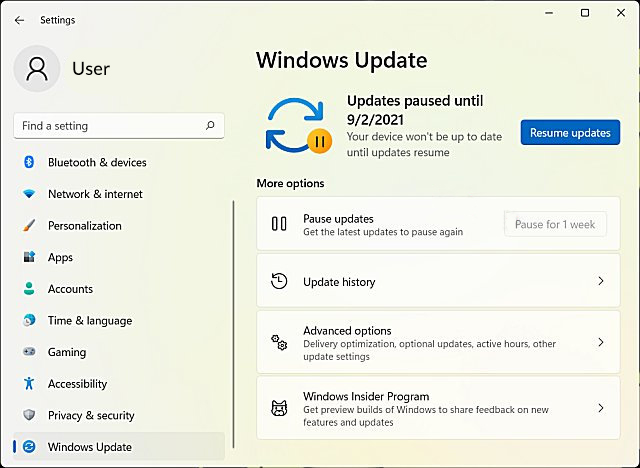
This is one of the easiest ways to stop automatic updates in Windows 11. However, this method will only stop updates temporarily. If you're still looking to pause updates, here are the steps you should follow.
Go to settings and click on update and security. Once there, you can click on pause updates. This will pause it for seven days. If you want to change the pause period, click on advanced options. The next page will have a section named pause updates. Under this section, you will see a dropdown for a date. Click on it and change the date to when you want the updates to be paused.
You can select any date up to 35 days. Pausing updates for longer durations is not advisable because most of the updates are for system improvements. Some of the scenarios where you may want to pause updates are when you want to play a heavy graphic game.
Disabling Updates Permanently via Services
To disable updates permanently, follow the following steps. Type run after clicking the start menu. In the run dialog box, type 'services.msc' and hit enter. This will open the service window box. Search for windows update and double-click it. Under the update settings, you will see startup type. Choose disabled from the dropdown menu. Once you click ok, you will need to restart the system to bring the changes into effect.
Disabling Updates Permanently via Registry
To disable automatic updates through the registry, follow the following steps. Click on the start menu and type regedit. From the search results, click the registry editor. In the registry editor address bar, type the below address.
HKEY_LOCAL_MACHINE\SOFTWARE\Policies\Microsoft\Windows
Right-click in the sidebar and select new and then key. Name this as WindowsUpdate and then press enter. Right-click on WindowsUpdate and again create another key. Name this AU and again press enter. Now in the right panel, right-click anywhere and click on new and then DWORD (32-bit). Name this key as NoAutoUpdate and hit enter. Double-click on this and edit the value from zero to one. After closing the registry editor, restart your system.
With Great Power Comes Great Responsibility
Now that you know how to disable automatic updates in Windows 11, be careful. Make sure your system performance is not affected when you're disabling these updates.
Advertisement