Backup your Linux desktop with Simple Backup

There are tons of possible backup solutions for the Linux desktop (and/or server). I have covered a number of possible solutions here on Ghacks. One of my favorite (and the one I use most often) is Luckybackup (see my article "Luckybackup: Linux backup made easy"), but that doesn't mean there aren't plenty of really good solutions. One of these solutions (and one that really lives up to its name) is Simple Backup (or sbackup). This backup tool offers very similar features to other solid backup options: local backups, remote backups via SSH or FTP, scheduled backups, include/exclude, and restore.
Simple Backup works to make the backup process simple. In this article I am going to show you how to install and use this handy Linux backup tool.
Installation
As you have grown to expect, sbackup is easy to install as it is included in the standard repositories. To install sbackup follow these steps:
- Open up your Add/Remove Software tool.
- Search for "sbackup" (no quotes).
- Mark Simple Backup for installation.
- Click Apply to install.
That's it! You will now find two new entries in your System > Administration menu: Simple Backup Config and Simple Backup Restore. As you can probably guess, the former is used to set up and run your backups whereas the latter is used to restore your backups. Now, let's see how simple it is to set up a scheduled backup.
Scheduling a backup
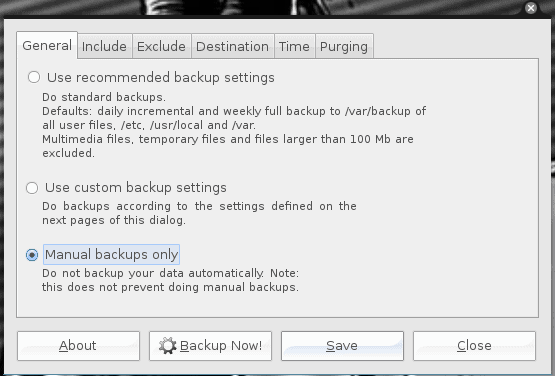
Click on System > Administration > Simple Backup Config which will open up the main sbackup config window (see Figure 1). In order to set up a fairly straight-forward backup make sure you hit these sections:
General: You can use this to do standard, automatic, or manual backups. Note: Standard backups will backup all user files, /etc, /usr/local, and /var. That's a pretty good basic backup scheme.
Include: The particular directories you want to include in your backup.
Exclude: Any particular directories you want to exclude from your backup.
Destination: Where the backup will be stored. By default the backup is in /var/backup. You will probably want to go with an external drive for this. NOTE: You might want to check the box for "Abort backup if destination directory doe not exist". This will keep the backup from running if you have forgotten to plug in your external drive.
Time: Here you can precisely schedule your backup. Â What this actually does is create a cron job for your backup.
Purging: This is a very critical section as it will ensure your backup directory doesn't get full. Here you can choose either Simple or Logarithmic purging. Simple allows you to just declare how old a backup can be before it is removed. Logarithmic uses an algorithm for keeping various backups. The Logarithmic backup is the recommended choice.
Once you have made all of your choices, click Save and then, if you want, you can run your backup immediately by pressing Backup Now! When you press Backup Now! the process will begin and remain in the background. If you have configured sbackup for a time, the first backup will run at the time you configured.
Restoring a backup
Because the restore is a part of Simple Backup, it will know where you have placed your backups. Until you have actually had a successful backup, there will be nothing to restore (so Simple Backup Restore will find nothing to restore). Once you do have a successful backup all you have to do is follow these steps:
- Click System > Administration > Simple Backup Restore
- From the Restore GUI, select which backup you want to restore.
- Click Restore.
That's it. Now the process of restoring your files will be begin!
Final thoughts
Between LuckyBackup and Simple Backup you will be hard pressed to find an easier, more reliable backup solution for the Linux desktop. But regardless of what backup solution you use, make sure you DO use a backup or else you stand to lose all of your precious data.
Advertisement