How to add proprietary drivers in Ubuntu

Over the last few years most of my video cards have had NVidia chipsets. And with these chipsets, open source drivers are iffy at times. Because of that I have often employed the use of proprietary drivers. It used to be a challenge to get these to work. Many times you had to recompile a kernel or make sure you had the matching kernel to your video driver. And once you had all of the software installed, you had to manually edit your X configuration file.
Things are very different now. And thanks to Ubuntu there is a very simple route to adding these proprietary drivers to your system.? This article will show you how to manage this task.
Opening the tool
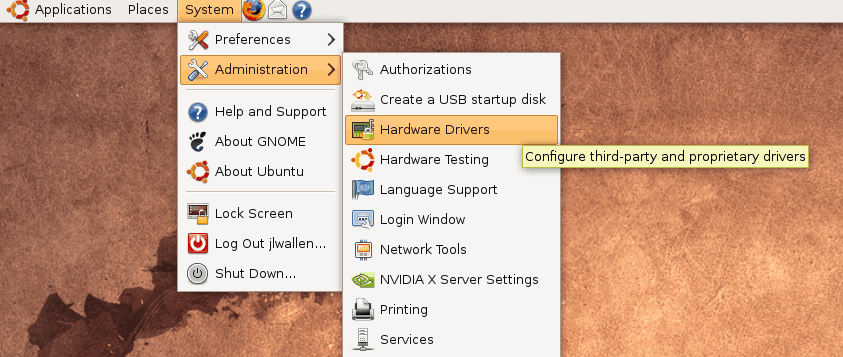
The first thing you need to do is open the tool for managing proprietary drivers. You might not have to go searching for this tool if you see a small icon in your panel that looks like a tiny PCI card. If you see that you only need click on that icon. If you do not see that icon, however, you will have to venture through the menu system to find it (see Figure A). Fear not, the menu entry is simple to locate: Click on the System menu, the Administration sub menu, and finally the Proprietary Drivers entry.

The window that opens (see Figure B) will be the only tool you need to enable or disable the drivers you need for your hardware.
Scroll through the list of drivers for your hardware. One of the first bits of information you need to look for is the "Recommended" tag. That is the driver you should select. Believe it or not, this tool is actually very good at choosing the correct driver for your devices.
Once you have selected the proper driver click the Activate button and the driver will be activated. Of course, depending upon the hardware the driver is for, you might have to either log out and log back in, or even (gasp) reboot. Most likely you will only have to log out and log back in.
That's it. That's all it takes now to load a proprietary driver in Ubuntu.
Final Thoughts
Of course there are many purists out there who wouldn't even think of loading a proprietary driver on their machine. But if you're looking to get more from your hardware, and your desktop, you will most likely want to go this route. I have used many NVidia cards on many Linux distributions and I have yet to find an open source driver that can work as well as the proprietary drivers can.
Hopefully some day the open source equivalents will catch up (or the makers of the proprietary drivers will open up their code). But until that day I will continue using tools like this to enable my machines to work as well as they do.
And in the case of some wireless cards like those with Broadcom chips - work period!
Advertisement


I went to System>Administration>Hardware Drivers, but the only proprietary driver listed was one I already use for Broadcom wireless connection. I am having problems getting proper resolution/aspect ratio and refresh rate on my Dell Mini 10 which has Dell graphics with proprietary drivers (based on Imagination Services SGX). Is it possible to add drivers to the tool?
i did like what you said but i couldn’t find any drivers the window was empty,,
so what should i do know :(
Asher: Take a look at this previous gHacks article I wrote:
https://www.ghacks.net/2009/01/09/installing-fonts-in-linux/
I’d like to know how to install fonts under Ubuntu please