How to encrypt your emails in Thunderbird
Emails are by default just like postcards. That's good on the one hand, as it ensures that sender and recipient can read the email messages without issues.
It means however as well that anyone or anything that is in the delivery chain may read those emails as well.
This is done by some email providers to serve targeted advertisement to its users for instance. Email encryption is not a new concept, but it never really made the jump in the mass market. Users who wanted to could encrypt email messages ten years ago and even earlier than that.
The majority of users on the other hand don't. One reason for that is that it is not super-easy to use encryption; first because it is not really supported by the majority of email providers out of the box, and second because it requires that recipients need to do something to read these emails, and reply with encrypted messages of their own.
The following guide is a basic tutorial that explains in simple terms how to set up email encryption in Thunderbird.
Here is what you need:
- A copy of the Thunderbird email client.
- The Thunderbird add-on Enigmail.
- A copy of Gpg4win if you are using Windows.
Setting up email encryption in Thunderbird

First thing you need to do is download the programs from the linked resources mentioned in the last paragraph. Install Thunderbird if you have not done so already, and Gpg4win. You need to have at least one account in Thunderbird to complete the configuration. If you have none, start by adding an email account or creating a new one.
The Gpg4win installer displays installation modules when you run it. I suggest you keep the defaults, but remove the Outlook plugin component as you may not require it.
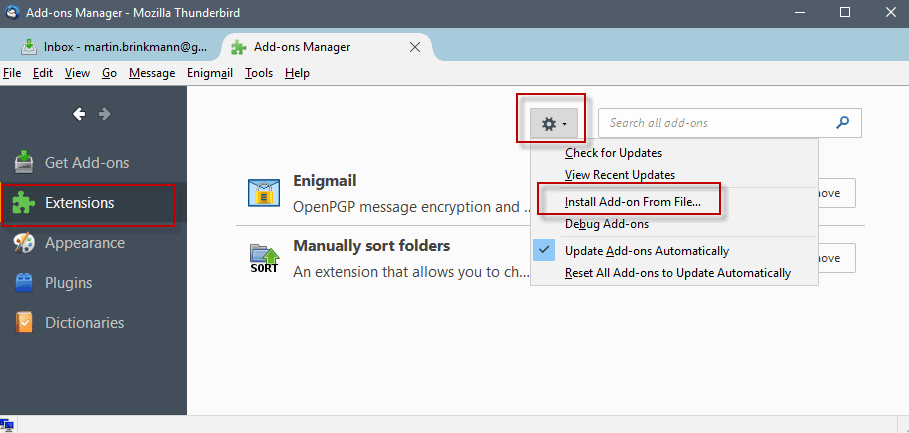
Once you are done with that, fire up Thunderbird and go to Tools > Addons. Switch to Extensions if another menu is selected by default, and click on the cogwheel icon next to search.
Select install add-on from file, and pick the Enigmail add-on that you downloaded previously. Follow the installation dialog to complete the installation.
You should see Enigmail listed as a new extension afterwards. Click on the options link first that is displayed next to the extension, and make sure the GnuPGP installation was found. Enigmail should pick up the installation courtesy of Gpg4win. Close the window afterwards again.
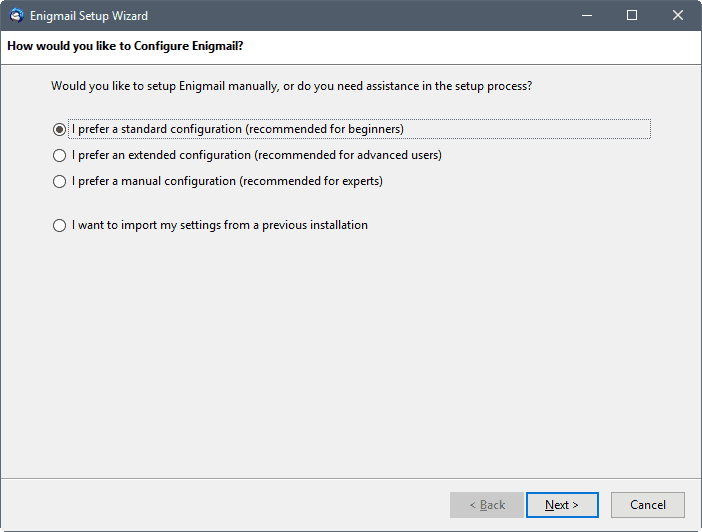
Select Enigmail > Setup Wizard afterwards. Keep the default choice "I prefer a standard configuration (recommended for beginners)" and click on next. If you already know your way around, select the advanced or manual configuration options instead.
These list additional options and use fewer screens to create key pairs. Additional options include setting a key expiration date, as well as the key size and type.
You may import existing settings as well if you have access to a previous installation already.
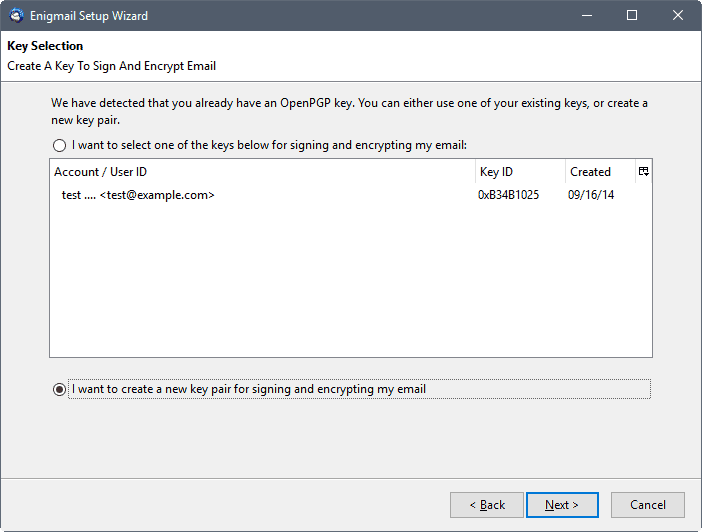
Enigmail displays all available accounts on the next page. If you have not used Gpg4win before, you should only see a test account listed there.
Since you have not created a key pair yet, select "I want to create a new key pair for signing and encrypting my email".
A key pair consists of a public and a private key. The public key needs to be sent or made available to others so that they may use it to encrypt emails. The private key is personal, and should not be shared or made available. It is used to decrypt any email that was encrypted using the linked public key.
Enigmail explains the key concept of key pairs on the next page. You are asked to pick a user account from the available Thunderbird accounts
Select one of the accounts, and pick a -- very -- secure passphrase. The passphrase protects the private key and it is essential that it is secure as someone might be able to brute force or guess it otherwise.
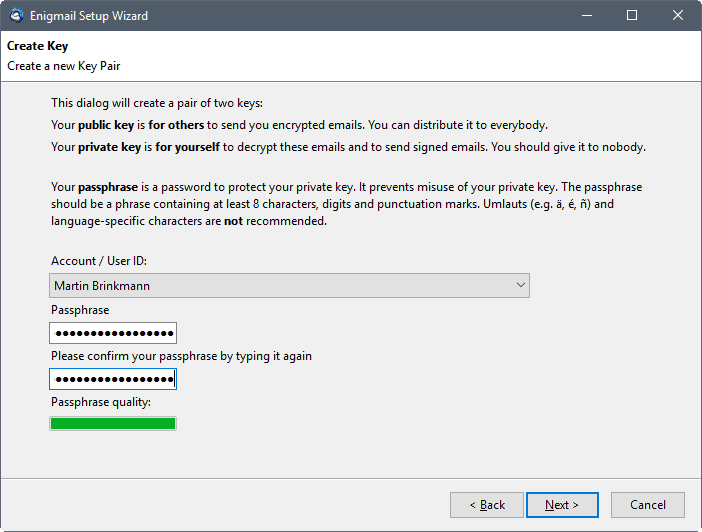
Select next once you have added the passphrase and selected one of the available accounts.
Enigmail generates the key on the next page. The extension states that this may take a couple of minutes, and that "actively browsing or performing disk-intensive operations" will speed up the key generation process.
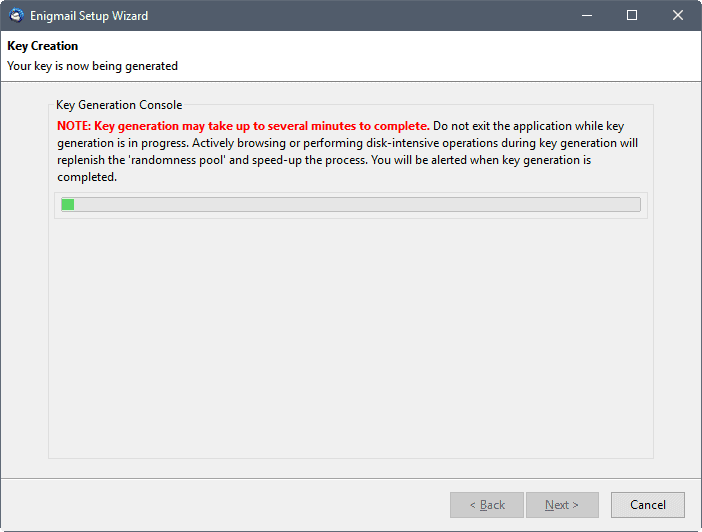
You cannot process after the key generation, as you are required to create a revocation certificate as well. This is used in cases where you need to revoke the public key, for instance after you have lost it, cannot remember the passphrase of the private key, or if a system has been compromised.
Select "create revocation certificate" to start the process. You are asked to enter the passphrase at this point and cannot proceed without it.
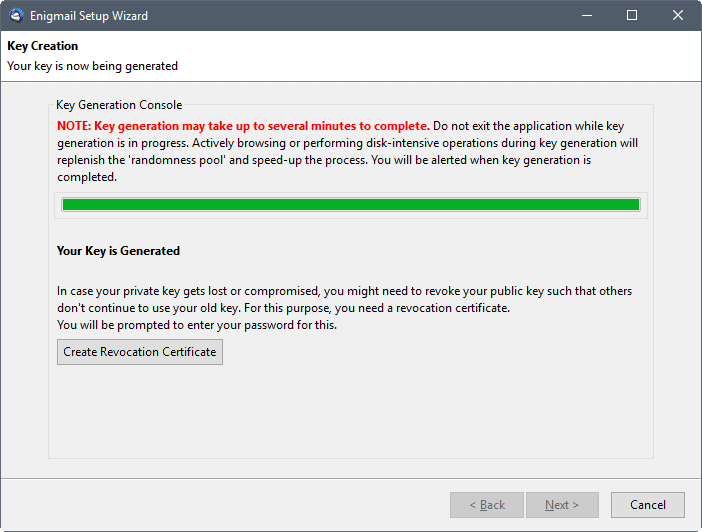
Thunderbird opens a save file dialog afterwards. Save the revocation certificate to a secure location, for instance encrypted storage on a connected drive, or even better, a Flash drive or CD that you put elsewhere so that it is not physically near the device you are using.
Select the next button afterwards, and then finish to complete the process.
Verification
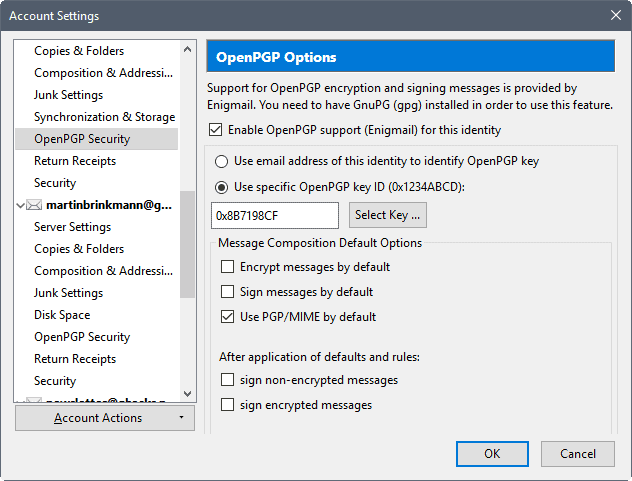
To verify that everything has been set up correctly, select Tools > Account Settings. Locate the account you created a key pair for, and open "OpenPGP Security" that is listed as an option underneath it.
The option "Enable OpenPGP support (Enigmail) for this identity) should be checked, and you should see that a specific OpenPGP key is selected as well.
Spreading your public key
Other users need to use the public key to send encrypted emails to you that you can decrypt using your private key. Similarly, these other users need to create a key pair of their own, and inform you about their public key so that you can send them encrypted emails using their public key as well.
You have a couple of options when it comes to sending others your public key.
The main options that you have are the following ones:
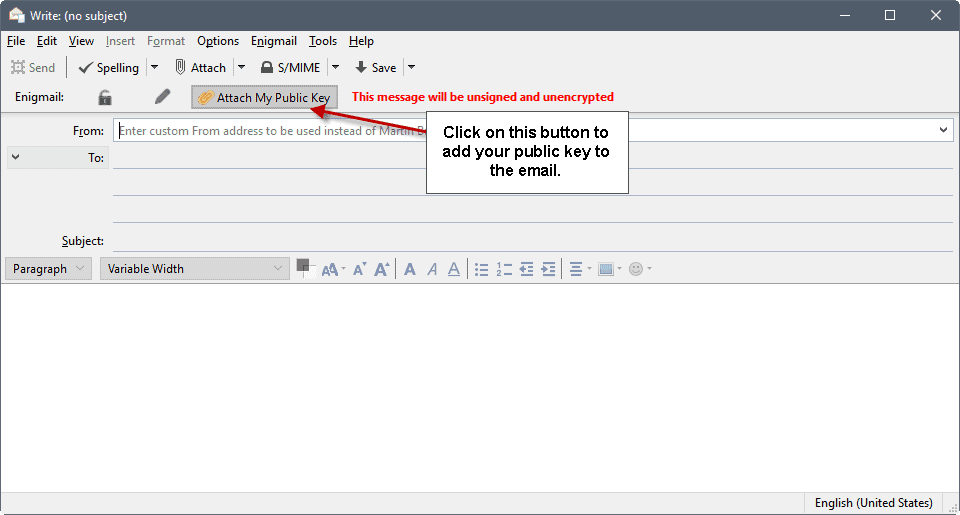
- Use the "Attach my Public Key" option when you are writing emails. Enigmail adds a button to the compose window that you can click on so that the public key is attached automatically to emails that you compose.
- Utilize a public key server. You may upload your public key to a public keyserver for easier distribution. These key repositories can be accessed by anyone. To do so, select Enigmail > Key Management. Select the key you want to upload to a keyserver, and select Keyserver > Upload Public Keys afterwards.
Importing public keys
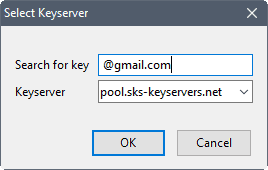
You need to import public keys before you can use them. If you use Enigmail, this can be done in several ways:
- Double-clicking on the .asc key file to import the key.
- Searching for keys using Enigmail > Key Management > Keyserver > Search for keys.
Validate keys
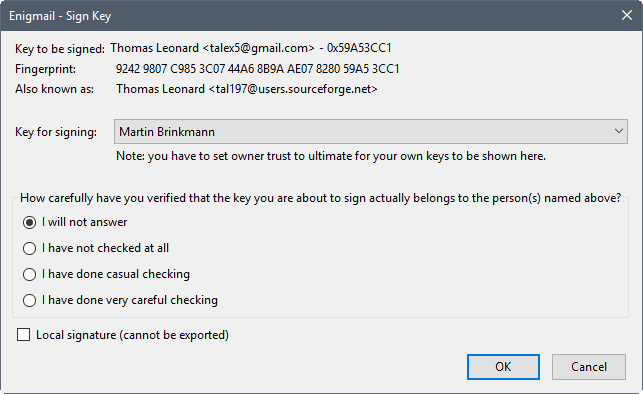
Signing keys is a form of verification. Since you don't really know if a key has been tampered with, you may validate it through other forms of communication.
Maybe over a (secure) phone call, or in person. To validate a key, select Enigmail > Key Management. Double-click on the key name that you want to validate to open the key properties.
You find a "certify" button next to validity on the page that opens. Click on it, and select the "I have done very careful checking" and type the passphrase afterwards.
Encrypting and decrypting emails
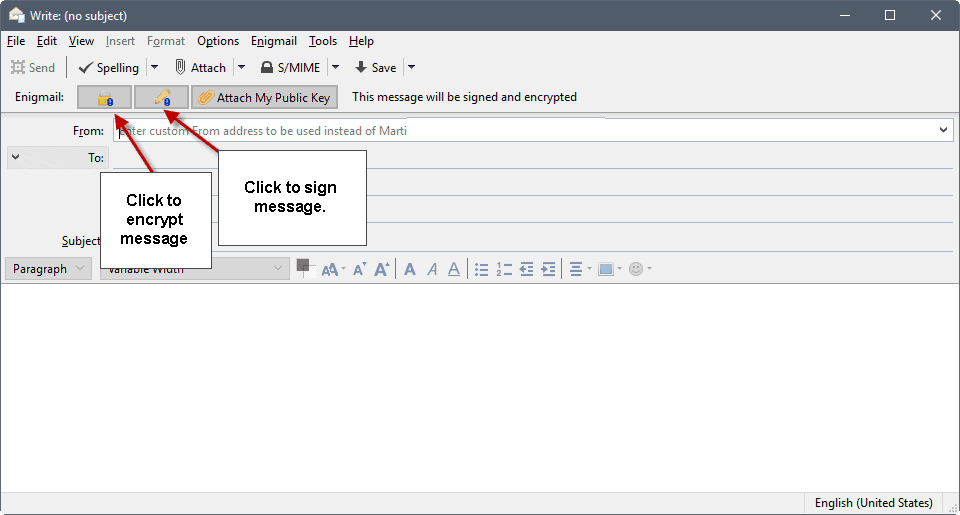
Now that you are done setting up Enigmail, it is time to encrypt emails, and decrypt them. To encrypt a message, simply click on the encrypt button in the compose window to do so. You may sign the message as well, and attach the public key to it.
You need the recipients public key to encrypt email messages. If you don't have them, you cannot use the encrypt option to protect it from prying eyes.
If you add attachments to encrypted emails, you are queried on how you want to handle those. You can send attachments not encrypted as part of the message, or encrypted in multiple ways (inline PGP, PGP/Mime separately or as a whole).
Thunderbird will ask for your passphrase to decrypt messages that are encrypted. These are then displayed just like any other email.
Closing Words
Setup is not difficult and it takes a couple of minutes to create your first key pair and configure the extension and Thunderbird accordingly.
The biggest issue is to get others to use PGP. If you are the tech savvy one in your family, at work or your circle of friends, you may need to assist others in setting this up.
Now You: Do you encrypt your email messages?








Big THX!
telv made me smile..so sillly. I have never used a phone to send e mail & very expensive to send messages around the world by phone.
I think email is becoming a thing of the past now that smartphones are so popular. Apps such as Signal by Whisper Systems https://support.signal.org/hc/en-us is encrypted by default and chat apps such as LINE https://line.me/en-US/ have encryption built in.
Also, encrypted webmail is freely available such as Tutanota https://www.tutanota.com/ which makes the configuring Enigmail totally unnecessary. Tutanota only needs both parties to be using it in order for emails to be sent fully encrypted. Encryption can also be disabled in the event the other party isn’t using it.
I still have Enigmail installed in TBird but now I prefer to just use the built-in S/MIME feature. Get a free S/MIME key from Comodo or StartSSL, and install it in TBird. That’s it! Then just press the S/MIME button in the compose window to sign and/or encrypt the message.
I would NEVER update any addons/extentions automatically ! Never. Have stumbled into problems with that. I rather read reviews before i update ! YOU should to !
THATS the articles we all looking for, thanks Martin!
When someone asked me I always linked these two articles:
http://www.wefightcensorship.org/article/sending-encrypted-emails-using-thunderbird-and-pgphtml.html
https://securityinabox.org/en/guide/thunderbird/windows/
Now I can link your article which shows easier steps! :)
Thunderbird 4Life
I’m looking forward to the initial release later this year of Mailpile (free open-source software, https://www.mailpile.is/), which is apparently designed to make encrypted mail easy…