Using GParted in GNU/Linux for beginners

GParted is one of the if not the most popular partitioning tool for GNU/Linux, when it comes to GUI tools.
Powerful, easy to navigate, and straight to the point; GParted does what needs doing and it does it well. However, for users who aren't familiar with it, or are not used to doing custom partition work; it still might seem a little daunting.
This article is an overview of GParted to help new users understand how to use it.
Installation
GParted often comes pre-installed on many distributions that use GNOME, Cinnamon, or other GTK based environments. However, if you don't have it, installation is as simple as installing the package 'gparted' with your package manager, and is available in every main repository that I know of.
Using GParted
Once installed, GParted is usually found in your applications menu under 'System Tools', and will require your root password upon launch.
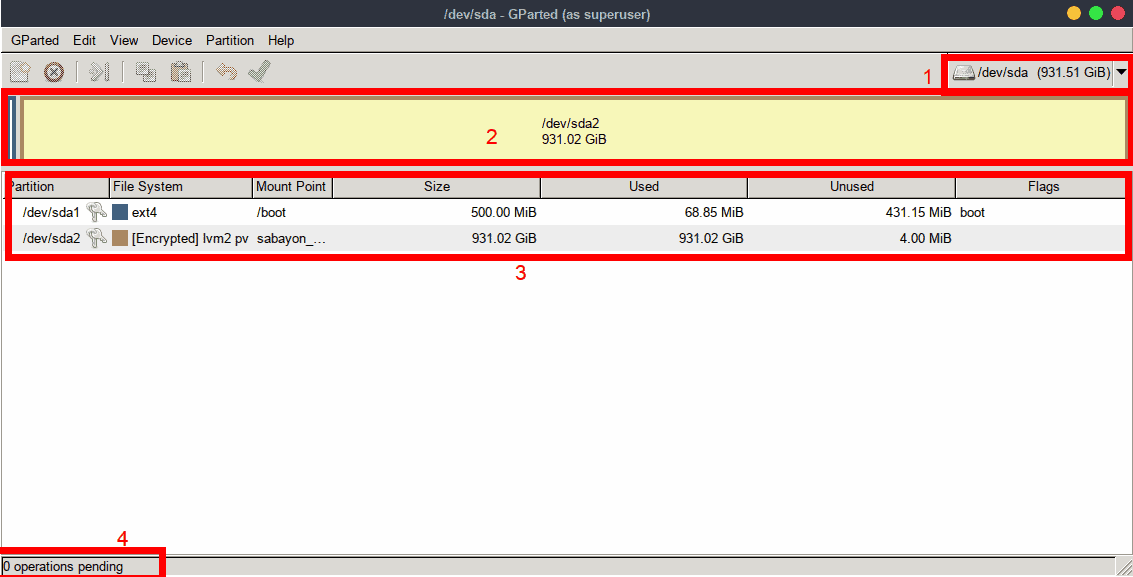
Once it's started, you'll be shown a screen like the screenshot below. I've highlighted certain areas, which are listed below:
-
The currently selected drive/device
-
A Visual representation of the partition scheme
-
A list of the partitions / the scheme
-
The number of operations pending to be completed by GParted
GParted can work with any device that is capable of being partitioned, from USB Flash drives and external drives, to internal Hard Disks, etc.
The image above shows that the currently selected drive is partitioned to have a 500mb /boot partition, and 931.02GB used for the rest of my system, which is an encrypted LVM (Logical Volume Manager, think of it as a sort of psuedo RAID setup, or a dynamic partition that can be modified,resized, deleted etc, while your system is running.)
However, for this example article I will be partitioning a small USB Flash Drive. So, we click the device selector (#1) and select the drive that we want.
As you can see from this image, the drive currently has a small partition on it, so we will use GParted to delete the partition. To do so, simply right click the partition you want, and select "Delete."
GParted will automatically change to reflect what you did (although it hasn't ACTUALLY happened yet) so you'll have a visual representation to look at.
Next, let's Make two new partitions; one will be ext4 and the other will be NTFS. Right click on the unallocated space, and select "New." A window will pop up where you can select the size, name, format, whether you want it to be a primary partition, logical, or extended, etc.
Generally you'll want to keep most settings as default unless you know what you are specifically aiming for, like logical volumes. The image below shows me setting up a 4000MB ext4 partition.
Once that is done, I need to repeat the process but change the format. GParted automatically set to use the remainder of the free unallocated space for me, however if you don't want to use all of the space available, that can be changed like we did the first time.
Once finished, GParted is ready to proceed with the changes we have queued.
However, before we proceed, make extra sure to review the pending operations and make sure that what GParted is about to do, is what you want. Make sure its the right drive, the right formats, etc; mistakes can be fatal if done to the wrong device!
If you are sure you are set, then click the bright green checkmark button! GParted will warn you the same warning I just gave you....Click Apply when you are ready!
If all goes well, you will now have done what you set out to do!
In conclusion
GParted can do much, much more, but for beginners this is what you need to know. But always remember to double and triple check your pending operations before you do anything! Making backups is always a good idea too!


In general I would like to thank Martin and his fellow writers for providing Linux topics. For me they are very helpful especially in respect of changing from Windows to a Linux distribution since I will not go with Win10. Keep up the good work.
Best tool in the box.
Important tips to mention:
– BACK UP critical partitions before moving or changing their size !!
– As mentioned above, you must use a live (bootable) OS on cdrom or usb when using Gparted to change an OS partition that is normally in use (mounted). Besides Gparted Live, most Linux ISOs are bootable and include gparted.
Changing a bootable partition (Windows or Linux) may require additional steps like refreshing the master boot record, volume/partition boot record and/or boot manager. Command line programs in Windows and/or Linux are often used.
It can be tricky – read up first and be prepared !
If you use GRUB2 as your boot manager, have a copy of Super Grub Disk 2 handy on usb/cdrom. When GRUB2 gets confused, you can use SGD2 to boot into your otherwise inaccessible boot partition to recover.
Great job Mike, thanks!
I use GPartedLive: gparted.org/download.php
It’s small (200-some MB) so you can make it on a stick or SD card. You can even resize your Windows partition. I also use it to create the partition(s) before installing Windows, this way it doesn’t create that 100MB system recovery partition. You can also use it to physically move a partition more towards the beginning (or the end) of your drive, in case you decide to remove an existing one that happens to be somewhere at the middle of the drive (note that this will take a lot of time to complete, depending on the size of the data you’re moving and the disk’s speed).
Would Love a tutorial on that! … especially moving windows partitions ‘safely’ with G-parted ;)