Setting up a Windows / Linux Mint Dual Boot using MBR
Windows is the reigning champion when it comes to operating system share percentages according to NetMarketShare.
However, as the world is learning more and more, day by day, there are other alternatives out there; the main two being Apples Mac OS X, and GNU/Linux.
However, not everyone is ready to entirely dedicate themselves or their machines to making the switch to GNU/Linux, and so that leaves some people in a pickle of trying to decide what to do. Thankfully, there is a very easy solution: Dual-Booting!
How to dual boot Windows and Linux
A dual-boot system is exactly what it sounds like, two different Operating Systems running on the same machine, be it on the same hard drive or separate, usually with a bootloader such as GRUB to handle helping the user select which OS they want to boot into when they turn their machine on.
It sounds like it’s complicated, but in the world of GNU/Linux today, it’s actually a very simple task, and for the average user it could be done in an hour or less. So, today we will be talking about how to set up a dual-boot with Windows and Linux Mint 18.1 ‘Serena’ Cinnamon Edition!
Things you’ll want for this are:
- A USB Flash drive of at least 4GB
- An active Internet connection
- At least 20GB free space
PREPARING FOR THE INSTALLATION
NOTE: This tutorial assumes you are currently running Windows as your primary OS, and you wish to install Linux Mint onto the same Hard Drive that your Windows system is running on.
If you are currently running a GNU/Linux system, and wish to Dual-Boot with Windows on a single drive, you have two main choices:
Reformat the entire system with Windows and then follow this tutorial, or you will need to make separate partitions using something like Gparted and then install Windows, followed by re-installing the GRUB bootloader as Windows will overwrite the boot sector with it’s own Master Boot Record, essentially trapping your GNU/Linux partition as invisible and unbootable until you re-install GRUB.
We will cover doing a tutorial like that in the future, as well as doing a multi-disk boot setup with separate Operating Systems on separate drives. Note End
Attention: we recommend that you create a system backup before you proceed. While the method outlined below works really well and should not cause any issues, it is better to be safe than sorry. A backup ensures that you can restore the system if things go wrong during the process (power outage, data corruption, PC won't boot anymore, you name it). You can use Veeam Endpoint Backup Free for that, or any other backup software that supports full backups.
The first thing you are going to want to do is download our Linux Mint ISO by navigating to https://www.linuxmint.com/
Click on ‘Download’, and then select your flavour of choice; for this article I selected ‘Cinnamon’ and of course 64bit since my laptop supports it, as anything made in at least the past decade will as well.
From here you will be given a list of download locations, as well as the option to download your ISO via Torrent, select the download of your hearts desire, and we will be on our way to the next step!
Another piece of software you’re going to want is Rufus, a tool for making our ISO bootable off a USB stick, so head over to https://rufus.akeo.ie/ and grab the portable version of rufus.
Once you have both the ISO And Rufus, we will be using Rufus to make the LiveUSB. Open Rufus, and you’ll want to leave most options as their default, with the exception of one thing:
If you intend to use a drive over 2TB in size, or your windows system is currently setup to use GPT rather than MBR, then you will want to select “GPT†in the first drop down box
How do I know if my system is using GPT or MBR?
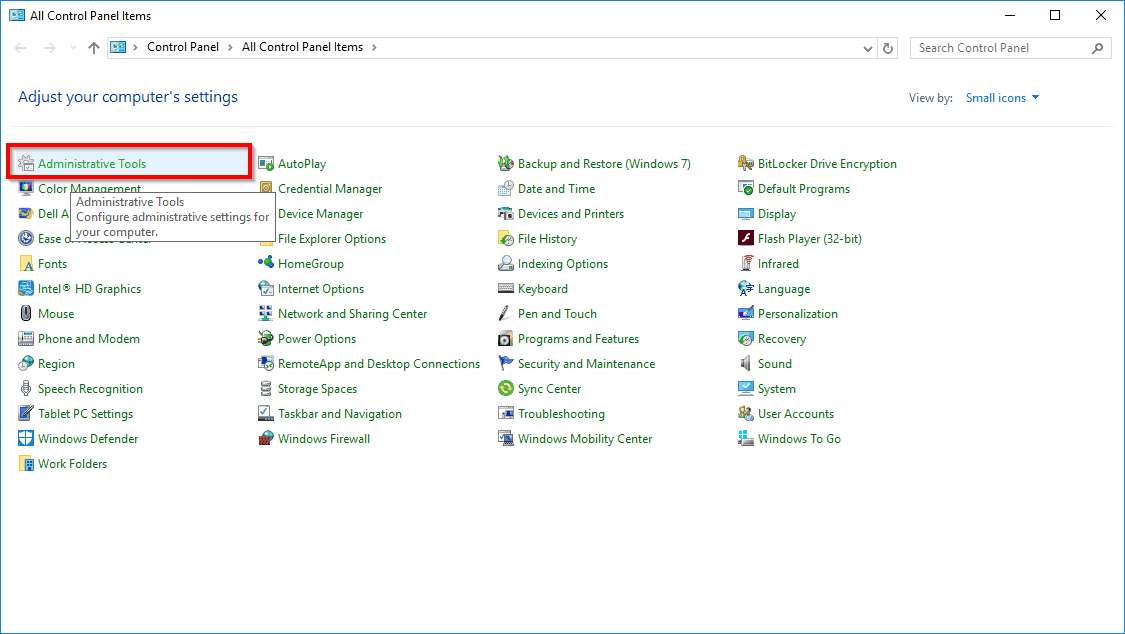
Checking if your system is currently set up as MBR or as GPT is a simple process in Windows; simply visit your control panel, and select “Administrative Toolsâ€

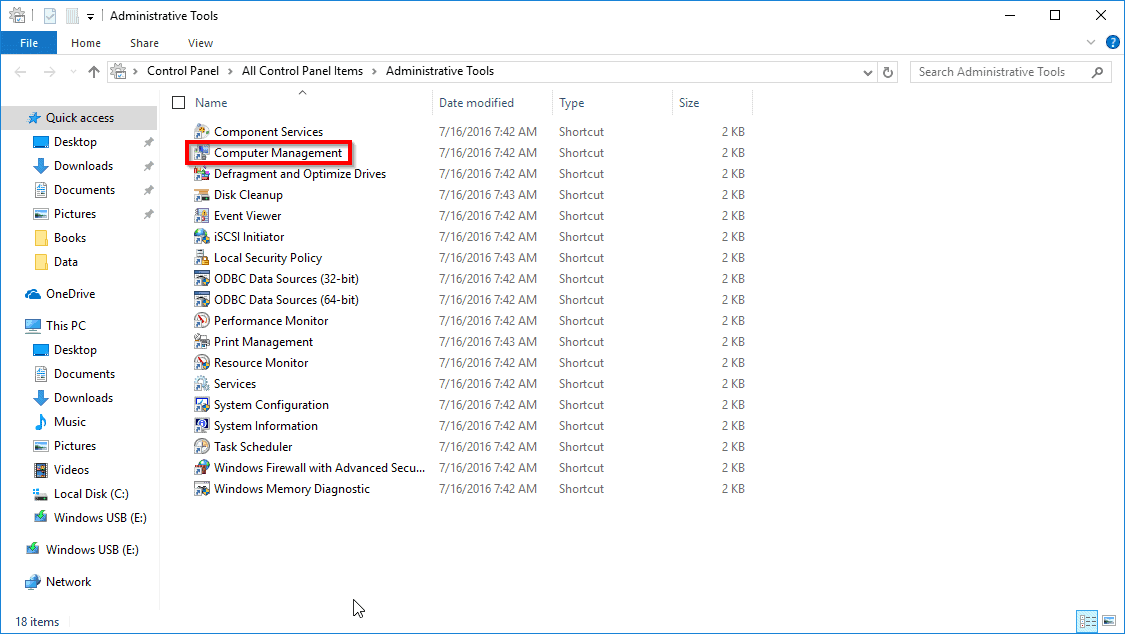
Then select “Computer Managementâ€
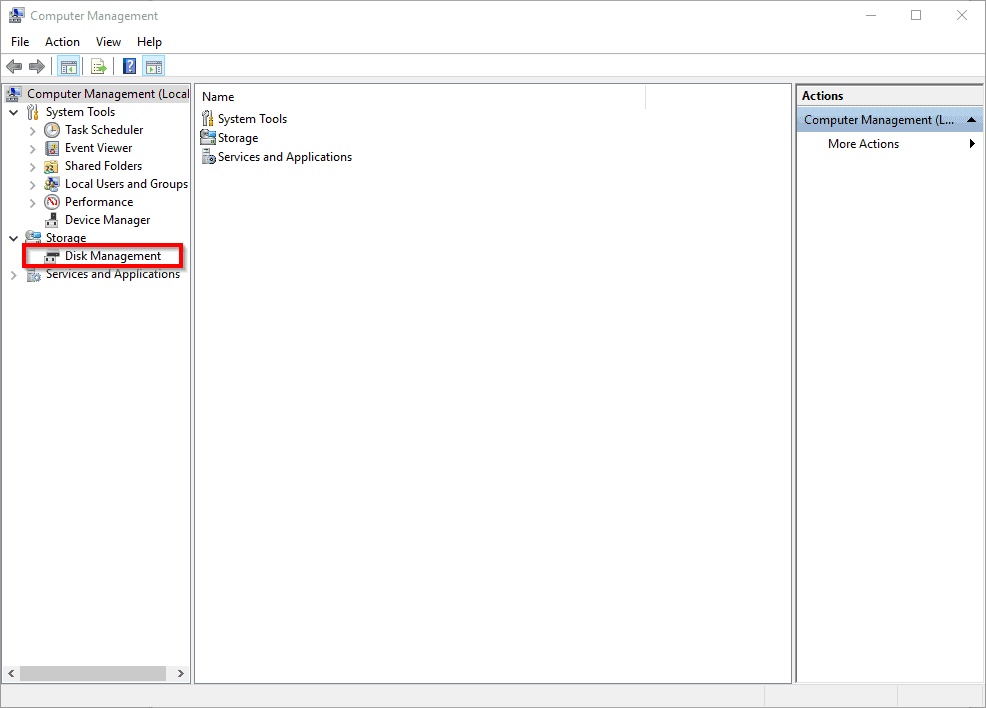
And then continue to “Disk Management†where you will locate your Windows drive, and right click the grey box where the disk number is listed, and select ‘Properties’.
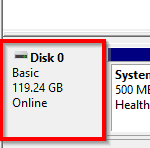
From there, click the Volumes tab, and it will list the partition style!
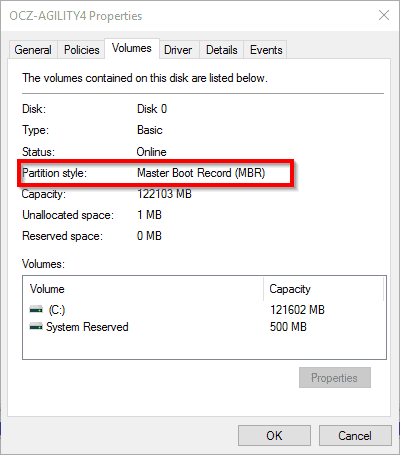
My laptop uses the MBR style, and thus this tutorial will be focusing on that, however using GPT is really quite similar in regards to installing Linux Mint, and I will write up a detailed guide in the near future focusing on GPT for those of you who are using GPT partition tables.
Moving forward, besides selecting either MBR or GPT, the rest of the settings in Rufus should be left as default, and then it is time to select our Linux Mint ISO by clicking the small disc icon, and then picking the ISO file.

Once that is done, click Start! You may get a popup window next mentioning something about Syslinux versions and how Rufus will need to download two files; the short version of this is that Rufus needs to download two small files to support this latest version of Linux Mint; click yes to allow Rufus to download the files needed, and then another box will pop up asking which mode you wish to use to write the image file to the USB, leave the recommended option selected and click ‘OK’.
Lastly a window will pop up notifying you that everything on the USB is about to be destroyed in order to write the ISO to the USB Drive; so if you have anything crucial on this USB Stick you will want to back it up before proceeding, otherwise once again click ‘OK’ and let Rufus work its magic; once it’s done, it’s time to boot into our LiveUSB.
Depending on your BIOS/UEFI the hotkey to press to get to your boot menu will vary, it could be DEL, F1, F8, F12 etc, so when you reboot your machine keep a lookout for the text letting you know, and hit that button, then select your USB stick as the device to boot from, and you’ll reach the Linux Mint splash screen.
Either let the time run down, or select ‘Start Linux Mint’ to be taken to the LiveUSB Desktop. Feel free to click around and explore if you wish, and when you are ready, select “Install Linux Mint†from the Desktop and we will start the installation process.
INSTALLING LINUX MINT
The first thing that we need to do is to make sure your language of choice is selected on the left side of the window that will pop up, and then select Continue.
The following screen is going to have a checkbox that says “Install third party software for graphics and Wi-Fi hardware,Flash,MP3 and other media,†you have two choices here: Select the box and have things installed for you automatically, or don’t.
Most people are going to select this box, however there are some people who switch to GNU/Linux in order to avoid proprietary software altogether, and they may not wish to have closed-source software or plugins/codecs installed onto their machine; if this sounds like you, leave it unchecked, regardless when you have made your decision you’ll want to click Continue.
The next screen for the purpose of this tutorial will be very easy to navigate. You’re going to get multiple options available to you, such as erasing the entire disk and installing Linux Mint, Installing Linux Mint alongside your current system, encrypting Linux Mint, using LVM or doing your own partition setup. We are going to select, “Install Linux Mint alongside Windowsâ€.
Next we are given a screen that shows what the Linux Mint installer wishes to do in terms of partition sizing, by way of showing bars to represent the partitions. You can slide the bars to adjust the sizing of things be it increasing the Linux Mint Partitions and decreasing the Windows partitions or vice-versa, by clicking and dragging the dotted line back and forth. Once you have figured out how you want to size things, you’ll want to click ‘Continue’. I recommend giving Linux Mint a bare minimum of 20GB space.

The installer will then pop up a box or two letting you know that the changes need to be written before installation can proceed.
NOTE: This is your last chance to back out before the resizing takes place, so if you aren’t sure you want to proceed, this is the time to cancel. If you are ready to continue, click away to do so, and the installation will start.
The next screens are all pretty straightforward as well. First you’ll be asked to choose your location either by clicking on the map, or typing your location in. This is for your locale and your timezone settings.
Next, we are asked to choose our language and keyboard layout....For most, leaving this as is, is what we want.
And then we are taken to a screen asking for our details. Username, password, name etc. You absolutely MUST set a password here, regardless of whether you choose to require a password to login or not. I also highly recommend you choose to encrypt your Home folder; it will have a next to zero performance hit, but will increase the security of your system, should your machine ever fall into an adversaries hands.
Once that is done, you’ll be presented with a nice slideshow showcasing some of the features of Linux Mint Cinnamon Edition.
Simply let the installer continue until it is done, and when all is finished you will be presented with a box asking if you wish to reboot into your new system or not.
Click reboot!
When your machine starts back up, you will be presented the the GRUB bootloader screen, which will enable you to choose whether you want to boot into Windows or Linux Mint. Select the OS of your desire with your arrow keys, press enter, and enjoy!
More details about Linux Mint 18.1 Cinnamon can be found here, as well as some links about what to do after your installation in terms of setting things up!
- https://www.linuxmint.com/documentation/user-guide/Cinnamon/english_18.0.pdf
- https://sites.google.com/site/easylinuxtipsproject/mint-cinnamon-first
- http://www.ubuntubuzz.com/2016/12/what-to-do-after-installing-linux-mint-18-1-serena-cinnamon-edition.html





Maybe if I found your article before I tried…:o(
Anyway…I decided to try dual booting a Sony VAIO Windows 10 machine to allow me to look at Android X86. I discovered the hard drive was MBR so could only have 4 Primary partitions, all of which W10 seemed to be using, though from GParted via a Mint USB stick hot boot I could only see 3 – System Reserved, Recovery and an unlabelled one that was actually the Windows 10 C drive.
To allow me to create a partition for Android X86, I decided to try changing to an Ext partition with two Logical sub-partitions using Partition Wizard under W10. I foolishly ignoring the warnings that this might stop Windows booting and then defined a new NTFS partition and installed Android X86, which worked. However, W10 hasn’t booted since. I’ve now converted the two Windows Logical sub-partitions back to Primary but still no joy. Oddly, Android X86’s GRUB installation defined its Windows boot as hd(1,0), which of course doesn’t exist. When I edit this back to eg hd(0,3) it starts to load Windows but then says it’s going to load Repair tools then can’t find any (even if I insert a USB containing a W10 iso).
I’m now well out of my depth on this one, though I have other machines that dual boot Windows XP and Mint fine.
Any ideas?
Brian
So did you ever write anything as a follow-up to your Note:
NOTE: This tutorial assumes you are currently running Windows as your primary OS, and you wish to install Linux Mint onto the same Hard Drive that your Windows system is running on.
If you are currently running a GNU/Linux system, and wish to Dual-Boot with Windows on a single drive, you have two main choices:
Reformat the entire system with Windows and then follow this tutorial, or you will need to make separate partitions using something like Gparted and then install Windows, followed by re-installing the GRUB bootloader as Windows will overwrite the boot sector with it’s own Master Boot Record, essentially trapping your GNU/Linux partition as invisible and unbootable until you re-install GRUB.
We will cover doing a tutorial like that in the future, as well as doing a multi-disk boot setup with separate Operating Systems on separate drives. Note End
If you did, I didn’t happen to find it. Maybe it really is too hard to write about?
Can you make a samba tutorial on Linux Mint 18.1 using GUI as much as possible how to install and configure samba so windows and linux see each others shared folders/partitions if possible?
I tried to do this myself but couldn’t get windows and linux to see each others shared folders/partitions. :|
I guess its cuz file sharing is kind of messed up in Linux Mint 18.1 so it wont work out of box so would like to know if there’s a easy way around this to get file sharing working back on Linux Mint 18.1
Thanks for the article, Mike!
I think this article only makes sense for those that want to dabble in or use Linux quite a bit. If you only want to test-drive Linux, I would probably suggest running the your Linus ISO of choice in VirtualBox so you don’t have to partition your current Windows install.
One thing that is preventing me from using a dual-boot setup is finding a way to share files across partitions. I guess one way of alleviating this is to put the shared files onto another partition itself.
Exactly!
For me, having a ‘shared data’ partition separate from the o/s boot/system partition is good insurance. If the o/s must be reinstalled, less worry about your important data. Still, backup backup and Backup!
After some research and testing, I’ve been using NTFS for shared data as Linux r/w support is very stable compared to the EXT drivers available for Windoze.
I am running Linux Mint 17.3 from an external USB hard-drive on my Win 7 cptr by doing a full install of LM 17.3 on it.
…….This is to prevent any possibility of M$ thrashing a Windows cptr that has been dual-booted with Linux, thru a “security” update. This has happened b4, whether intentional or unintentional.
Others prefer using their Linux cptrs to run their Windows in VM.
IMHO
Mike, once again I appreciate your writings but so wordy. example: “The first thing you are going to want to do is”
“first” is all that needed. My advice let Martin proof-read & edit out the extra.
As far as the subject matter is concerned I have been building,teaching,playing with computers since the mid 70’s. From punch cards at my warehouse to commodores then tandy, pc’s,macs. To many of us older types linux is like going backwards. If there is a problem you are back to command line like dos. That is why so many do not switch. I play with all OS but will not switch..yet. I believe a virtual system is better, faster & more fun when learning a new operating system. VirtualBox is great.
Back in 2007, I my laptop died and I was skint, so I picked up a beat-up old ThinkPad for cheap. For whatever reason, XP would not run stably on it. I installed PCLinuxOS and used it full-time, exclusively, for a year, with zero problems. I never had to use the command line.
I’m now running Windows 7 on a better, more recent, less beat-up ThinkPad. With the exception of the hassle of avoiding GWX and buggy Windows updates, it’s probably been the best Microsoft OS I’ve ever run. That being said, I’ve had to use the command line on a number of occasions — for running system file checks, for making sure the OS understood that I’m no longer using an SSD, and a couple of other less straightforward things that I’m having trouble remembering. (Something to do with networking and file permissions rings a bell.)
I’m much less familiar with Linux than Windows, but I have used the command line a few times. In Linux Mint 18, there was a bug with the Font Viewer (at least initially), and I think I recall that the workaround required the command line. I just followed the instructions I found on a forum, and that was that. And in Linux Mint 18.1 running in VirtualBox, Linux Mint’s own Linux guest additions apparently don’t support hardware acceleration and Oracle’s reference guest additions seem to prevent some categories in the Cinnamon menu from populating. As part of my diagnostic process, I manually purged Linux Mint’s additions before installing the reference additions — theoretically unnecessary, since I’m pretty sure there’s a purge routine built into the reference additions’ installer — and the manual purge required the command line. Again, I found complete instructions for that on a forum. All of the other times I used the command line in Linux were just me experimenting with various “recommended tweaks” (in several different distros, not just in Linux Mint).
At any rate, although I still don’t have much experience in Linux, I haven’t noticed a big difference between Windows and Linux in terms of how often I’ve had to use the command line, nor in how difficult it is to use. Maybe that will change as I start pushing Linux harder and doing more challenging things with it, but it’s not intimidating and it certainly doesn’t feel like going back in time to the days of DOS and Windows 9x.
Fena,
Martin does proofread my articles ;)
Thank you for the tips nonetheless!
Hello Fena,
I agree with what you said about the virtual machines. I initially started with a Raspberry Pi (Raspbian), then moved to VMWare Player with Linux Mint until I got the hang of it and my confidence grew, and finally after so many botched updates from Microsoft I finally installed Mint natively – Mint’s been running flawlessly for over a year now. In fact even my mother can even work it and she’s a complete technophobe!
The handy thing about the virtual machines is it’s easy to re-install and they can be backed up easily. This means you can really “go to town” on the Linux Virtual Machine knowing full well that if you break it then you can easily repair it. I learned a lot of “what not to do’s” along the way! I also learned a heck of a lot of what really does work too.
At the minute I’m getting into compiling the software from scratch – it can be a bit fiddly but you certainly find out how it runs. i.e. VLC runs on QT4 and not QT5, Calibre was compiled using something from the Ark, Kdenlive is actively being developed and has improved significantly, Banshee is effectively a Windows port etc.
Quite a nice installation guide and to the point. I would add some tips:
– When installing LM, you will get a option similar to ‘Download updates during installation’. I would recommend strongly NOT checking this option, as it seems to download first and progress is hard to judge. Run Update Manager after first LM login to bring all packages up to date since the ISO release.
– Since this is an SSD, many ‘experts’ recommend leaving some unpartitioned (unused) space for the SSD controller to replace eventual ‘worn out’ physical data blocks. I’ve heard that ~5% is a reasonable value. Due to the opaqueness of consumer hardware specs and documentation, this may not be necessary if the drive actually has ‘invisible’ spare blocks available. Just some more ‘belt and suspenders’ protection.
– If you need to adjust partition sizes later, reboot using the LM ISO image or the smaller GParted Live ISO and use the included GParted application.
A future post might be devoted to increasing SSD lifespan by using additional root partitiion mount parms (NOATIME, etc), using tmpfs (RAM) for temporary files, etc. The gnome-disks GUI is a workable alternative to the command line :-).
Mike
Hey Mike,
I wrote the article without focusing on the fact that I have an SSD in my laptop, as not everyone is using SSD storage, I am on the side of leaving a little unused space as well though!
That’s a great suggestion for a future article, I will definitely keep that in mind!
Hi Mike – love the article and would love to see more! This is exactly what the GNU/Linux community needs and you can’t go wrong with Linux Mint. You can also customise the Grub bootloader to make it more appealing with Grub Customizer. I have a picture of Windows and Linux as a choice in the background (Mint 18.1 Cinnamon). More info here:
https://www.youtube.com/watch?v=ijPb8f7oVXU
Also I would recommend cloning Windows onto another drive using Clonezilla before attempting this (just in case).
Keep up the good work Mike!
Thanks for the really well-done article. The clear instructions illustrate that setting up the dual boot is an easily-approachable task.
Regarding “not everyone is ready to entirely dedicate themselves or their machines…”, with that in mind I’m surprised that you are advocating a headfirst dive into dual boot. The article could have been, perhaps should have been, chunked into sections.
Step1: create liveboot pendrive
Step2: take LinuxMint for a liveboot testdrive
Step3: If you “like what you see”, proceed and install LinuxMint (commit to dual boot setup).
The point (an important one, IMHO) is that the experience can be a zero-risk, zero-commitment adventure. Although I personally do not favor LinuxMint as my “daily driver”, I’ll regularly (say, annually) throw it on a pendrive and take it for a spin to see what’s new/different. Same goes for other liveboot-able distros like PCLinuxOS, antix, xubuntu …adventure awaits!
Ams,
I have an article in the works for the near future about installing GNU/Linux onto a USB stick as a non-live environment / persistent, that way users can use their system without having to touch their Hard Disk, and can play with their system without losing everything on reboots, as a way for them to get used to using GNU/Linux without risk :)
Great tutorial. Another great option to dual booting is to buy “Boot It Bare Metal” from “TeraByte Unlimited” I like this option for more than one reason. Two of them are because I can create a system backup using “Image For Dos” and that I can do partition work with it.
Great article Mike, thanks for the post and keep up the good working and more Linux articles coming.
Thanks Joe!
No, thank you Mike! :)
As reasonable, legitimate and correct as referring to “Linux” as “GNU/Linux” is, I cringe every single time I see it because it’s completely unmarketable to normal people. The most successful consumer derivation is “Android”, or “Google Android”. The most successful business derivation (AFAIK) is “Red Hat Linux”. You don’t see smart companies using band branding. There’s no “GNU/Linux Android”. Or even GNoogle/Linux Android”, LOL.
Worse than any of this is how there is actually no user-facing element, be it shell or desktop. You’re interacting with BASH et al, or GNOME et al. You’re not really interfacing with anything branded “GNU/Linux”.
Then factor in the long history of forks and derived distrubutions. It’s just as legitimate to get your tongue around Debuntuxome (“DEBoontUXohme”), Debuntunity (“DEBooonTUNity”), Debuntuxintate (“DEBooonTUXintATE”) than “GahNew slash LINUX” or “New slash LINux”.
The FLOSS movement needs to stop shooting itself in the foot so much and get better at branding. It will not matter to GHacks so much but the non-techy prefers less convoluted branding.
Personally I’m running a GNU/Linux/GTK/apt/dpkg/Freedesktop/Xfwm/Compton/Xfce monstrosity. When it behaves itself I let it have a taste of Qt as well.
But in seriousness, I don’t object to the GNU/Linux term – I even used it myself in the past. I just came to believe it creates as many problems as it solves, so might as well just say “desktop Linux” and be done with it!
pd,
The reason I try to always use GNU/Linux when writing, is to stop people from complaining “Linux is just the kernel!” and the entire big hub-ub that comes with that arguement that happens on blogs when you simply refer to the OS as Linux. When I speak about the system to people face to face, I simply call it Linux.
I simply call it “pd busily amusing herself ranting and inventing nonsensical words like BuNoogle and DEBtoon…”