Installing Linux Mint 18.1 Serena MATE Edition 64bit
There are many popular distributions of GNU/Linux to choose from, but it’s generally recognized among the GNU/Linux world that there are a few major players that people tend to gravitate towards more often than others.
The most common known are primarily Ubuntu, Fedora, OpenSuse, Debian, and Linux Mint. There are vast numbers of other distros that range in simplicity and user-friendliness from the it-works-out-of-the-box-like-Ubuntu: Manjaro, which is based on Arch Linux, to Arch Linux itself which is built entirely from the command line, to Gentoo which takes building your own system to an even further level than Arch.
However, today we are going to be focusing on Linux Mint version 18.1 which is code-named ‘Serena’, and my personal Desktop Environment flavour of choice ‘MATE’ which is a fork of the old Gnome2 code base that anyone who used Ubuntu a decade ago was likely familiar with.
Firstly, why Linux Mint? I love Mint, it’s not my favourite distro out of all that I have used, but it definitely is one of the most complete in terms of a working system out of the box with as little configuration needed as possible.
There is also the fact that because it’s based on Ubuntu is uses the same repositories as Ubuntu, which gives it a huge wealth of available software and package for users to download and install; a huge leap in simplicity for users who don’t wish to get into using things such as Git or building from source.
Mint is a great option for users who want to migrate away from Windows or Mac, have a fully working system with office software, music and video players, simple graphics and other hardware proprietary driver installation and more.
Linux Mint installation tutorial
In this tutorial we will cover how to do a base Linux Mint install using the entire hard drive without setting up dual boot by removing windows entirely, as well as how to install any proprietary drivers if you would prefer them over the open source drivers as well as update all packages to the latest versions available in the default repositories so that we have a fully functional and ready to use system.
The things we are going to need for this tutorial are:
-
A blank USB Flash Drive of at least 4gb (Larger if you plan to use the USB Drive for running the Linux Mint live USB for more than just installing, in that case go to 8+GB)
-
Any computer running Windows 7, 8.1, or 10
-
A Hard Drive of at LEAST 20GB in size that you plan to use entirely for Linux Mint
-
An active internet connection
-
One hour of time
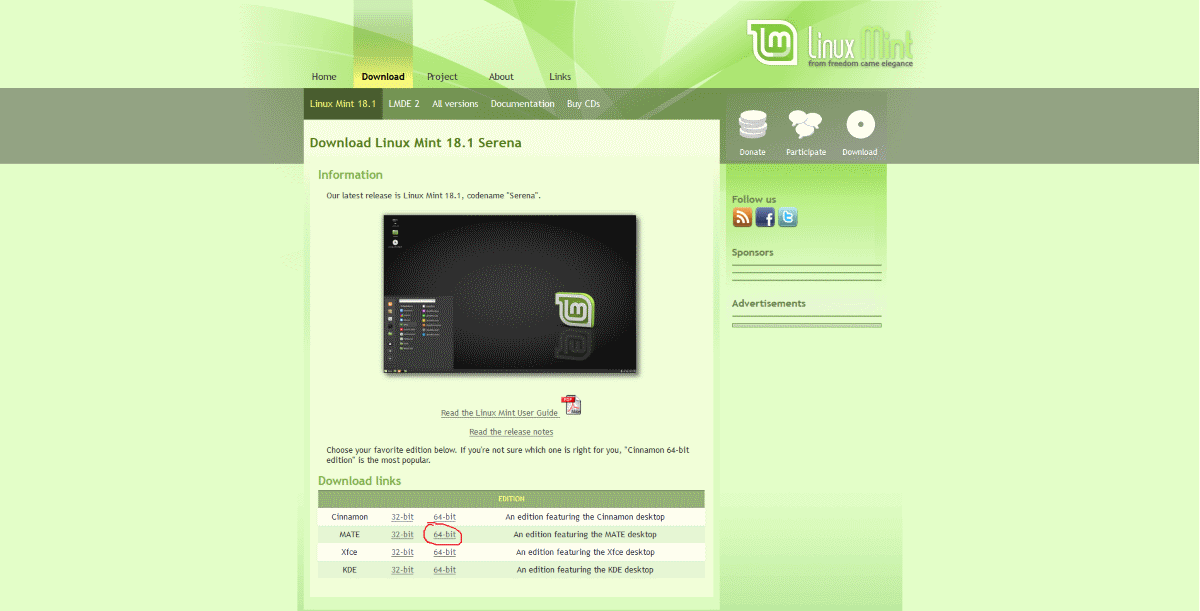
The first thing you’re going to want to do is head over to http://LinuxMint.org and hover over ‘Download’ and then select ‘Linux Mint 18.1’ which will take you to the download page, from there select ‘64-bit’ from the MATE downloads listed, if your system is 64bit (Most are. If you’re running a machine that is Pentium 4 or newer, you are likely 64bit, so if you didn’t have to blow the dust off your machine first and check for cobwebs, select 64bit)

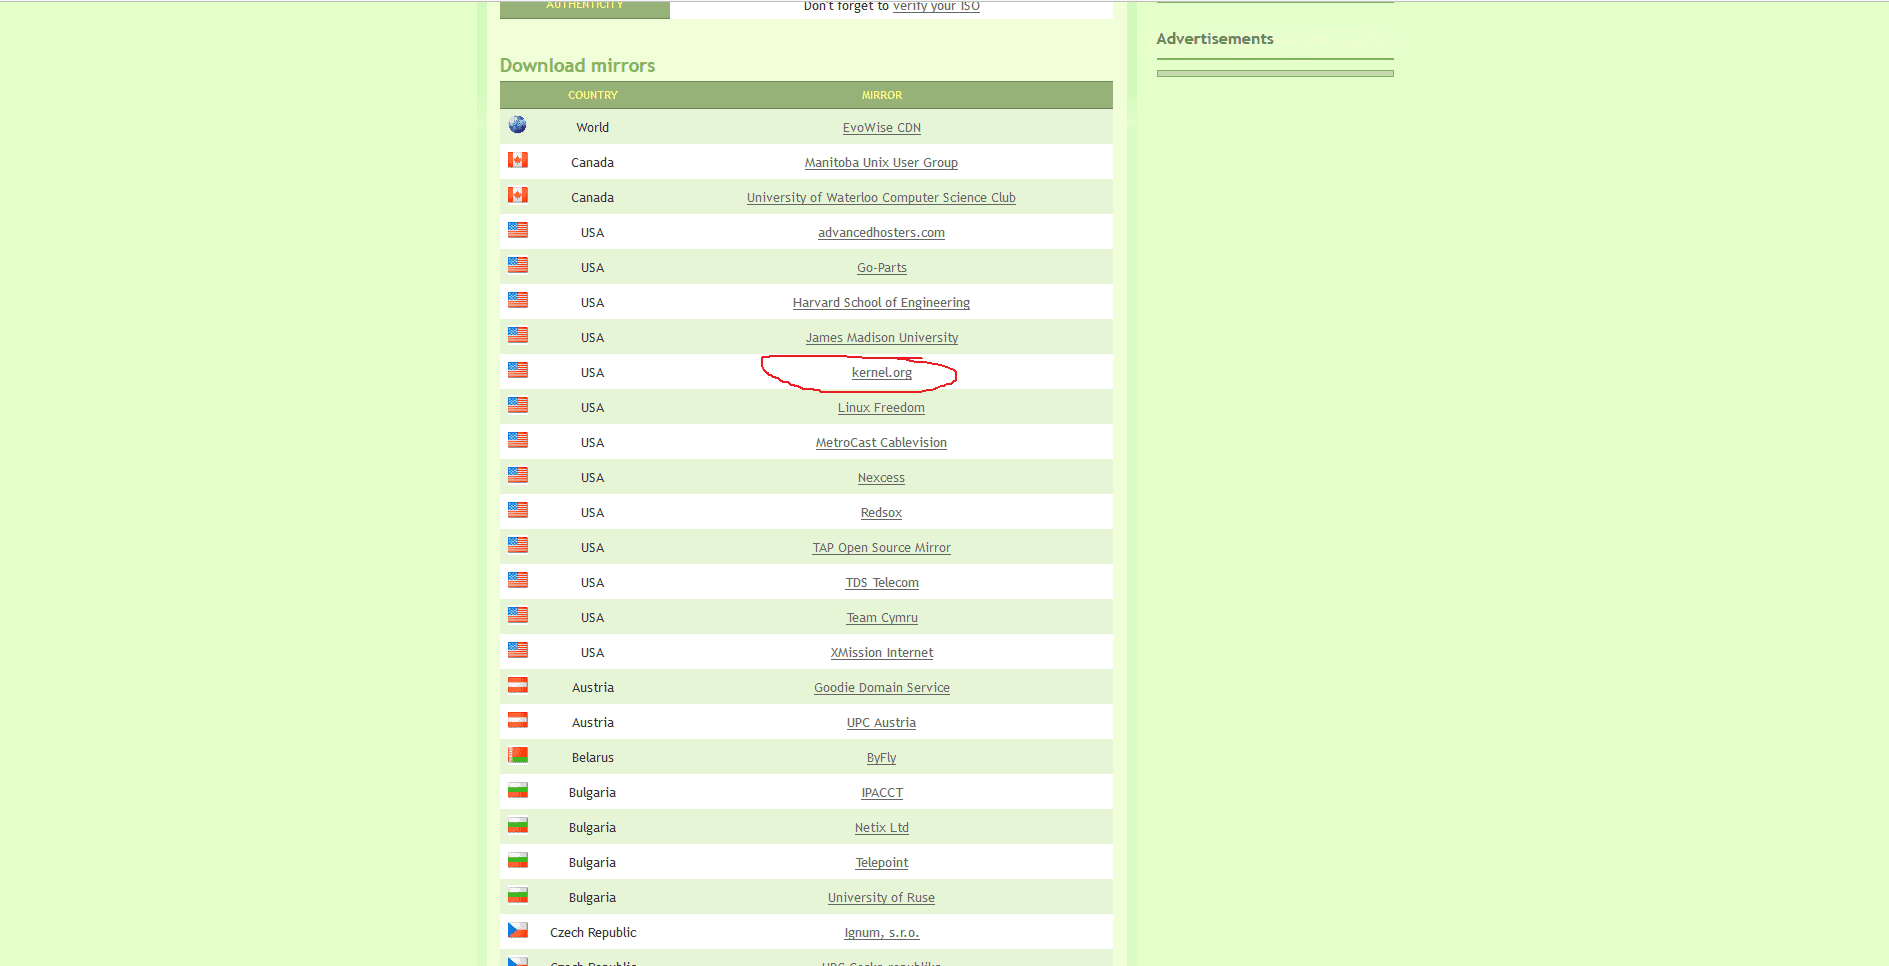
From there you will be taken to a page of various download locations. You are going to want to select a mirror that resembles a close location to where you are, such as by country.
I personally do not live in the USA but I find that the Kernel.org link always is nice and fast for me, faster than my local mirrors; so I tend to choose that one. The download will be the same regardless, so just pick whichever one makes your heart content.
Once you have your ISO file downloaded, you will need to make either a bootable DVD or a LiveUSB of the Linux Mint ISO. My personal recommendation is to make a LiveUSB as it will function considerably faster than a DVD, as well as many laptops today do not have CD/DVD drives.
To do this we will be using another piece of software called ‘Rufus’. There are many different tools out there similar to Rufus however I have personally had less issues and find Rufus to be the fastest.
You can download Rufus from https://rufus.akeo.ie/ and then scroll down until you find ‘Rufus 2.12 Portable’. We have no need to install Rufus to the hard drive at this time, so the portable version will do us just fine.
Once you have Rufus and the Linux Mint ISO downloaded, you’ll want to pop open Rufus.
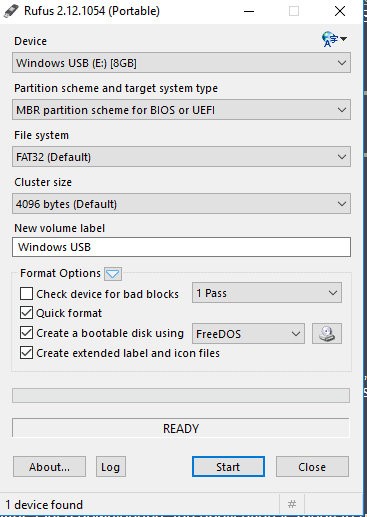
Upon opening Rufus it can look a little overwhelming with various options to select, however most of these actually are quite fine as their defaults. The only ones we are going to want to select are as follows:
-
DEVICE – Make sure that your USB stick is selected here
-
Partition scheme and target system type – MBR is usually fine, unless you have a hard disk that is over 2TB in size, or you specifically intend to use UEFI. If you have absolutely no idea what this means, stick with the default 'MBR' partition scheme for BIOS or UEFI’
-
File System – Leave as FAT32
-
Cluster Size – Leave as Default
-
New volume label – Lets name it ‘Linux Mint LiveUSB’
-
Leave all other options as per defaults and let’s click the small disc icon, navigate to where your Linux Mint ISO is, and select it.
-
Click Start – A warning will pop up notifying you that what you are about to do will erase everything on the USB Drive. This is normal and expected, your flash drive should be blank anyway (if it’s not, BACK UP YOUR STUFF OR IT WILL BE LOST FOREVER). Click Okay, and let Rufus do it’s thing.
Once Rufus has finished, the next step is to boot off your USB Drive and into the Linux Mint live environment; but what IS a live environment?
Linux Mint Live Environment
A Live environment or LiveUSB/LiveCD is a really neat feature that allows you to ‘try before you buy’ GNU/Linux. You can boot off the device (USB in our case) you have put your flavour of GNU/Linux onto, click around, install software, surf the web, and generally use as normal; without actually touching your computers Hard Drive.
The entire system will run off the USB stick, and when you reboot back to your main Hard Drive, your primary system is still there untouched, unless you chose to install the GNU/Linux system, as we will be doing.
In order to boot from your USB stick you are going to need to select the USB stick in your BIOS as your primary boot device. This part is the only part that you will need to figure out a little bit on your own, as without going through the steps of listing EVERY different BIOS in existence and the steps necessary; this tutorial can’t really guide you on how to do this. However, some basic pointers are:
-
Mash the DEL key on your keyboard upon doing a reboot of your machine, the second the power goes on. Typically this is the key that will take you into your systems BIOS. The key is listed usually during boot, it may also be F1 or another key.
-
You’ll want to navigate using the arrow keys of your keyboard through the BIOS, until you find something like ‘Boot Order’ or ‘Boot Devices’
-
You’ll then want to use the legend typically at the bottom of your screen, and adjust the boot order until your USB drive is the FIRST device in the list, or is the ‘Primary Device’ etc.
-
Once done, exit the BIOS (There is always a page somewhere that has the option to ‘save and exit’ the BIOS)
-
The Machine will reboot, hopefully into Linux Mint!
Assuming all was done successfully, you should see a screen like this:
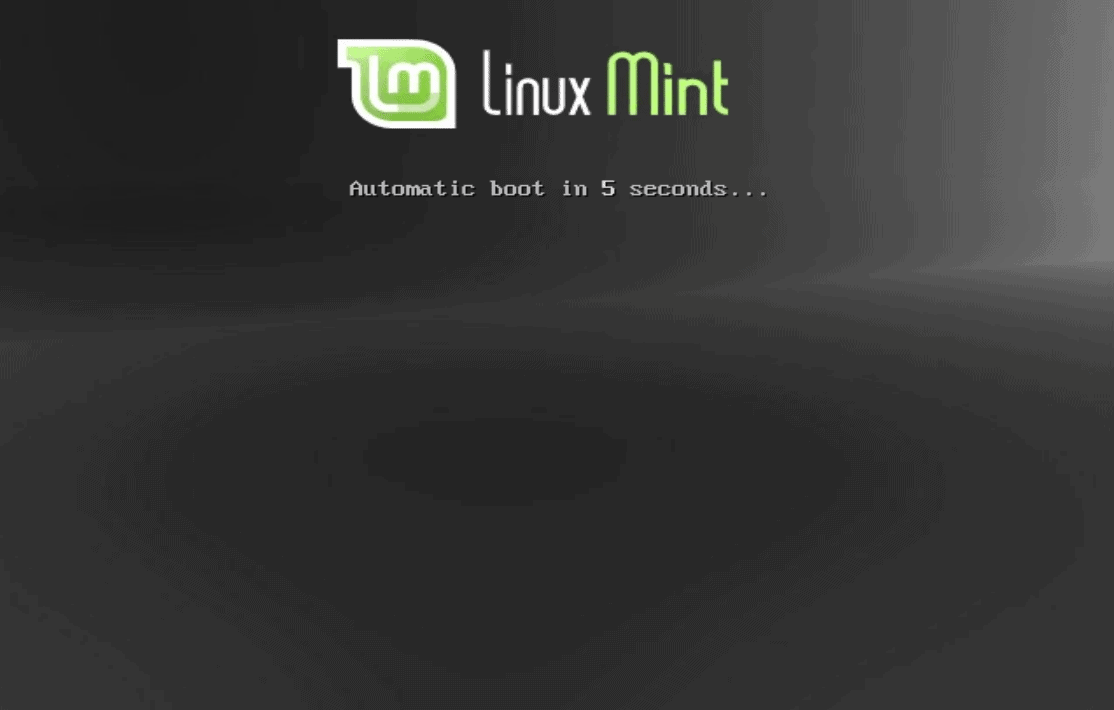
Just let the countdown do its own thing (or if you already hit a button, select “Start Linux Mintâ€) and you should in a short time, be taken to the Linux Mint MATE default desktop screen.
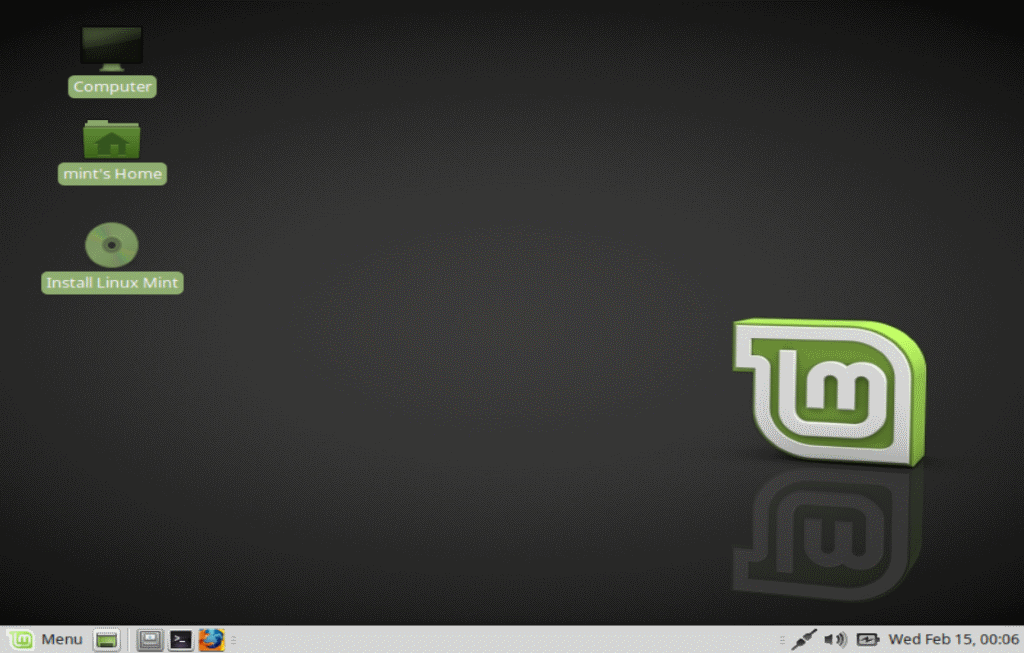
Now, feel free to click around until you get bored or you satisfy your curiosity, and then double click the “Install Linux Mint†desktop icon.
Next, make sure your language of choice is selected on the left side of the window that will pop up, and then select Continue.
The following screen is going to have a checkbox that says “Install third party software for graphics and Wi-Fi hardware,Flash,MP3 and other media,†you have two choices here: Select the box and have things installed for you automatically, or don’t. Most people are going to select this box, however there are some people who switch to GNU/Linux in order to avoid proprietary software altogether, and they may not wish to have closed-source software or plugins/codecs installed onto their machine; if this sounds like you, leave it unchecked, regardless when you have made your decision you’ll want to click Continue.
The following screen for the purpose of this tutorial will be very easy to navigate. You’re going to get multiple options available to you, such as Erasing the entire disk and installing Linux Mint, Installing Linux Mint alongside your current system (Like dual-booting Windows and Linux Mint together), Encrypting Linux Mint, Using LVM or doing your own partition setup.
For this tutorial let’s select “Erase disk and install Linux Mint,†and then click “Install Nowâ€.
Attention: This removes any data on the hard drive. Make sure you have backed up any data that you don't want to lose before you make that choice.
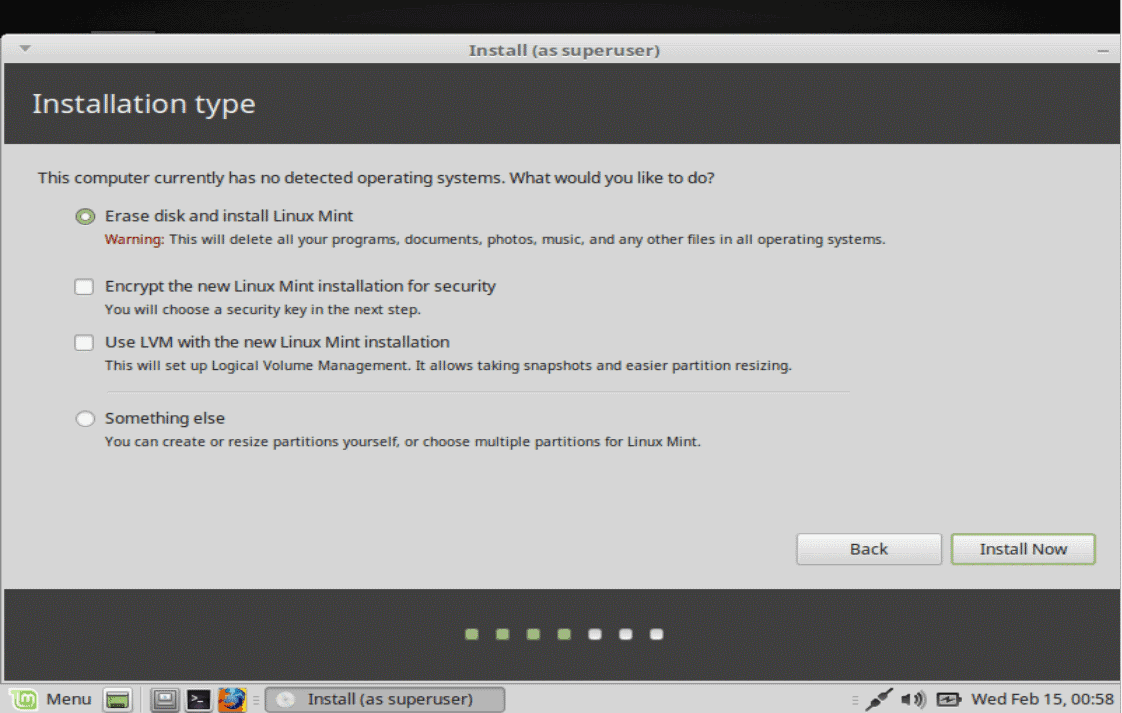
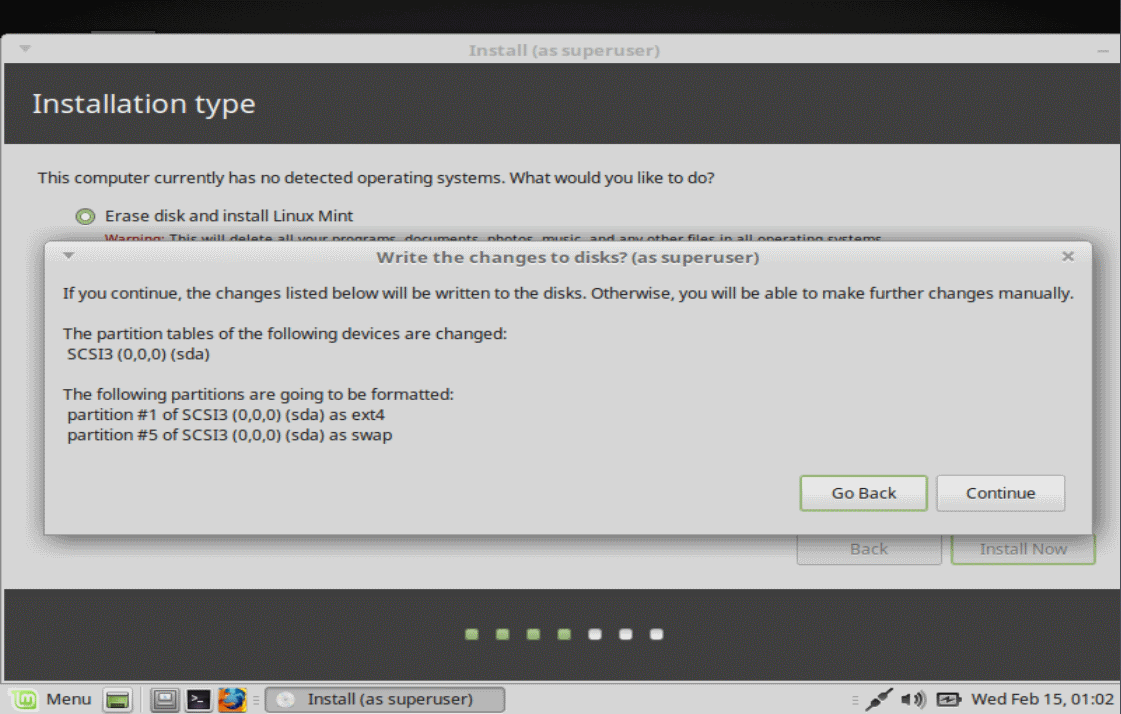
A window is then going to pop up, letting you know what the installer is about to do, such as erasing your old partitions, resizing them, making new ones for Linux Mint, so on and so forth. Unless you have specific needs for partition sizes, the default settings will be fine for the purposes of this tutorial. However, PLEASE BE AWARE: THIS IS YOUR LAST CHANCE TO MAKE SURE ANYTHING FROM YOUR WINDOWS MACHINE IS BACKED UP. IF YOU WANT TO SAVE ANYTHING, DO NOT CLICK ‘Continue’, DOING SO WILL ERASE EVERYTHING YOU HAD.
That being said, if you are all backed up and ready to go.....click Continue.
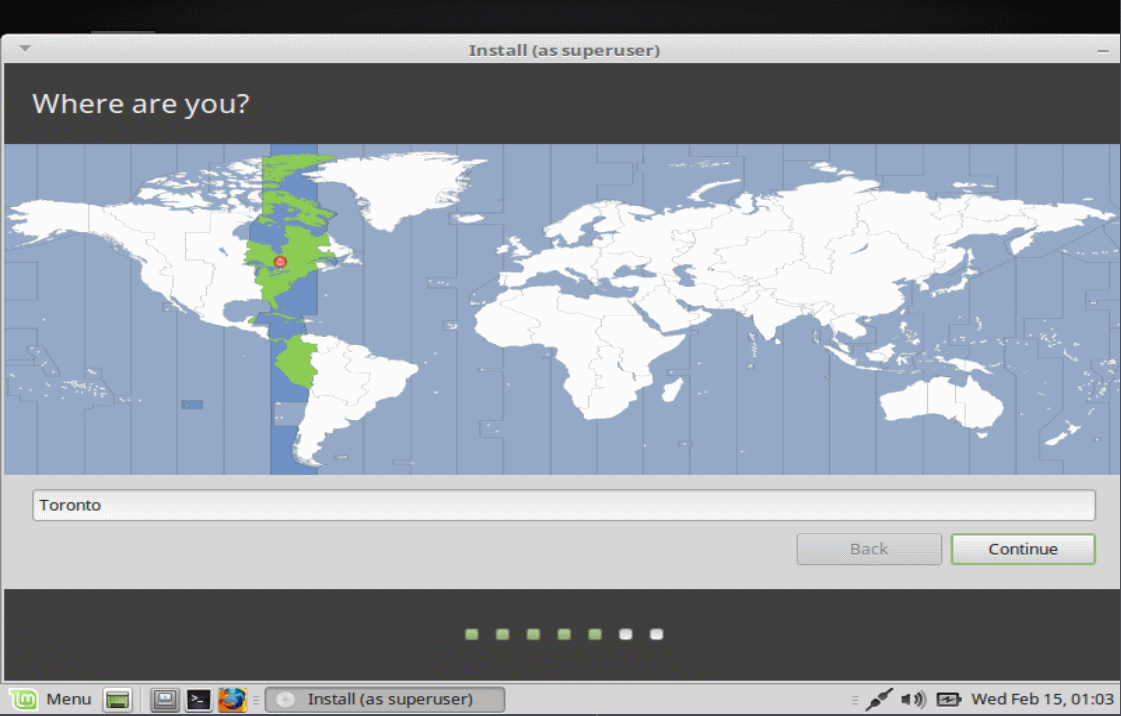
From here your system will now install Linux Mint. But the setup is not entirely done yet, we still have a few things to do while the system installs. The first screen you are going to see is going to ask you to select your location and timezone. You can click the map, or select your location from the drop-down boxes.
Then you will get a screen asking you to select your language and keyboard layout. Unless you use a different language or layout than most, leaving this as default is best.
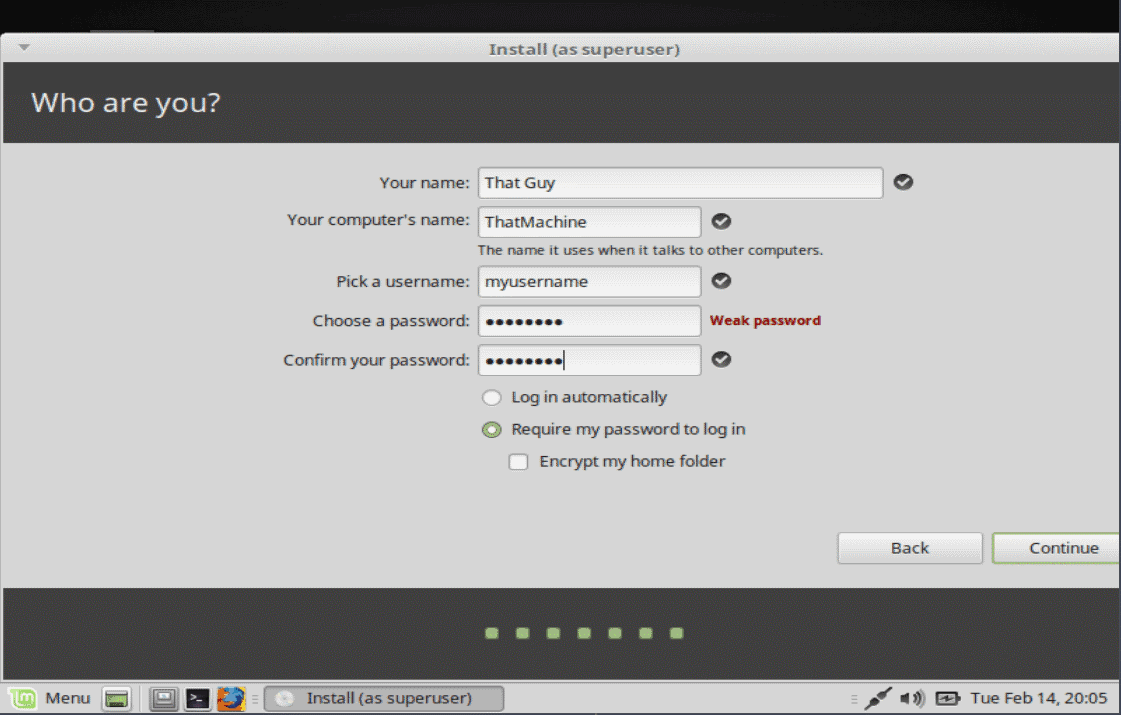
Following that will be a screen asking you for some details:
-
Your Name (John, Bob, Carol, Chris, etc)
-
Your Computer name (John’s Laptop, MachineODoom, etc)
-
Your username (Coolguy123, RagingDeathKill, etc)
-
Your password (DO NOT FORGET THIS, and YES, YOU NEED IT!)
-
Whether you want to Log in Automatically or whether a password is required (You STILL need a password even if you select automatic login!)
-
Whether you want to encrypt your home folder
GNU/Linux has a very different filesystem structure than Windows does. There is no C:/ Drive, there is no “Program Files†Folder etc, 99 percent of what you do, and save, will be kept in your ‘Home Folder.’
So, if you wish to keep your home folder protected from outsiders who may wish to access it, check this box. I highly recommend everyone encrypts their home folder, even if you didn’t select to encrypt your entire Linux Mint installation earlier in the tutorial. You will not notice this encryption happening, there is no noticeable performance hit, and it means that should your machine ever fall into the wrong hands, without your password, nobody can access your home folder. Even if they remove the hard drive, place it into another machine and attempt to access it; they will be unable. What reason is there NOT to encrypt?
Once all of that is done, click Continue.
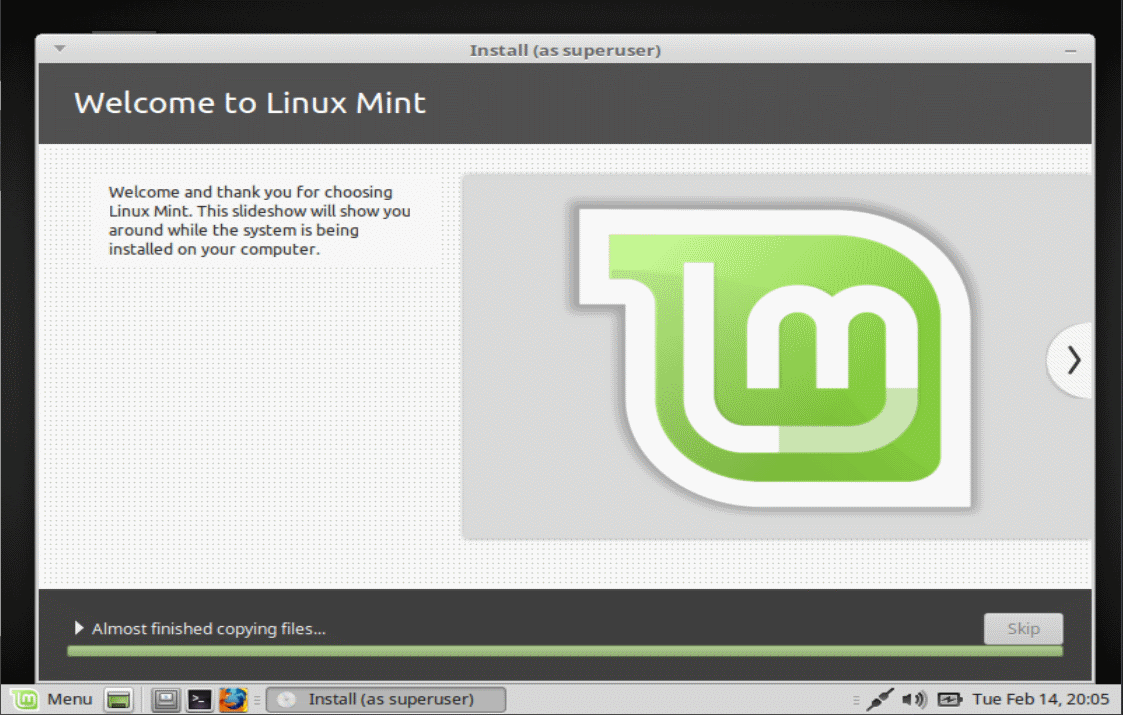
Now you are going to be presented with a nice shiny slideshow showcasing some of the basic features of Linux Mint. Feel free to sit back and enjoy the show, go get a coffee/beer, and let the installation finish.
Once finished, you will be presented with a box asking if you wish to continue testing or reboot. Let’s get out of the LiveUSB and boot into our new Linux Mint System!
Once your machine has reboot you should be welcomed with a shiny new login screen (If you selected requiring password during the install), click your username, enter your password, then press enter to log in and reach your desktop.
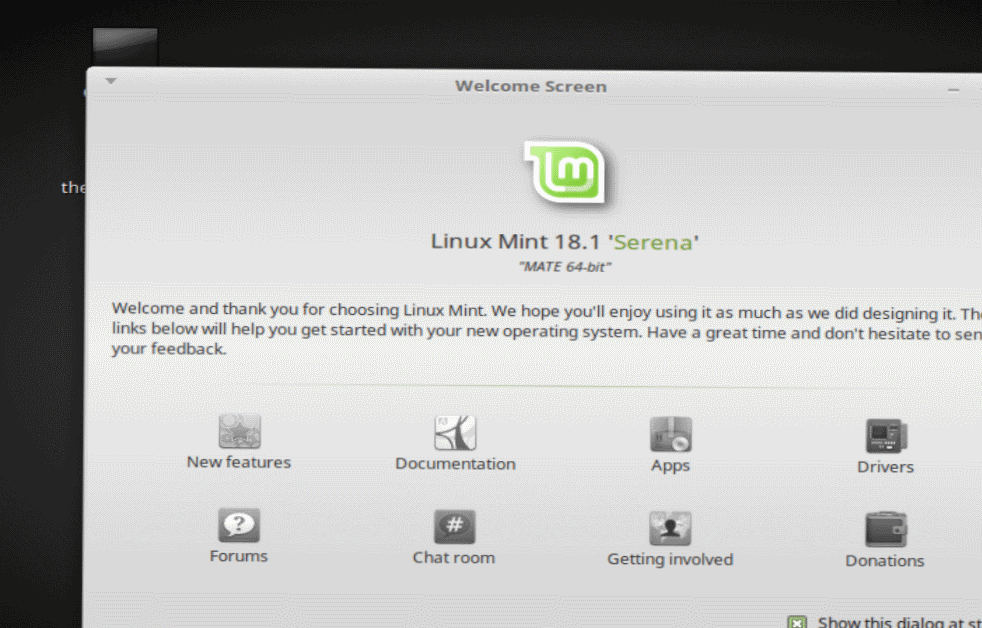
Upon reaching your desktop you will have a box pop up with the Linux Mint MATE welcome screen. On here will be various buttons for things like New Features, Documentation, Forums, Drivers, and Donations, as well as an option for you to uncheck/check a box to show the welcome screen on startup. Let’s leave that box checked for now and select “Driversâ€.
The first thing you are going to notice is that a box is going to pop up asking you for your password. This is normal, a security feature of GNU/Linux. Those of you familiar with Mac OS X will be familiar with this way of doing things as well; or those of you running Windows who did not disable UAC.
Anytime you do anything on a system level, requiring elevated privileges, you will be asked for your password; in order to help prevent hackers or bugs from doing anything that shouldn’t be done. Enter your password, and the Driver Manager will pop up.
Updates
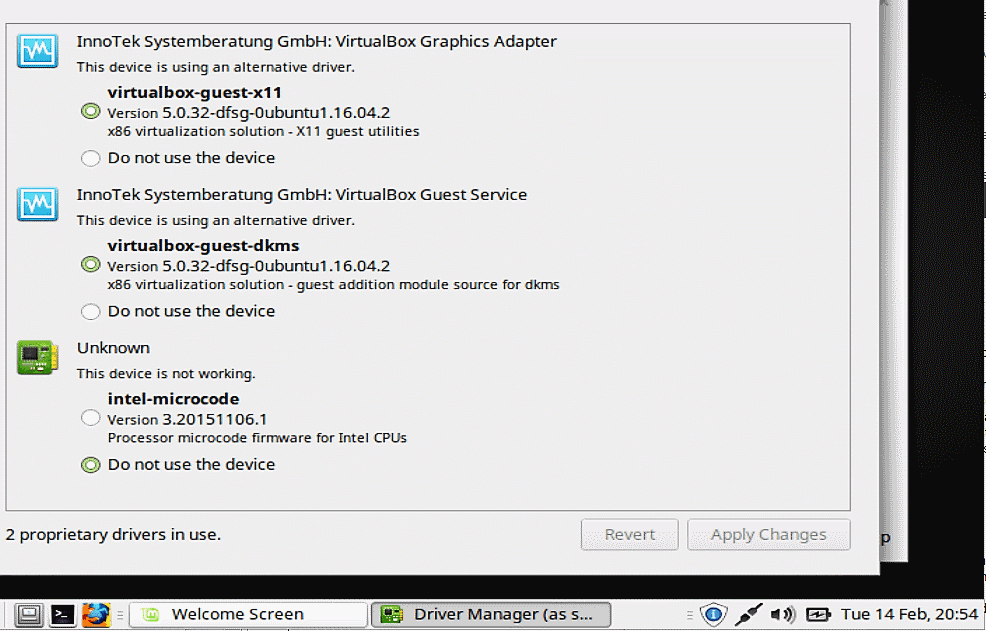
Now, depending on your hardware you may be given some options here. Things like GPU drivers, CPU microcode firmware and such may all be potential options, or you may simply have no options pop up. You will need to make an executive decision about what to install or not install. If you are a gamer and wish to play games requiring heavy 3D acceleration using an NVIDIA GPU for an example, using the open source driver that is installed by default may not be enough, so you’ll want to select the NVIDIA Driver listed as an option.
I myself on the machine installed, only had the option of installing proprietary firmware for my Intel CPU. I’ve attached a photo to show you what that looks like. Select the driver(s) you wish to use, then select Apply Changes, and enter your password if requested.
Once that is done, it may tell you depending on your choices that a system reboot is necessary. Hold off on that for the time being, as we are going to update our system as a whole first, and then we will do a reboot anyways.
After you have done everything involving drivers, it’s time to update our system, as even though we are running the latest version of Linux Mint, packages are updated sometimes multiple times a day, and it’s always good to keep our system running the latest software. In the bottom right corner of your screen beside your clock, will be an icon of a shield with a blue circle and the letter ‘i’ inside of it. If you click on that, a window will pop up asking you to set an update policy.
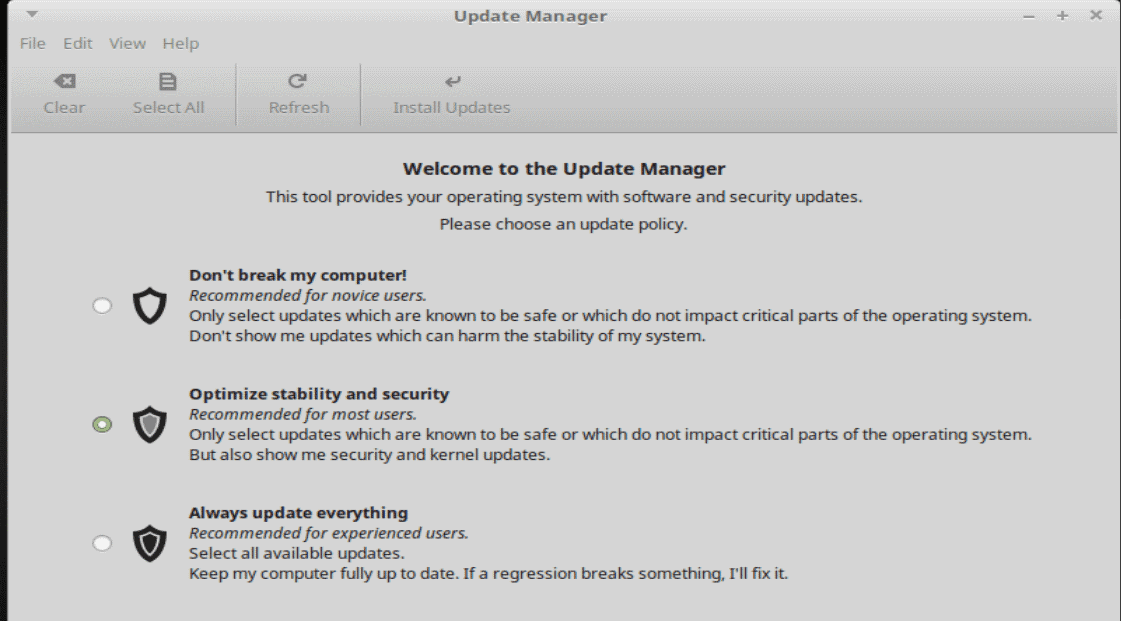
The average user is going to either want to select the first or the second option; option three should only be selected by users who are comfortable and experienced with Linux.
Read the details given about each option, and make your choice of either option one or two; I personally recommend option two, as you still are only given updates that will not impact critical parts of the system and potentially break something if a conflict happens with another package, but you will also get security and kernel updates as well which are crucial to anyone using their machine on the internet.
The only real reason I can see using the first option is if you have no intention of ever installing new software, visiting websites on the internet beyond your email or extremely basic web searches, or the machine is only ever going to be used for super simplistic tasks. Your grandmother might want to choose option one, but otherwise; go with option two, and then select ‘OK’
At this point the Update Manager is going to pop up, and show you updates that are available. Simply click “Install Updatesâ€, enter your password, and the Update Manager will handle the rest for you. Once that is done the first time, it’s going to show you more updates. The reason for this, is the software updated itself first, and once the Update Manager itself was updated, then it can show you the latest packages your system needs. Again, click ‘Install Updates’ and let the system do its thing.
Once that is finished, let’s reboot the system. Click the ‘Menu’ button in the bottom left corner of your screen, select ‘Quit’ and then ‘Restart’ to restart the system. Assuming that everything goes as it should your system should reboot normally, take you back to the login screen if you have one, and then bring you back to the desktop again.
Installing Software
The last part of this tutorial is getting some programs! On your welcome screen (because you kept it as showing up, right?) select “Appsâ€, enter your password, and then you will be taken to the ‘Software Manager’. This is where you will get the vast majority of programs you ever use, until you start dealing with outside repositories, installing software via terminal etc.
For now, let’s install something simple; Banshee, a music player. We already have one installed called Rhythmbox, but I prefer Banshee. We could simply search for Banshee within the Software Manager, but let’s explore a little and find it. Looking at the main screen you will see a variety of categories, let’s select ‘Sound and Video’, which will then show us a big list of software.
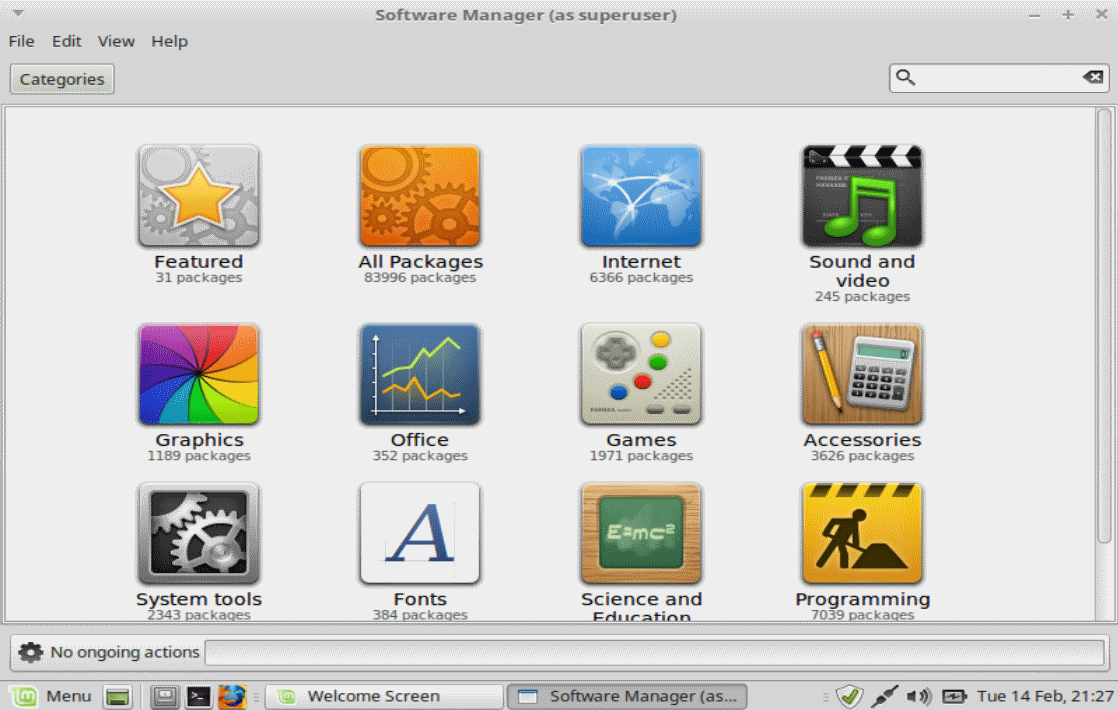
Once inside the Sound and Video category, scroll down until you find Banshee and double click it. This will take you to a page with screenshots and information about the program. Simply click ‘Install’ and the program will automatically take care of downloading and installing Banshee for you. Once that is done, click your Menu in the bottom corner, then click ‘All Applications’ in the top right corner, navigate with your mouse to ‘Sound and Video’ and you will find our brand new shiny Banshee listed. Installing a vast array of software is literally that simple. Explore the various software that is already installed, and if you can’t find a type of software that you’d like to have, browse the Software Manager and install something for it!
That’s it for the basic installation of Linux Mint 18.1 MATE. There is a lot more that can be done that will be covered in more tutorials in the future, but this should be enough to get you started into the wonderful world of GNU/Linux.
More information can be found at the following sites, for installing software, drivers, and other things we touched on during this tutorial! Another thing to keep in mind, is that because Linux Mint 18.1 is based off Ubuntu 16.04, if you ever run into trouble and can’t find answers on the Linux Mint website, do a web search for your problem with the keywords Ubuntu 16.04, and the fix for it if one exists, should be fully compatible with your Linux Mint system!
https://www.linuxmint.com/documentation/user-guide/MATE/english_17.3.pdf
https://www.linuxmint.com/documentation.php
Enjoy your new Linux Mint system!


Don’t ever use Linux Mint, there is backdoor included! If you want Mint, then use Ubuntu Mint, not Linux Mint.
https://en.wikipedia.org/wiki/Talk:Linux_Mint/Archive_Israel-Palestine_Controversy
https://github.com/linuxmint
The source code for Linux Mint, if you’d like to review it yourself :)
Please do not spread misinformation. There is no backdoor in mint relating to the Israel-Palestine controversy.
The Lead developer of Mint put a personal opinion online, that had nothing to actually do with the codebase or structure of Linux Mint. His personal views and opinions do NOT relate to the actual Distro in relevance to it’s security, usefulness, or stability.
Also, there is no such thing as Ubuntu Mint. I think you meant Ubuntu MATE. MATE is available to use with pretty much any Distro, as it’s simply a desktop environment.
Thank you very mucho for this article Martin!
We have lost our privacy and that scares the hell out of me. After knowing about the mandatory telemetry (spyware) Windows 10 imposed I reached my limit. It made me take seriously a Linux-Windows dual boot system. Ufortunatelly I have never used Linux on the PC and I have not too much free time right now to go through the learning curve it requires. Articles like this help a lot. I am definitelly going to migrate to linux. The idea is eventually use Linux as my daily OS and Windows as an option for mandatory software or tasks.
This is not Martin’ article. At the top (below the title) or infobox is by Mike Turcotte.
It’s so good to see a Linux-focused writer on Ghacks! That’s great.
Let me make an addendum to what Mike has written:
-On the Mint download page where all the mirrors are listed, you will also see a torrent link near the top of the page. I recommend downloading the .iso as a torrent instead of doing a direct download from one of the mirrors. Besides saving the mirror host some money (many of these are run with quite limited budgets), there may also be a security benefit for you. Some of you will recall that a hacker breached Linux Mint’s server last year and replaced the .iso’s with custom ones with malware in them. This particular attack likely would not have affected anyone downloading via torrents, because the torrent is seeded by dozens of people, many of whom would have obtained the file before the attack took place.
-Speaking of security: you should verify GPG signatures after downloading. The Linux Mint download page has a good explanation of this.
-A minor point, but when you are booting up your computer and trying to enter the boot menu (in order to select the USB stick), the DEL and F1 keys are not the only possible keys to trigger this. On my systems it’s usually the F12 key, and I have seen F8 do this as well.
Really good article, well written, clear. Hope you write many more Mike. :)
Clairvaux: Install Mint in a VM and play with it. You’ll find far more options than Windows. No need to resort to Noobslab, ppas. (‘How a ‘noob’ can break a system in one easy swoop’ :) ). Do it from within Mint itself. Change your fonts, font sizes, type ‘themes’ in software manager, play around with Appearance, click on ‘Menu’ icon, import your own screensavers, and so on. You’ll soon find you can get a beautiful look, (and if you break it, hey, its’ a VM). :) I admit there was some distro I played around with, forget the name, based on Mac look (?), which really did have horrible orange/brown!
Billy: Great link, especially security page, complements this tutorial well. I agree with him, don’t bother with Wine. Can always install VirtualBox in Mint for Windows software.
Owl,
Thank you for the compliment, there will be more to come for sure!
I must disagree though, about not bothering with WINE. It truly depends on what you intend to do, windows software wise.
Gaming is my prime example, running games through a windows VM that simply do not work in Linux tends to be a nightmare if not downright impossible, and that’s when WINE comes into play, taking better advantage of the hardware than a VM will. It truly depends on what you desire to do.
I personally think WINE should be installed and ready to use if needed, just my two copper though ;)
Thanks for your encouragements. Will do that some time.
Or just try all those things from the installation USB (or disk) without actually installing the OS yet. No VM is required. Mint comes with some beautiful options for colors, borders, icons, controls, backgrounds, menus, applets, transparency, etc. They’re all easy and intuitive to apply with a click or two. It’s totally customizable. (I agree it looks a bit drab when first installed.)
Great tutorial, Mike!
Linux Mint installation tutorial
It would be useful if the author wrote a supplementary tutorial on Installing Linux Mint 19.1 Serena MATE Edition 64bit in a dual boot configuration with Windows 7/8.* , using Linux’s multi-boot setup and also using the Windows multi-boot loader.
To make things easier, It probably could assume the reader is familiar with the above tutorial, dealing only with differences related to dual-booting.
As I recall, Red Hat Linux (back when it was still primarily freeware) mostly left Windows installations alone when it was installed and when patches were applied. The last time I tried to dual-boot Windows and Linux was when Windows XP x64 Professional was very new — I ordered my copy from MS because Frye’s didn’t have it yet.
My goal is to migrate to Linux by the end of the year, at least for my personal machines. Having a stable dual-boot system will let me do valid bench marking of the operating systems and software running under them. How they compare in terms of network performance is also of interest. I am betting that Windows will still be better at dealing with a wider range of devices added/connected to the computer. But I haven’t looked at Linux much in several years…
Personally, I would be most interested in knowing how to best install Ubuntu 16.04.2 (Xenial Xerus), on a laptop that has been great for casual gaming and also occasional development, running Windows 8,1 Pro with Media Center since late 2015, with the result being a stable dual-boot machine.
FractalZ,
I will be posting a ‘How-To-dual-Boot’ Tutorial in the very near future, quite likely later today actually, although I will be using Mint 18.1 again for said tutorial. However, dual-booting most common GNU/Linux Distro’s is all relatively the same idea, it only really changes when doing installs of things like Arch/Gentoo/Net Installs, so your installation tutorial request for ubuntu 16.04 will essentially be the same and easily transferable, especially since Mint 18.1 is based on Ubuntu 16.04 quite heavily!
Since you are a student English needs some work
You are going to want (not needed)
The first thing you’re going to want to do is head over to (why so long) the word Go works as well
You are going to want to select a mirror (soooooo long)
you’ll want to pop open (ditto) notice a pattern
once – comfort word for you. etc etc
One of the things I like about this site is Martin’s writing style. Not american but educated English that keeps getting better. This is a good article but since it was written by a student perhaps my critique might help a bit.
american English is bastard English & sometimes rubs me the wrong way “go ahead and” all americans use & it’s a useless phrase. IMHO
Fena, I agree that public writing should be held to a high standard, which I believe is the intent of your comment. That said, and despite my presumed deficient American public education, I think your own writing would benefit from the use of proper punctuation, capitalization, grammar, and sentence structure. I mean no offense.
Fena,
Thank you for the suggestions.
I am a Canadian first off, not American, you’ll note some of the spelling differences follow british english conventions, although not applicable to your critique.
As a writer, I’ve always had a habit of over explaining and using longer than needed terms, or falling back into comfort words as you said, it’s a habit I actively am working on breaking!
I appreciate the critique highly!
Why the file with kernel.org instead .torrent? Should be even faster.
Linux Mint is a “FrankenDebian†unlike Ubuntu. There have been many discussions on LWN and HN exposing the problems with Mint. Even their servers were pwn’d (I think more than once) serving up malware infected images. Just stick to Ubuntu (pick a flavor).
I understand your desire to pick “the easiest†distro but the bottom line is you’re going to end up using the terminal at some point. If that is too much for you then no distro will be suffice. At least start with one that’s not broken on install.
Gonzo,
While you are entirely correct that Mint has had some issues in the past, I’ve been using GNU/Linux since back in the days of Mandrake, and I must say that it’s come a very long way; using a terminal is no longer essential for the average computer users who just like to surf the web, check email, watch YouTube videos, and browse their favourite Ghacks posts. Mint comes prepackaged with nearly anything the average user could need, and functions extremely well out of the box. The only time a user will really need to use the terminal is when they get into deep customization, or the beginnings of poweruser functionality and ways of doing things.
Ubuntu has had it’s fair share of issues over the years too, and lacks some of the really useful GUI tools that come with Mint; however it is another really great system to run as well.
I’ve been using Linux Mint for about 8 months now. Windows 10 was the push I needed to change and I’m glad I did. Good to see more Linux articles here – I read every one. I recommend Linux users donate money to your favorite distro to help them keep up development.
Hmmm . . . isn’t this a tutorial for installing Linux Mint Mate on VirtualBox by Oracle? Making a VM is much different than installing Linux on bare metal. It’s too bad reference isn’t given for creating a “persistent” USB that can then be used on a variety of computers in the home or workplace [assuming the computers are all different] to determine the extent of variables that will be encountered. Wireless and sound tend to be common problems that aren’t encountered when making a virtual machine.
Oddly enough, I’ve never had to “mash” the DEL key to open the Boot Menu, not the BIOS, and arrow down to the USB.
But as every computer is different so are the users of computers.
It is nice to see a tutorial on Linux. Future–Mint on USB with persistence; Mint on VMware and VirtualBox; how to move virtual machines from one computer to another.
jasray,
I used a virtual machine, but the tutorial is written to work regardless of whether you are installing the system on a VM or on your home system. The only part of this tutorial relevant to it being on VM is when I show the screenshot of the drivers available, some VM related drivers are shown.
I personally have rarely run into wireless or sound issues when installing Mint, or most modern GNU/Linux Distro’s, although I tend to use machines with (seemingly) highly compatible hardware. For an example, the Dell Inspiron 13 7000 that I used to write this tutorial is dual boot with another version of Linux Mint, and had no issues — everything worked out of the box just as it did in this tutorial :)
I will keep your suggestion in mind for a post about installing onto a persistent USB, it’s basically the same thing just selecting your USB in the partition scheme of a manual setup; so a great idea!
Thanks!
You’re right, a VM won’t expose hardware issues and will limit you a bit but I think it’s as good a place to start as any. If you get tired or frustrated just close it and you’re back in Windows. Virtualbox also makes it easy to create snapshots allowing you to recover if you mess up (this probably should have been mentioned in the article.)
Thank you for for the article. I am happy to see Linux articles here. I am in the process of switching to Linux.
I had to buy a computer with Ubuntu 16.04 installed, since I could see no way to boot Linux Mint which I wanted, from my Windows computer.
Secure boot was enabled, and there was only the Windows Boot Manager available. I could have disabled Secure boot, but I received dire warnings about not being able to boot if I did this. I took the easy but expensive way out.
Ubuntu seems nice, but I am mystified about setting up a wireless Brother printer on it. Brother support is only luke-warm.
If someone has a good tutorial on that, I would be happy to read it.
@ Mark H , ……. Secure Boot in post-2012 OEM Win 8/8.1/10 cptrs was for M$ to become the nanny of cptr dummies who might install virus-infected OS = only OS that hv been signed or certified by M$ could be installed. Canonical hv to pay Verisign, a M$ affiliated company, about US$70 yearly in order for their Ubuntu OS to be signed-in or certified for install with Secure Boot cptrs.
……. So, it is safe/secure for cptr users to disable Secure Boot on their modern OEM Windows cptrs if they wanna install a trusted OS, eg Linux Mint, Puppy Linux or Win XP.
Personally, using an old non-UEFI Win 7 cptr, I am booting LM 17.3 from an external USB hard-drive.
About wireless Brother printers, to install the drivers, try this link , …
https://ubuntuforums.org/showthread.php?t=2246878
I’ll say this with a big smile but my feeling, based on Linux users I’ve read here and there, is that their universe seems confined to a bubble which includes themselves and their ‘distro” (sounds close to “destroy”, doesn’t it?) together with a distinctive inclination for showing-up. Is this the definition of a geek?! :) That’s maybe why I never get to understand one word of their explanations…
I’ve been using Linux as a desktop since the early days of Ubuntu, but I have no particular loyalty to a distro except to use one that ‘just works’. I find that the Xfce flavor of Linux Mint meets that criteria, but Xubuntu works fine most of the time also. I find no advantage in the every increasing clutter of the Windows desktop environment, and I don’t have an inexpensive way to try out MacOS.
Seeing the responses here from mostly Windows users, the OP was smart not to go into repartitioning in Linux Install 101. I would encourage everyone to install Virtualbox and use the excellent Gparted partitioning distro to gain confidence and insight. Once I did this years ago, dual booting setup became a snap!
Xubuntu or death!!! :-D
But yes, we’re sometimes a strange bunch. Personally I get annoyed by those who distro-hop (install every distro under the sun just to see what it’s like) instead of choosing one, installing the programs they need, tweaking the interface (I mean, if I like the Manjaro theme I know where to find it, no need to install Manjaro) and off to work. :-)
Do you get annoyed if i order egg rolls for lunch? Pity the triple exclamation-point sod who can’t just enjoy the free lunch and be happy.
Nice beginner article and well written out (I’d expect no less from a Journalism student). There are a number of things that should be addressed immediately after installing Mint with some dealing with security but thankfully these are easy to do by following the simple guides in the below link. Choose the installation edition for your install, I use Cinnamon for my families laptops and then you’ll have a more secured and powerful set up.
10 things to do first in Linux Mint 18.1 Serena – https://sites.google.com/site/easylinuxtipsproject/firstmint
Billy,
Thank you for the feedback, and a great link!
great with linux stuff on this blog.
Now this is comprehensible and, in my case, finally is. Hard to find a step-by-step explanation of how-to, of the Linux environment, of its terminology… and here it is. For those who have always and only known the Windows environment (my case) this article is an oasis.
Many thanks, Michael. I’ll be following your articles, for sure.
Tom,
Thank you very much! I tried to make it as clear as possible and make sure that every step was explained in detail; it’s not only important to know WHAT to do, but also WHY afterall!
Good article.
How ’bout a Manjaro installation article?
Best Linux distro currently.
buck,
One of my personal favourites, expect to see some Manjaro related articles in the future!
Two words: Solus MATE
@giddayMATE
Even though Solus is a great distro, it’s not that beginner friendly. For Windows renegades the best transitional distros are Mint or ZorinOS for sure.
Very nice article. Starting Linux road with Linux Mint It is the best thing for all those who want to try Linux.
Good to see more Linux articles on Ghacks. I have experimented with many distributions, but I prefer Mint MATE on my main PCs.
Perhaps you should add a “Linux” button to your top-of-page toolbar, Martin?
Lets see how this goes first. If we get a steady stream of articles going, and if we see an uptick in Linux users, then I might ;)
I agree though that more Linux content would certainly be welcome.
But how will you measure the “uptick” in Linux users? I’m sure you know that a lot of Ghacks readers are spoofing their user agent etc. I’d suggest looking at the number of visits / comments that the Linux articles inspire rather than the number of user agents saying “Linux”.
Number of comments is not a good indicator either. I look at several indicators, including comments, but also Linux users, and visitors to the articles.
Great article! So good to see a Linux / *nix author here. Linux is the future and it would be wise to catch that train ASAP. We really need more articles about Linux in general, not just Mint.
Once again, this wonderful website desperately needs the Linux subcategory. Vox populi, vox Dei. :)
Great article Martin. I have been considering for a while now to move away from Windows. I have archived this article and will use it to install Linux down the line.
Thanks.
wybo,
Thank you, and enjoy the wonderful world of GNU/Linux.
and thank you to @Robert as well!
Not my article :) Mike is Ghacks’ new Linux / nix author.
Oops. Sorry about that and apologies to Mike.
Thanks for a great article Mike.
Haha. The writing style gave that away to me right away. Great instructional article for those who who want to stick a toe into the waters of Linux though.
Take Ubuntu. Mint is based on it. It has another horrible interface. ;) :D
You can get Ubuntu with all sorts of horrible desktop environments (interfaces), although most of them are still better than Windows. ;-)
Ubuntu (with Unity), Xubuntu (with Xfce), Ubuntu Mate, Kubuntu (with KDE), Ubuntu Gnome, Lubuntu (with LXDE) – check out ubuntu.com/about/about-ubuntu/flavours – and you can make them look even more horrible by freely moving stuff around and changing themes, wallpapers and icons!
You’re mixing unrelated things. The file manager not having tabs is not a graphical design issue. It’s a features issue. You shouldn’t have a choice on graphical design because you’ll probably break it if it was good in the first place, and there’s very, very little chance you’ll be able to make it better if it wasn’t.
Software developers are rotten at graphic design. It’s an entirely different type of talent. It’s analog. Devs think digitally. Beauty is analog.
Mint is a case in point. It is green. And I mean, green. The developer thought : I like green, so let’s make it green all over. That will be distinctive. That will make it stand out. Oh, and it’s a very ugly and offensive type of green : it’s mint green. Hey, green, mint, get it ?
This is stupid and childish. And ugly.
Linux is the only place in the world where orange-brown reigns supreme. One of the ugliest colours in the world. People should be shot for using this.
@Clairvaux – Maybe “to each their own” but still, if you want monolithic almost-unmovable nearly-fascist design there are Gnome, KDE and Unity. KDE in particular looks better than anything out there, if you like the modern look. How are custom icons not helpful, though? Every program you install has its own icon, custom icon themes make them look uniform. Also, pretty much every important distribution has its own theme, the desktop environment is just a skeleton. Many desktop environments are old, some are new and updated. The same goes for themes. Choice is good. Imagine having Windows, but being able to choose between XP, Vista, 7, 10 or OSX interface while keeping all the same internals. And then tweaking them to your taste. Not everyone likes round, square, big, small, flat or skeuomorphic. Why would anyone want one possibility? That kind of attitude is for iStuff users.
And I totally disagree about Windows being “better” in anything concerning the design. After a year or two with Linux, Windows (which I used for a decade and have experience with XP, 7 and 10) looks cluttered, illogical, bloated, kitsch and sometimes downright hostile. A mess vomited on the screen in some cases. Can you rearrange or move the close, minimize or maximize buttons to left or right? Does the file manager have tabs? Can you even choose the file manager? Can you even change a theme without hacking the registry or you have to look at the same gradient for years? Can you change the size of anything? Did Microsoft even bother with Windows 10 design? Look at all the wasted space in the title bars. I don’t see how design should be “specialized” with so many talented people around and yes, you probably haven’t seen much of Linux. ;-)
Thanks to all for your suggestions. Windows has its drawbacks (otherwise we wouldn’t be reading this), but it does have the merit of valuable graphical design work. Not everything in Windows is good graphical design, but transitioning from XP to 7, for instance, was a boon in that matter. From Windows 8 to 10, it became more about eye candy and less about good interaction with the machine.
I haven’t seen much of Linux, but my first impression is of sub-par work in that department. Linux geeks are not that much into beauty, it seems. Adding “themes” does not help. Design should be fascist : you should be given one possibility — and it had better be the right one. Developers who can’t get it right the first time offer scores of “themes”, and then they pretend you have “choice”. Having the choice between 20 rotten designs is not better than having a single rotten design to use. Actually, it’s worse.
As I said, I might be prejudiced. I haven’t really explored Linux yet. But what I’ve seen of it, from Linux articles or Windows applications originating from the Linux environment, does not seem encouraging to me.
Also, graphical design is very, very specialised work. Offering customisation instead of good design from the start does not cut the mustard.
Take Debian, *Buntu is based on it. It has just a horrible dash interface. :D :P
Let me ask a very, very noob question : can one opt for Mint and get rid of that horrible green interface ?
Customising Mint is the best part – I’ve spent days doing this (not because it’s difficult, but there’s just soooo much to choose from and so many different ways of doing it – Linux is addictive!). Personally I use Mint-Y themes and Cinnamon with dark borders and leave the green but you can choose any colour you like. Then there’s Breeze too, wait, add your own desktop pictures and make them fade randomly and add Cairo Dock, Desklets for time and weather, system sounds, adding hashing to Nemo along with exif data, changing the icon sizes – 66% works well, Xpad, re-arranging your application favourites and panel, making the date appear with day / month / time, hiding the taskbar until you roll over it, oh you get the idea!
I love Mint – it’s how operating systems should be – you’re in charge to change it to how you like it. It’s stable too, which is more than can be said for some rolling distros…. Although I have to admit that I’ve been bitten by the compiling bug and have so far managed to compile most of the software that you can find in the repos because (most) software is open source – occasionally with negative results, but heyho, I learned a lot (and gained a lot more functionality in the applications). I would definitely try installing it and having a play around – just be prepared to find all your spare time eaten up trying new things out!
Menu > Control Center > Look and Feel > Appearance
Linux is very customizable, that’s the beauty of it.
Don’t forget to also change the theme of your window manager (accessed through a menu like Settings > Window Manager). This will affect the title bar, window borders, etc.
Here’s a good article: http://www.omgubuntu.co.uk/2013/05/show-us-your-ubuntu-desktop
Users submitted their screenshots. And that’s just Ubuntu (although I chipped in too).
Want it to look like MacOS?? Just published yesterday my MakeUseOf.
http://www.makeuseof.com/tag/make-linux-look-like-macos/
Yes you can install other themes and use those.
Also, full icon sets are available, which means changing all the app icons to the same style, as well as app buttons (play, pause etc) and other actions icons – all at once.
As an example check out the RAVEfinity web site, or Noobslab.