Snipaste efficient screenshot tool with extras
Snipaste is a free portable screenshot taking tool for Microsoft Windows devices -- Linux and Mac versions coming -- that is easy to use and ships with extra functionality that you may find useful.
There are numerous free and paid screenshot programs out there for Windows, and it is usually difficult to convince users to try a new program once they have set their mind on using a particular program.
On the free side, there are excellent programs such as Greenshot or ShareX, options to take shots right from Firefox's Developer Toolbar, or paid programs like SnagIt.
Snipaste
Snipaste falls into the free screenshot taking tools group. Windows users can download a 32-bit or 64-bit version of the program for their devices -- there is a version for XP as well -- and run it right after extraction from that location.
Like most screenshot taking tools, it sits quietly in the background waiting for input. You may control the program directly through the system tray icon or by using keyboard shortcuts.
Snipaste does not use the usual keyboard shortcuts -- using the Print-key on the keyboard -- to power its screenshot taking functionality. Instead, it mapped the functionality on the F1 key.
A tap on F1, or a click on the program's icon opens selection mode. Move the mouse around and Snipaste will select windows or areas on the screen automatically as a suggestion. This is not a new concept as many programs in the vertical support this, but it is welcome as it makes things easier more often than not.
You can still draw a custom sized rectangle around an area on the screen though so that is covered by the program as well. The program displays a magnifier by default which magnifies what is underneath the mouse cursor so that it is easier to fine tune the borders of the screenshot.
There is also a color picker tool included which shows the color underneath the mouse cursor and lets you copy it to the clipboard with a tap on the "c" key on the keyboard.
Once you make a selection editing tools are displayed directly on the screen. You can move the screenshot, or use one of the available tools instead. Tools include what most users require such as an option to draw an arrow, add text, erase or blur, highlight, or draw rectangles around certain parts of the screenshot. A tap on the save icon opens the file browser that you use to save it.
The display of the editing options on the desktop make the operation a bit quicker than with the majority of comparable tools. SnagIt for instance loads the image in an editor where it can be edited afterwards.
While that is handy already, it is only part of the application's capabilities. Since it is called Snipaste, you'd probably assumed already that it supports pasting functionality as well.
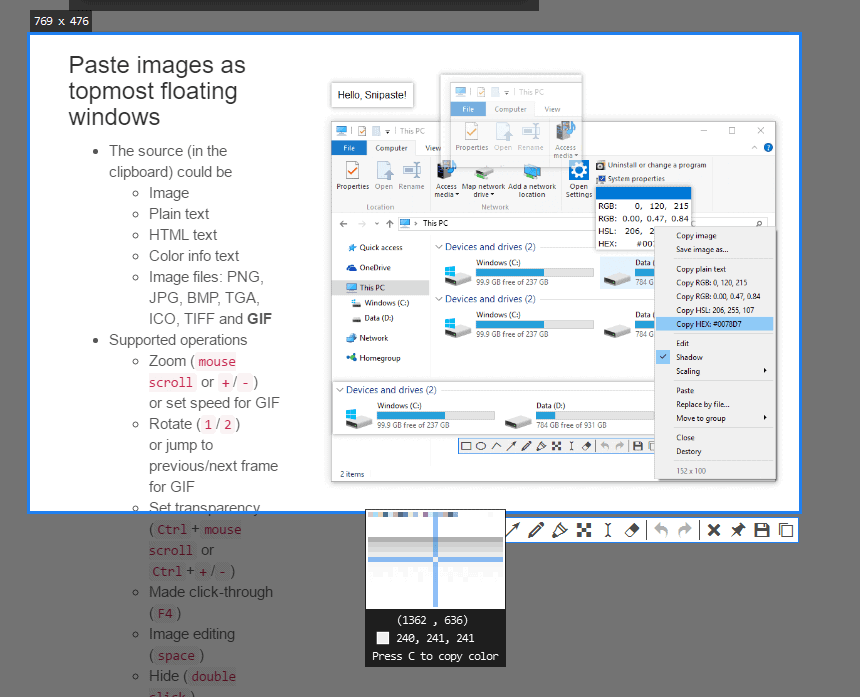
Pasting works a little bit different than the default Windows operation. Instead of pasting the contents of the clipboard on the active window, Snipaste displays a previously copied image on the screen. Think of it as a preview of the image on the screen that you can interact with. It supports multiple sources including images, plain text, HTML and various others.
You may zoom in and out, rotate, set transparency or use other controls to interact with that image. A right-click displays options to save the image, or to destroy it again.
There is also a grouping feature available that enables you to display multiple items at the same time on the screen.
Snipaste preferences
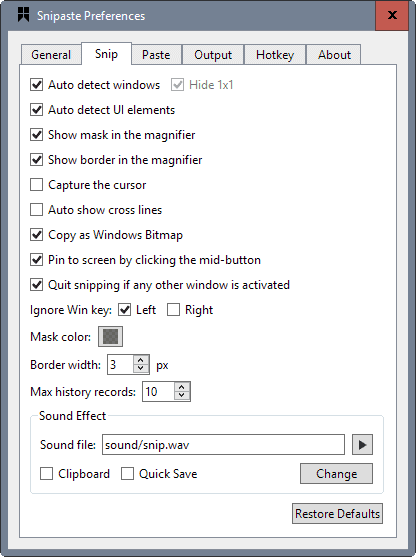
The program's preferences are quite extensive. You may use them to change snipping and pasting behavior, and to configure appearance functionality.
There is a lot to configure there, with hotkeys probably being one of the interesting options. First, the tab displays all available hotkeys so that you know what is supported and what is not. While you can only change some, the global hotkeys such as snipping and pasting functionality, there is whole bunch of internal hotkeys that you cannot change but make use of.
Closing Words
Snipaste is an efficient portable screenshot taking tool for Microsoft Windows devices that offers excellent functionality. The program supports multi-monitor setups and HiDPI displays on top of what has been mentioned already.
The application uses roughly the same amount of memory that SnagIt uses on the system.







I have been using this software for long time and it’s a very impressive software.
So how do I download it?
There is a link to the product homepage in the summary box below the article.
I installed the free for home use PicPick from http://ngwin.com/picpick . All I really want to do with it is capture a complete Windows 10 x64 Home AU scrollable screen that Windows itself creates. A PicPick option is to throw its output to the clipboard with a beep when done, where I then edit it in IrfanView. I’ve tried lots of free and fee programs to do this, and PicPick best meets my requirement. It’s too bad Windows 10 AU Snipping Tool does not have this capability.
Oh man, if you’ve never understood the “why” for these programs, this is the one to answer the question in full color fidelity. Awesome, Martin. Total cool factor of 10. Thanks!
Unfortunately, one of the most desired features in new functionality , IMHO, is the desire/ability to append snap shots together as one snaps to form one image at completion – lime a mural for instance
I still use Jshot for that purpose although it is an “old” program.
ScreenShot has been “promising ” this feature it seems for a year but nothing has happened as far as I know
You can do that easily with the program Hypersnap, Which I have used for many years. Unfortunately, the program is now fairly expensive at $39.95. See:
http://www.hyperionics.com/hsdx/
I think you can also do it with the free Screenshot Captor. See:
https://www.donationcoder.com/Software/Mouser/screenshotcaptor/
Personally I never understood why programs like this are supposed to make things easier. It’s like they try to solve some problem that doesn’t exist in the first place. At best, they save you a mouse click.
In my own situation, I’ve always been happy with just the standard Windows PrintScreen and Alt-PrintScreen keyboard shortcuts. By pasting the resulting screenshot in your regular image editor, you always get much better editing and saving options than with one of these utilities.
Exactly! +1 Henk. And, who knows what other “features” are being included in that free software. A free lunch maybe? A smart person has the absolute minimum of 3rd-party programs. Hell, msoft is doing enough snooping as it is without asking more companies to steal your personal stuff. Slick, single product websites cost money to setup and run, who pays?
Run Gimp, “Paste as new image,” then add text, stitch pics and whatever else you need Gimp to do.
hah the only reason i’ve had onenote installed is because of WIN+S.
Used to use Gadwin printscreen, now moved to Greenshot (open source – Windows only) and find it meets my needs.
Max,
Thank you so much for letting me know about Greenshot. I installed it and it meets all my needs also.
I previously used two programs: Hoversnap to capture the whole screen with the Print Screen key and MWSnap to capture areas of the screen. Greenshot replaced both these programs.
Again, thank you.
I wish I could add a comment to a screenshot in Android!
Will give it a try. I have been using the Free version of Gadwin printscreen just hit the printscreen button.