Restore Accidentally Deleted Files with Restoration
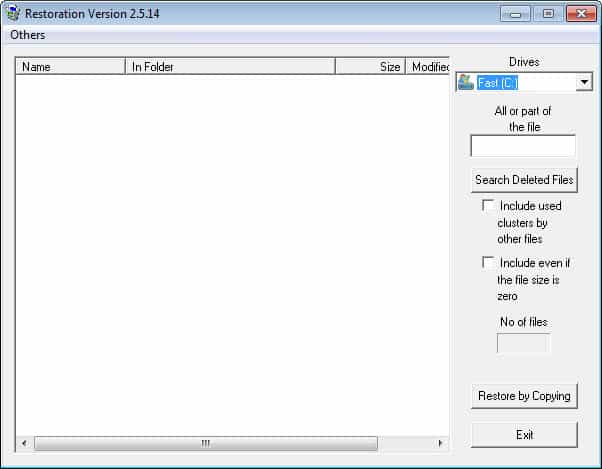
I'm sometimes deleting files holding down the shift-key without thinking much about it. It happens that I delete a file that I did not want to be deleted at that moment because it is still needed on my system.
A very easy way to restore files that have been accidentally deleted is Restoration which is a nice little freeware application that scans your hard disk and lists all files than can be either partially or fully restored.
Running Restoration might give you a shock at first use, more than 11000 files were listed on my C: drive that could be restored. That's a lot of data that is still on the drive: I advise you to use a file shredder like Eraser for sensitive files and folders to permanently remove files that have been deleted so that they cannot be restored using file recovery software.
Taking a look at all the 11000 files searching for the files that I would like to restore would take a lot of time, Restoration therefore offers some methods to narrow down the results.
You can sort the results by name, original folder, size and date modified which helps a lot if you know the name of the file or the folder it was in. Restoration also offers the option to enter a partial file name or extension and display only those. This is actually the best option to reduce the amount of files that are displayed. If you are searching for a text document you could make Restoration display all .txt files.
Restoration does not install itself on your system, just unpack the program to any location on your system and run it from there afterwards.
Note: The original website the program was offered on is no longer available. The download portal that is offering it embeds it into its own downloader that contains adware. Make sure you uncheck and decline any offers here if you do not want to install them on your system.
First thing that you need to do after you run the portable program is to select a drive that you want to scan. If you want, you can enter a filter directly, for instance to filter by file extension or a file name that you want restored. Depending on the user account and operating system used, it may be necessary to run the program with elevated privileges.
Restoration Tips
- You may need to run the program with elevated privileges for some of its functionality. To do so right-click the program and select Run as administrator from the context menu.
- Note that the program will process the files again if you enter a search term into the field. So, make sure you enter it before you do the initial search.
- Files are restored by copying them to another location. I highly suggest you copy them to another drive on the computer to avoid conflicts (restore a file may overwrite other files that you may want to restore as well).








it is realy helpful
Great suggestions ;-). I delete stuff accidentally all the time.