Remove Unnecessary Entries From The New File Menu

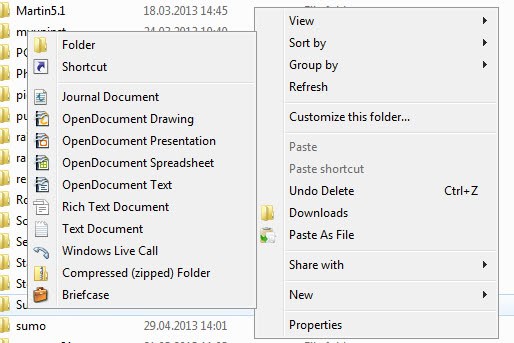
You see lots of file types that you can create when you right click in Windows Explorer and select new from the context menu. I do not really need most of them or use them, except for the New Folder option perhaps and the creation of a new text document every now and then.
It is likely that many Windows XP users feel the same way about the menu, that it contains too many items that one never uses.
How many of you are making use of the briefcase option for instance? I do not know a single Windows user who makes use of that feature in Windows.
You may want to remove some of the entries from the menu as it does not really make any sense to keep them listed in the menu if you never make use of them.
Doing so is in fact really simply.
You need to know the file extension that the entry creates when you select it in the new menu, but that is about it. To find that out, simply create a new file by selecting it so that you see that file's extension in Windows Explorer.
Lets take Microsoft PowerPoint as an example and remove it from the new menu.
- Open the run box with Windows-R, type in regedit and hit the enter key. This loads the Windows Registry Editor.
- You may get an UAC prompt depending on the version of Windows you are running and the security policies on the system.
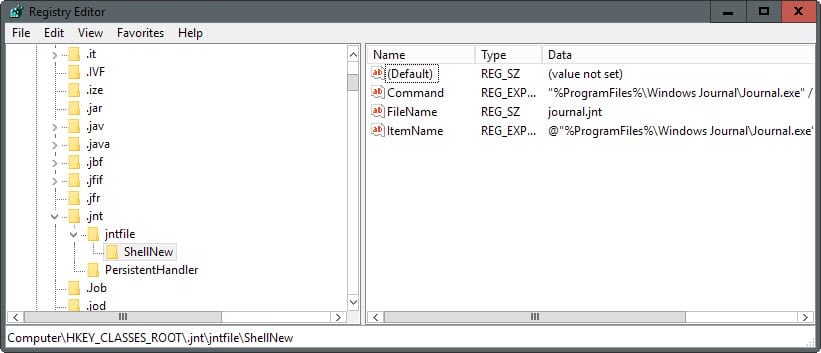
- Search for the .ppt file extension which is used by Microsoft PowerPoint (or .pptx if a newer version of Office is being used).
- To search, press Ctrl-F and enter the search term.
- Alternatively, open HKEY_CLASSES_ROOT directly and browse for the file extension instead.
- Expand the menu on the right afterwards.
- Locate the ShellNew key here in the submenu.
- Deleting the key removes the entry from Windows' new menu.
Tip: I suggest you backup the key before you delete it so that you can restore it at a later time if the need arises. To do so right-click the key and select Export from the menu. Follow the instructions to save the key to the system. To restore it at a later time, select File > Import and open the exported data file using the file browser.
Repeat the above steps (backup the key, locate ShellNew, delete ShellNew) for all extensions that you do not use. Briefcase is a special case. It has no extension, locate Briefcase in the registry, it should be below all your extensions in the same in HKEY_CLASSES_ROOT structure. Backup and delete the whole Briefcase entry to remove it from the file menu.
Adding files to the New menu:
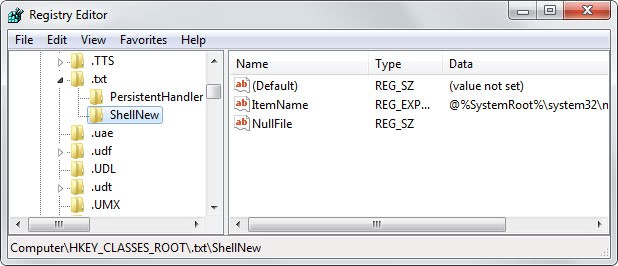
Adding files to the new menu is really easy as well. You need to know the extension of the file that you want to add, let us use .htm as an example.
- Navigate to the .htm key and create a new key called ShellNew.
- Create a new String (REG_SZ)in the right area of ShellNew and name it Nullfile.
- This means that a file with zero bytes will be created whenever you choose to create a new .htm file from the context menu.


yep, using powertoys tweak UI is easier…i tried it works fine
Much easier than the reg editing: download and use the free Tweak UI from Powertoys for Windows XP (http://tinyurl.com/h8zs). Then you can turnon/off all added entries or delete them entirely, by means of checkboxes and an Apply button. Plus, with Tweak UI many other things you might do by reg edits are easily accomplished. On the topic of Adding, you can do this without registry hacking too, although it won’t be as apparent as the modifications via Tweak UI: Go through this menu sequence { Tools > Folder Options > File Types > Advanced } and then add a new action. You can do many customizations this way.