How to Create a Hotkey or Shortcut to Eject a USB Drive
Windows has a powerful dialog built in to safely eject a USB Drive. This is most likely sufficient for most users, but if you want to gain more complete control, it is possible to create a hotkey or shortcut for immediate USB drive ejection. There is a handy freeware utility called USB Disk Ejector that will help do the trick. This utility will only work with USB drives, not DVD drives. It is ideal for a quick click and pull to dismount the drive. Some users may need to switch USB drives frequently and this utility makes this process a little less time consuming. This is a simple operation yet it is invaluable to those who like to keep a fast pace. This article will demonstrate how to effectively use the utility.
Here is the link to download USB Disk Ejector: http://quick.mixnmojo.com/usb-disk-ejector
To stay on the safe side, always perform a security scan on internet downloads before opening them.
This is a .zip file, so you will open the application from your .zip software. It is not necessary to open the HTML document unless you simply want to do so. Double click the application.
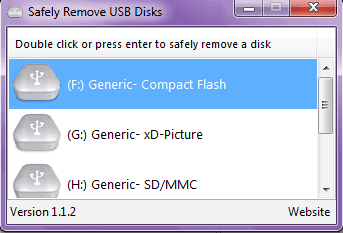
After opening the application, it should look like this:

For this demonstration, we will focus on removing a compact Flash drive. As you scroll down the list of options, you will see that you can also work with xD, SD/MMC, MS/MS, Pro/HG, and Micro SD drives as well. You can use the utility without creating a hotkey or shortcut by highlighting the drive and pressing enter or double-clicking it.
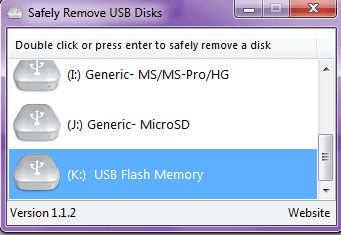
In this example, the user wants to eject a USB Flash Memory stick from drive (K:). Highlight the drive then press enter and it is done.
To operate this from the keyboard, you can use the utility from a command line. This will allow you to pass parameters and identify which drive to eject.
Begin by passing in the /? Parameter. This will show the help dialog:
- /? Displays this message
- /SILENT Stops balloon messages from appearing when the program is run in GUI mode
- /SHOWEJECT Shows the standard now safe to remove message when a drive is ejected. This message is disabled by default
- /REMOVETHIS Ejects the drive that the program is running from. Eg if the program is run from a usb stick on drive G, then drive G would be ejected
- /REMOVELETTER Ejects the specified drive letter
- /REMOVENAME Ejects the drive with the specified name. Partial name matching is possible if a wildcard (*) is used. Eg /REMOVENAME *SANDISK would eject a drive that had sandisk in its name
These are the command line options. Test them out. The Drive in this example is Drive (K:), so the syntax used in the command line is as follows:
usb_disk_eject /removeletter K
The command line used depends on the name of the disk sometimes, so you may need to include variations of the disk name in the command line or you will receive error messages.
Creating a Shortcut
Right-click on the desktop and then select New > Shortcut. In this location box, enter the full pathway for the USB Disk Eject application file.
Click Next and assign a name to the shortcut and this will create an icon that can be kept on the desktop for easy ejection of a given drive. You can do this with any USB drive.
To create a Hotkey to the Shortcut: Right-click on the icon and open Properties. You can do this with any Shortcut, by the way. It all works the same.
Click Apply and it is done. Here, F12 is used as the hotkey, but you may choose any key or combination of keys. In Windows Vista, you can add the shortcut to the quick launch bar and use the built-in hotkey option.
Advertisement










Interesting program that could be useful, but XP and above you don’t need to eject USB objects before unplugging them. By default they can be safely removed. Back in the day Windows used to cache write operations to USB devices so that’s why you had to safely remove it to ensure everything was written, but they stopped that back in XP.
Your right Melanie this is a great program I still use it on main Xp o.s. systems.
On main 7 o.s. i prefer the o.s. installed possibility.