Easily Download / Upload files to remote server in within Cinnamon

Previously I wrote a very simple beginners article on how to host your own nginx webserver and host a webpage. But, not everyone is familiar with ways to get the files you want onto your server (assuming it's not hosted on your everyday machine) so that you can use those images, files, etc.
There are a multitude of ways ranging from using the command line to transfers files over SCP (secure copy of files via ssh), using an FTP client like FileZilla if your server has an FTP server running, etc.
However, my favourite way is simply to integrate my server into my locations within Nemo, on the Cinnamon Desktop. This can also be done in similar ways on other Environments, but this article will stick solely to Cinnamon, as it's a very popular environment.
The first thing we need to do, is ensure that our server has openssh installed, which will allow us to remotely connect to the server. If you're renting a VPS from a hosting company, this is done already, but if you set up your server on a local machine at home, this may not be done.
For users running Debian / Ubuntu / Linux Mint:
sudo apt install openssh-server
This will allow you to connect to your server in a variety of forms, just to show you one, let's pop open a terminal and connect to our server. Once your terminal is open, enter the following command, replacing XYZ with your domain name or server IP:
ssh XYZ
You will then be prompted for a username, you can use the username of the account you want or (unless root is disabled) you can use root. After this, it will ask you for a password, enter it accordingly. Once that is done, you should be granted access to a commandline interface of the server, and are able to do as you please within.
If you were able to successfully gain access, our next step is to open our file manager, Nemo, and add our server to it.
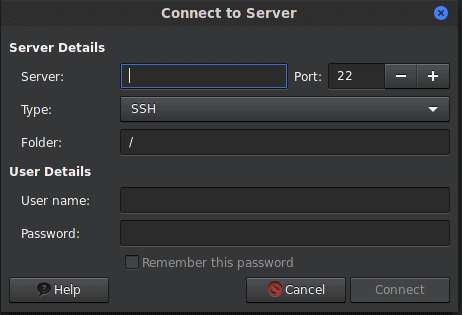
One you have Nemo open, click FILE> Connest to server...

From here, you'll want to enter the information accordingly like we did when we connect via the command line. I DO NOT personally recommend that you connect to the root account of your server, as that means if your local machine ever fell into the wrong hands, the person who has it would also have total root access to your server. Under the "Type" we want to keep it on SSH for this tutorial, and use the default port of 22 unless you changed it; which was not covered in this tutorial so it is unlikely that you have done so!
Once you have entered the correct information, and decided if you want to save this information for future use, click 'Connect' and as long as the information was input correctly, you will now have access to your server within Nemo.
Now you can simply drag and drop files back and forth all you want, and will now find your server listed under 'Network' in the list of locations on the left side pane of Nemo!


