How to Automate Disk Cleanup using CCleaner
The Windows operating system should have several different maintenance tasks performed on a regular basis. It is easy to forget to do these things and many users don’t do them at all. This article takes a look at how you can automate one of the most important tasks, cleaning the hard drive. Rather than use the Windows Disk Cleanup utility, we will look at using a free third party utility. This will work in XP, Vista and Windows 7.
You can automate the built-in Disk Cleanup utility in Windows if desired. However, in my experience, a more thorough disk cleanup can be achieved with a free utility called CCleaner. This free software is a well known “geek†standard. It allows you to customize the disk cleanup with a little more finesse than the standard Windows Disk Cleanup utility. The download link follows. Use the Slim-Build version to avoid toolbar add-ons.
You should still perform a security scan on the download before opening it, as you should with anything downloaded from the internet. Run the installation after the security scan shows that the download is clean. The program will open automatically and a shortcut icon will appear on the desktop.
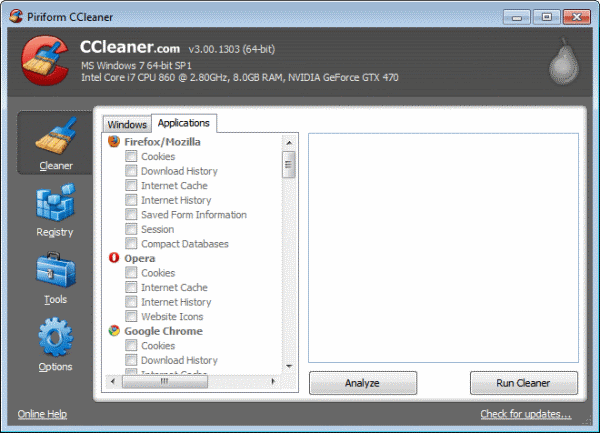
This is the control panel for CCleaner. Determine the setting that you want to run automatically. In this example, everything is selected. You would only do that for a complete clean. If you use some cookies and want to save recent documents and recently typed URLs, you will want to leave those boxes unchecked.
All checked boxes will indicate items to be cleaned out, so customize to your needs. For example, here cookies, recently typed URLs and recent documents have been unchecked. You can always run a manual cleanup if you wish to clear these at a later time.
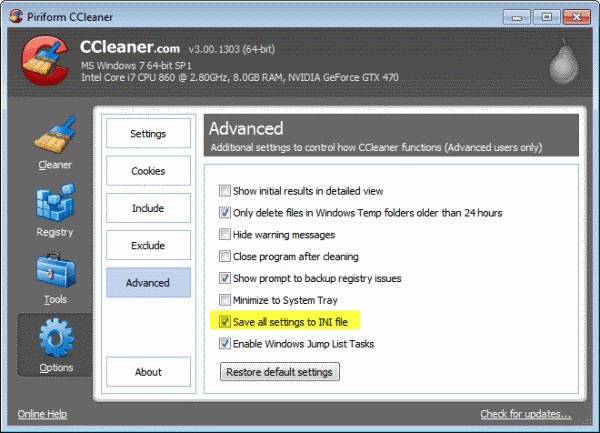
Now click on Options \ Advanced and ensure that all settings will be saved to an INI file in the same directory. “Save all settings to INI file†should already be checked by default. If it is not checked, do so.
Type “Task Scheduler†or “Schedule†in the Start menu search box and select Task Scheduler from the menu and press Enter. Click “Create Basic Task†in the right-hand column.
You will need to give the task a name. In this example, the name “CClean†was used, as it is easy to recall. Provide a description of the task as shown. Click Next and this will open a window that allows you to select the schedule. Select how often you want the task to run. Daily is best, but other options are available. Click next after selection.
Next you will need to choose the time of day to run the cleanup. Choose a time of day that your computer is on but you are not using it. Click Next and choose “Start a programâ€. Click Next. Browse to the CC Cleaner .exe file. Add the /AUTO switch to the “Add arguments†box.
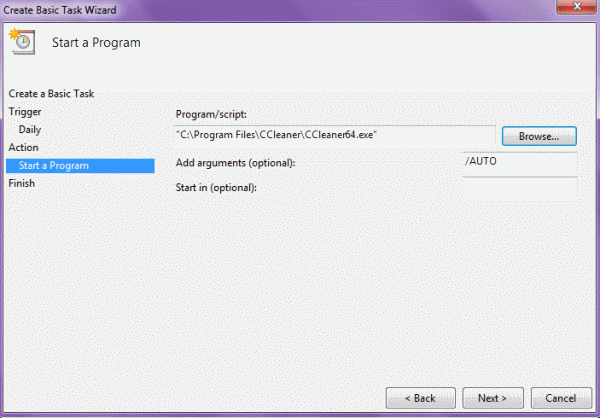
Click next once you have added the correct pathway. Check the box next to “Open the Properties dialog for this task when I click Finish†before clicking finish:
Choose the option to “Run with highest privilegesâ€. This will ensure that the task will run with administrator privileges. Click the conditions tab to select different options for when the task will run. You can customize to start the task only when the computer is idle for a selected period of time and also choose to wake the computer from sleep mode to run the task. Other options are available. Click OK when you have made all the selections and everything is set.
Advertisement







If you want to increase its abilities add CCEnhancer:
http://thewebatom.net/software/ccenhancer/
Hello Melanie,
CCleaner also works on Windows 2000.
http://www.piriform.com/ccleaner/faq/installing/what-operating-systems-does-ccleaner-support
Just a heads up make sure to untick Steam if you use it, if you don’t it will muck up your steam install.