Add SASL to your Postfix server

Some time ago I did a series on the Postfix email server here on Ghacks (see the Postfix content on Ghacks for more information). Hopefully you found this outstanding mail server as easy to set up and maintain as I do. But you might have noticed a bit of a challenge using your smtp server outside of your network. Why is that? It is because, by default, Postfix will not authentic untrusted hosts - and any network outside of yours is an untrusted network. This is done by design - to keep others from using your SMTP server as a relay for SPAM. So how in the world do you set that Postfix server up so it can be connected to from the outside world? You will probably have users who need to do this.
When you have users that need access to your SMTP server from outside of your LAN you have to enable SASL (Simple Authentication and Security Layer). In this article I am going to show you how to do just that.
Assumptions
Naturally this article will assume you already have a working Postfix server that is both sending and receiving email. This article will describe the process as related to a CentOS 5 server (which makes an outstanding mail server for any size company). I will also assume you have root access to this server (as everything done in this article will need administrative privileges).
First step
The first thing you need to do is add a few lines to your /etc/postfix/main.cf file. What is needed is the following (add it to the end of the file):
smtpd_sasl_auth_enable = yes

broken_sasl_auth_clients = yes

smtpd_sasl_type = dovecot

smtpd_sasl_path = private/auth

smtpd_sasl_security_options = noanonymous
The next step is to add permit_sasl_authenticated to the smtpd_recipient_restrictions section of the same file. If you do not have an smtpd_recipient_restrictions section, just create the section like this:
smtpd_recipient_restrictions =

permit_mynetworks,

permit_sasl_authenticated,

reject_unauth_destination
Second step
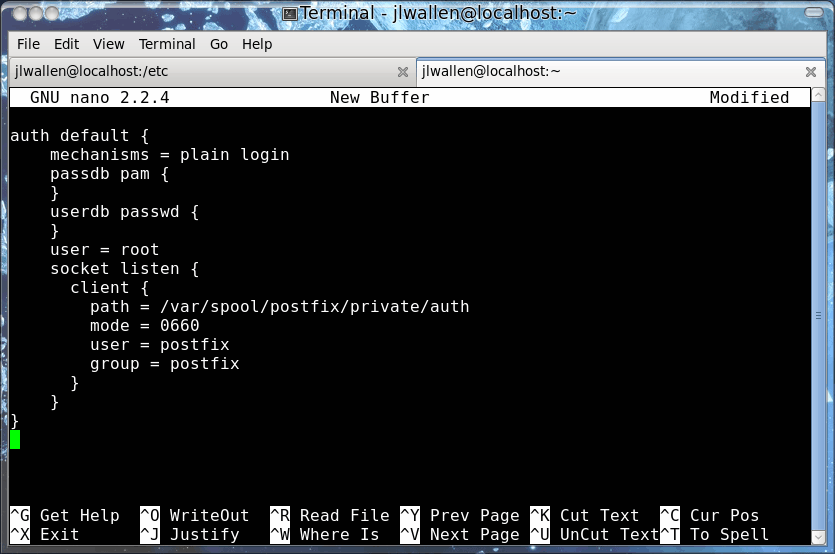
The next step is to configure auth default in the authentication processes section (around line 778)Â of /etc/dovecot.conf. This one is really tricky - only because this section of the dovecot.conf file is heavily commented and already contains some of the lines you will see Figure 1 and below. The code in figure 1 gives an easier representation of what needs to be added to the dovecot.conf file. The copy/paste-able text is below:
auth default {

mechanisms = plain login

passdb pam {

}

userdb passwd {

}

user = root

socket listen {

client {

path = /var/spool/postfix/private/auth

mode = 0660

user = postfix

group = postfix

}

}

}
Now it's time to restart Postfix with the commands:
service dovecot restart

postfix reload
Testing
It's time to see if your setup works. To do this you will need to telnet to your mail server on port 25 like so:
telnet ADDRESS_OF_SERVER 25
Where ADDRESS_OF_SERVER is the actual address of your mail server. Now you need to generate a Base64 username/passcode to do so. This is possible with the help of Perl like so:
perl -MMIME::Base64 -e 'print encode_base64("00USERNAME00PASSWORD");'
You can insert an actual username/password combination that exists on your server if you like in the command aboe (where you see USERNAME and PASSWORD).
This will print out a string of characters for you to use in the testing. The testing will look like this:
telnet ADDRESS_OF_SERVER 25

Trying 127.0.0.1...

Connected to localhost.localdomain (127.0.0.1).

Escape character is '^]'.

220 mail.example.com ESMTP Postfix

EHLO example.com

250-mail.example.com

250-PIPELINING

250-SIZE 20480000

250-VRFY

250-ETRN

250-AUTH PLAIN LOGIN

250-AUTH=PLAIN LOGIN

250-ENHANCEDSTATUSCODES

250-8BITMIME

250 DSN

AUTH PLAIN STRING_OF_CHARACTERS

235 2.0.0 Authentication successful

quit

221 2.0.0 Bye

Connection closed by foreign host.
Where everything in bold is what you must enter and STRING_OF_CHARACTERS is the string generated by the earlier Perl command.
Final thoughts
If all is good you should have seen Authentication successful in your test. Congratulations, you can now access your SMTP server from outside of your LAN.
Advertisement


useful howto
http://wiki.lepr-e.com/wiki/index.php/Ubuntu_Smtp_Server
Nice post.
It gave me the opportunity to check my configuration (on virtualised Debian Lenny) and possibly fix some things.
A small concern though …
Seeing “user = root” tends to give me goosebumps, so I avoid it if possible.
My configuration works perfectly with “user = nobody”, so I wonder why root would be required here.
Our authentication is implemented through a MySQL database.
Thanks for the nice post all together.