Copy partitions on your system with Partimage

Partimage is a unique open source rescue tool in that it can be used as an installed application or as a stand alone rescue tool with SystemRescueCD. So if whether your system is working or not, Partimage might be able to save you. But what does Partimage do? Partimage saves partions (in various formats) to a disk image. These images can be saved either to the local machine (and then placed on CD or a connected drive) or to a network Partimage server. And conversely, a machine can be restored with that image from the Partimage server. This also works well to image a machine and then install that same image on multiple machines.
In this article I am going to show you how to tackle the basics with Partimage - backing up a system to a local file. In later articles I will demonstrate recovering as well as backing up and restoring across a network. Once you know how to use Partimage, you will have an excellent disaster recovery tool (as well as an imaging tool).
Installation
I want to approach this in the simplest way possible. So we'll go ahead with the installation method for Partimage. And like many Linux application installations, this one is simple. You can install Partimage with the following steps (illustrating with Ubuntu):
- Open up a terminal window.
- Issue the command sudo apt-get install partimage
- Enter your sudo password.
- Accept the dependency installation.
That's it. Once Partimage is installed you are ready. The only other thing you will need for the method I am going to show you is either enough room on your machine for the compressed image you want to make, or an externally attached drive with enough room.
Using Partimage
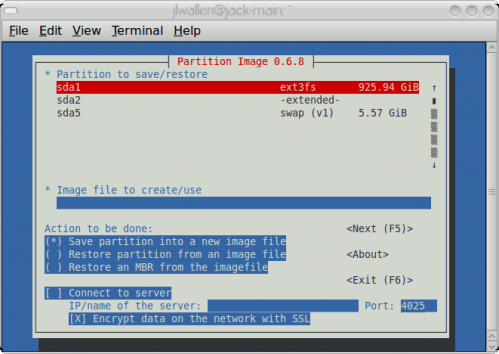
Partimage is run from the command line. The interface is an ncurses interface, so don't expect a fancy GUI interface. You will also need to run Partimage with root privileges (so either with sudo or after you su to the root user).
As you can see (in Figure 1), there is little to the interface. The options are few, but that does not make the tool any less powerful. Partimage has everything it needs.
In order to save your partition you will first need to select which partition you want to save. Move the selector up or down with your up or down arrow keys. When you've selected the partition you want hit the Tab key to move down the next section. One issue of note: The partition that you want to save can not be mounted. So if you are wanting to save the partition you work from for later rescue, you will have to do that using the SystemRescueCD.
The next section is the name for your image. You will need to enter the exact path and file name for your image here. Enter that and then Tab down to the next section.
In this next section you need to select that correct action. We are going to use the first option, Save partition into a new image file, so we won't need the connect to server option.
Once you have taken care of that hit the F5 key to continue on.
In the next window you will select the following options:
Compression level: How much compression you need to use on your image.
Options: Partition check, description, and overwrite without prompt.
Image Split Mode: How to split larger images.
Upon success: Wait, halt, reboot, quit, last.
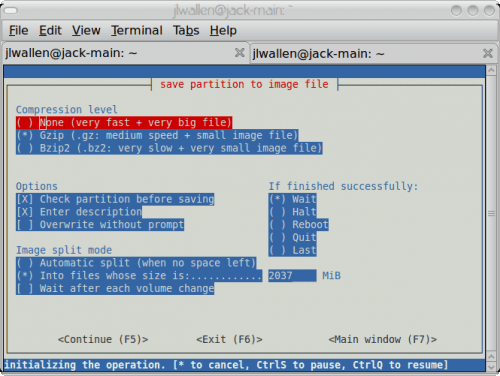
Unless absolutely necessary, I would opt for medium compression (Gzip) to prevent possible data loss. I would also make sure Check partition before saving is checked. In fact, the default settings you are offered (see Figure 2) are pretty good for most situations.
Once you have configured those options, click F5 again to move on.
The next window will ask you for a description (if you selected that option). Once you enter the description Tab down to the OK button and hit Enter.
After that, Partimage will do it's thing. Â Once finished you will have a backup image (or multiple images - depending upon the size of the image.
Final thoughts
In my next article I will show you how to save an image across a network using Partimage. Partimage is a very handy tool to use and we all know that keeping images of critical machines (or partitions) can make or break data recovery in case of disaster. We'll continue on with Partimage and cover as much of it's usage as possible.
Advertisement




The only thing wrong with partimage is it doesn’t support ext4 and doesn’t look like it will in the near future.
Nice article Jack, but you forgot to point out a huge plus (IMO) for using Partimage: it only backs up the used portions of a partition. That, in combination with the compression, makes for some decent-sized images!
I’ve used it to create an image of a Windows OS + several installed apps. The partition is 15 GB, but only 8 GB was used. With gzip compression, the created image was roughly 5 GB.