Linux Tips: Create an unfilled circle in The GIMP

I love The GIMP. I use it every day for many different things. I know The GIMP well and have little problem using any aspect of this image manipulation program. There is one task, however, that always throws me for a loop when I have to undertake it: Creating an unfilled circle. You would think it a simple task. Click a tool, drag the tool to create the circle you want, and create the circle. That works well if you are creating a filled circle. But what if the circle you want to create looks more like "O" than a large "."? Well for that you have to take a few steps to complete your "O". Oh sure you could just use the text tool and create an unfilled circle using the "O" character - but doing this requires you 1) find the right font and 2) choose the precise size.
But how is it done? It takes 6 simple steps to do (there is an optional 7th step I will show you). In this article I am going to show you those steps.
Step 1: Create an empty image
Most likely you already have an empty image ready for your work. If not click on The GIMP main window File menu and select New. You will then have to select the size of the image you want to create. Once this blank image window is open you are ready to begin.
Step 2: Select the color for your circle
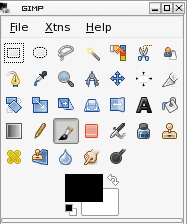
In the Toolbox window (see Figure 1) you will see the current colors for both foreground and background. You want to set your foreground color (in Figure 1 it is the black square) by clicking on said black square. When you click on this block it will open up the color palette window. From that new window select the color you want to use for your circle.
Step 3: Create a full circle
The first thing you do for this step is to select the circle tool. This is the tool second from the left in the top row (see Figure 1). Once you have selected that tool go to your new image window and left-click on the upper left corner to start your circle. By holding down the left mouse button and dragging the
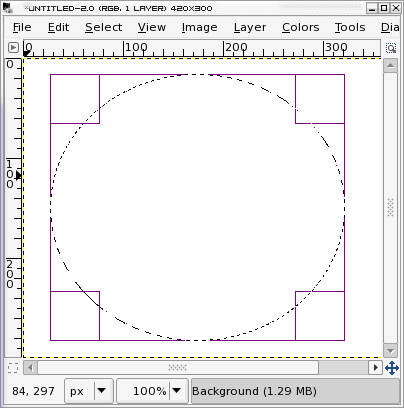
mouse to the bottom right of the window you will create a circle. (see Figure 2) You will notice, after you let go of the left mouse button, there are four squares (one in each corner). You can click one of those squares and drag it around to resize your circle. Once you have the exact size you want click inside of the circle. After you click inside the circle the dotted line will become a solid line. You are now ready to move on.
Step 4: Fill in your circle
You now how to fill in your circle with color. Click on the bucket tool (first tool on the right, third row from the top - See Figure 1) and then click inside of your circle. Your circle should now be a large, filled-in circle. Proceed to step 5.
Step 5: Shrink the image
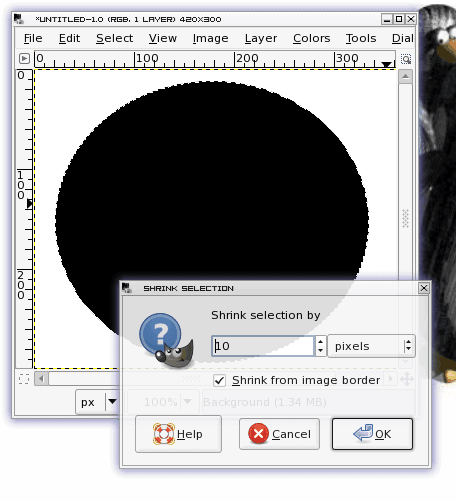
What you have to do now is shrink your circle. Right click anywhere inside of your circle and then click on the Select menu. Within the Select menu you will see the Shrink entry. Click on that entry to open up the Shrink window (see Figure 3). You want to set the amount to shrink to be the width of the line of your circle. This might take a bit of playing around before you get it right. As you can see, in Figure 3, I am shrinking my circle by 10 pixels.
Once you have this set, click OK and the shrinking will happen. Now, on to step 6.
Step 6: Cutting your image
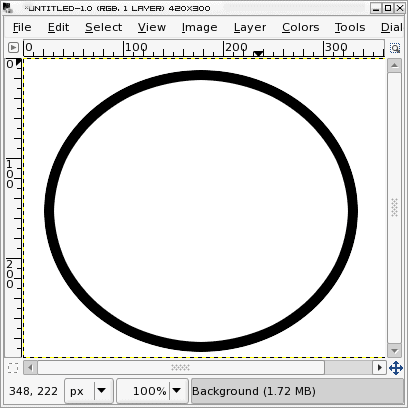
Right click inside of your circle and go to the Edit menu. You will see an entry called "Cut". Click the "Cut" entry and the center portion of your circle will disappear.
As you can see (in Figure 4) we finally have a circle. You could be finished at this point, however...
Step 7 (optional): Select only the circle
What if you want to lay your circle over another image? If you just copied the circle as-is you would select everything (including the white background). To avoid this you can use the color select tool (see Figure 1, top row 5th from the left). Click the color select tool and then click on the circle you have remaining. What happens then is that every color in your image that matches the color you clicked will be selected. Since there is only one color on your image, your entire circle will be selected. You can now copy that circle to the clipboard and paste it into another image.
Or you can just add to the circle you have created.
Final thoughts
You are probably saying "That's a lot of work just to create a circle!" It might seem like it at first, but once you get the hang of it, it's always a no brainer. By using this method you will always have unfilled circles exactly the size and thickness you want.
Advertisement


Better to use Bucket tool is using of Fill with FG Color (in Edit or CTRL + ,) – it will work also if you will have something on the background.
I think it is good idea to put also shortcuts to tutorials
PS Thnx for tutorial
why not just select a circle, choose the ToPath option from the selection menu and then stoke that path.
Although some simple tasks feel a bit awkward in GIMP and the user interface ain’t that friendly either by default, it still remains a great tool with many uses. Thanks for this tip on how to make up for GIMP’s inability to perform really simple tasks really simply. :-)
I use the “border” option in the select menu. It would also make your optional step 7 redundant as you circle would already be selected.
GIMP works on windows too ;-)
Nate: This tutorial needs to be updated to the latest version of GIMP. For example: to use the Stroke tool you have to Edit > Stroke Selection which will then paint over the selection.
The only other issue I have with this method is the resulting image is a bit more pixelated than my method. but if you are wanting quick results, and don’t care about precise, clean lines then this method works great.
Wouldn’t it be easier to do this the way the tutorials suggest?
http://www.gimp.org/tutorials/Borders_On_Selections/