How to enable Advanced Data Protection for iCloud in macOS 13 Ventura

Apple released the macOS 13.2 Ventura update last night with some important security features. We show you how to enable Advanced Data Protection for iCloud in macOS 13 Ventura.
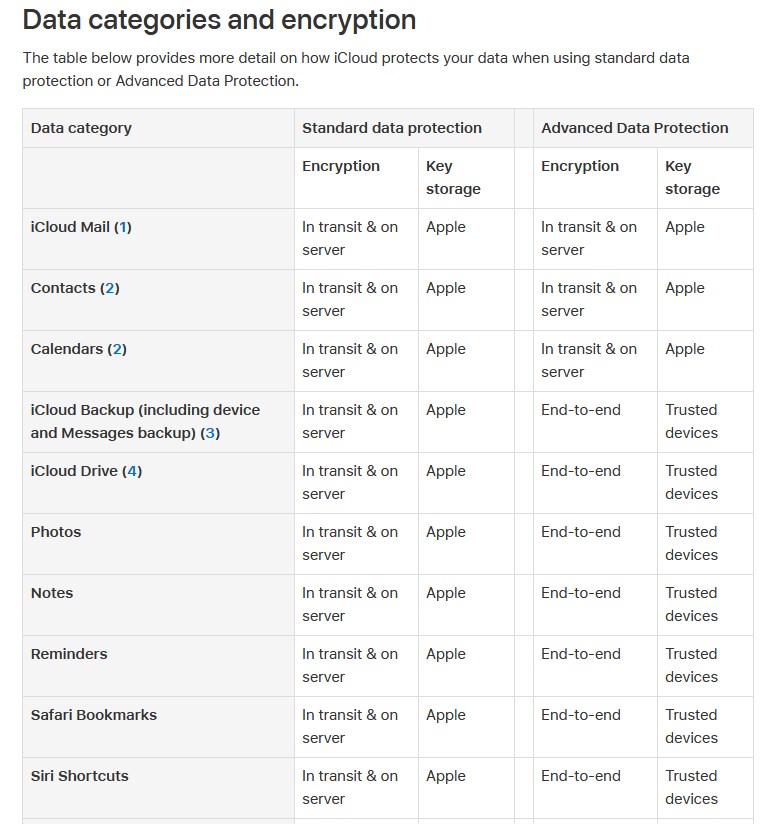
Why do you need this feature? The Standard protection, which is enabled by default, does not completely protect all of your data that is stored on Apple's servers, i.e. they are not encrypted. Advanced Data Protection, on the other hand, secures 23 data categories, which includes end-to-end encryption for iCloud Backup, Photos, Notes, Reminders, Safari, and other sensitive information.
The process to enable the protection requires a Mac with macOS 13.2 or later, with an Apple ID that has two-factor authentication enabled. Your system must have a passcode or password. Please be advised that you may have to reauthenticate (login) other devices that you have signed in to, after enabling the feature. I had to re-login to iCloud for Windows to use the app.
How to enable Advanced Data Protection for iCloud in macOS 13 Ventura
1. Open the Settings app on your Mac.
2. Click on your username in the left pane.
3. Switch to the right pane, and select iCloud.
4. Scroll down the page, till you see Advanced Data Protection. It is off by default.
5. Click on the option's name, and it should display a pop-up page that mentions the various data categories that it supports.
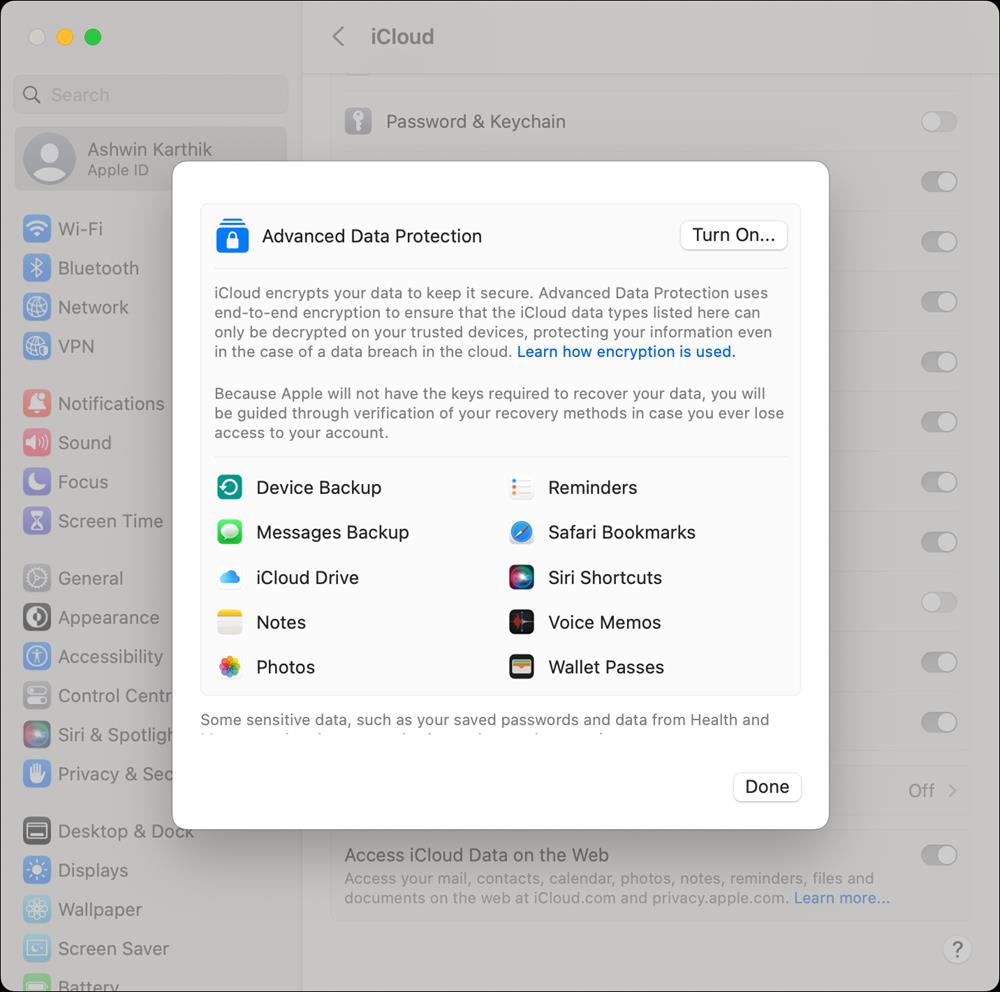
6. Hit the Turn On button, and it should prompt you to enter your account's password.
Note: This doesn't require your Mac's password (local account), instead you will need to enter the password of the Apple ID that you are signed in to on the device.
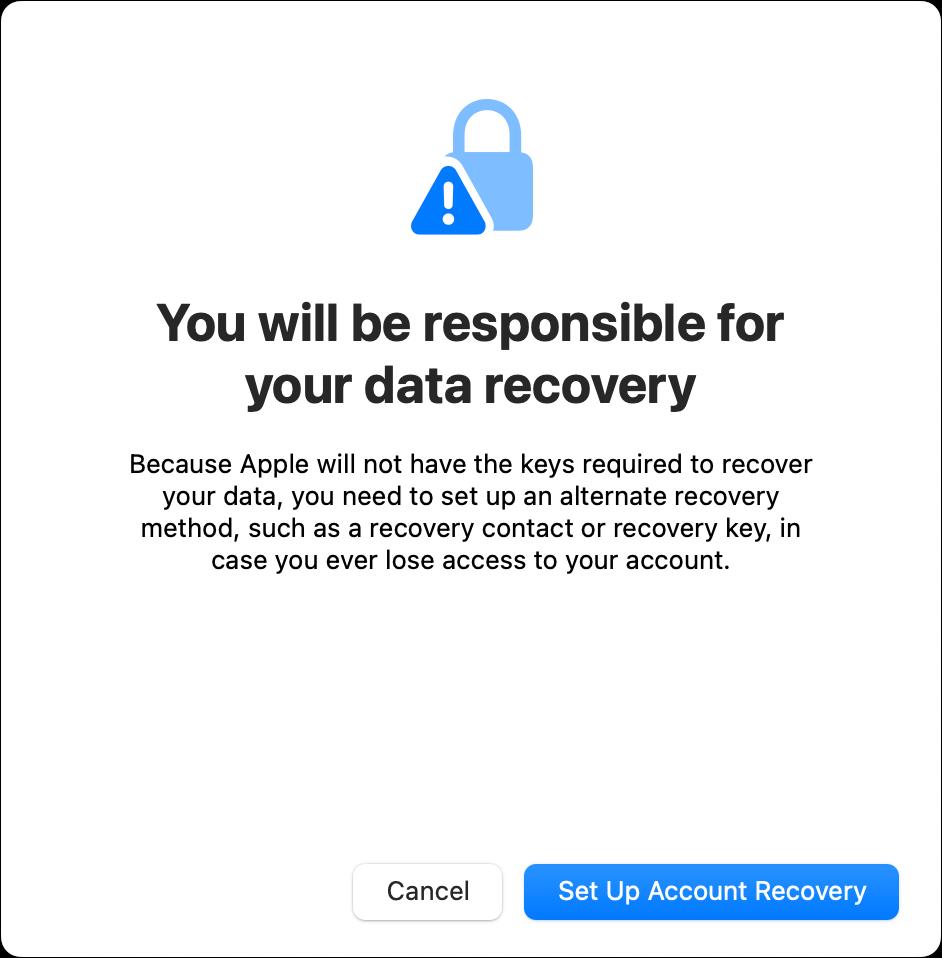
7. Accept the warning about the data recovery. It tells you that Apple does not have the keys to recover your data, and prompts you to set up an alternate recovery method, such as a recovery contact or a recovery key. This is very, very important.
8. Choose one of the two options, i.e. You can choose to add a user who can help you recover access to your system by generating a code on their Apple Device. Or, you can set up a 28-character recovery key that you can store somewhere safe. These are fail-safe methods that you can choose to fall back to, should you lose access to your account.
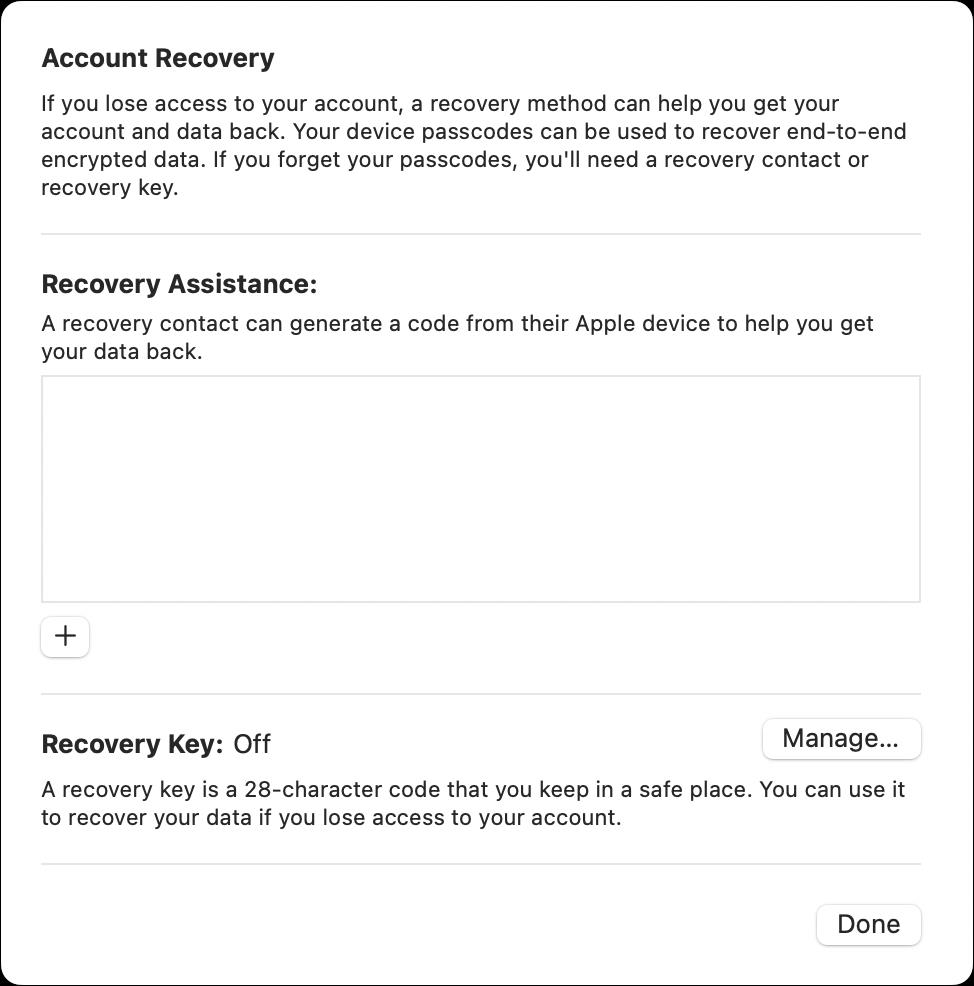
9. To use the Recovery Key option, hit the Manage button, and click on the "Turn On" found in the pop-up panel. Next, click the Use Recovery Key button. You won't be able to use a custom key phrase, the system will generate it on its own. This is a crucial step, I advise taking a screenshot, writing it down, or printing it and storing it safely.
10. Once again, macOS will prompt you to enter your password to confirm the change. On the next pop-up, you will need to enter your device's password.
Note: You may have to remove unsupported devices, or update them to the latest version of the OS to enable the feature, else you won't be able to proceed after step 10. In my case, I had to remove an old VM from the list. Settings > Username > Devices.
11. Hit Continue, and macOS will ask you to enter the 28-character alphanumeric key. Click on Done.
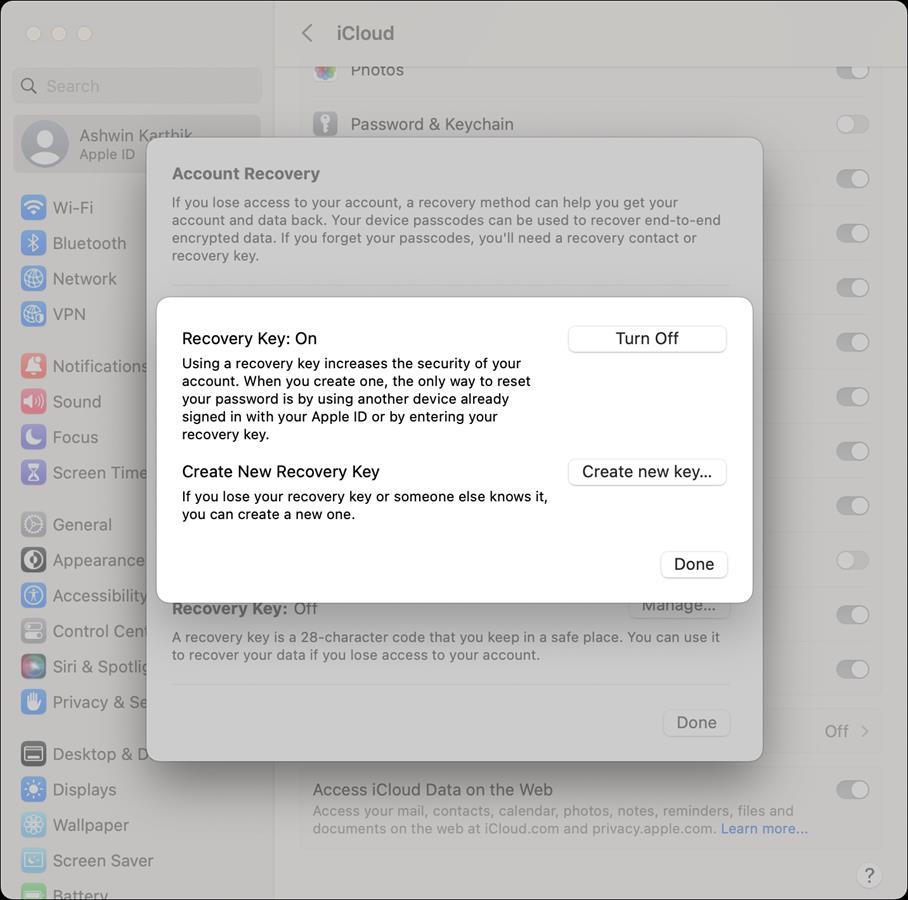
12. Go back to the Advanced Data Protection screen (in step 4), and select the Turn On option. A screen will pop up with an option to review your recovery methods. It will ask you to enter the 28-character key again, followed by your device's password. Wait for it to finish applying the settings, it takes a few minutes to complete.
Note: If your Mac is stuck on the "You will be responsible for your data recovery" screen that has a spinning wheel, you will have to use Activity Monitor to kill the process. Restart the machine, and try step 12 again. I had to do that, and it fixed the issue for me. You should see a screen like the one below.
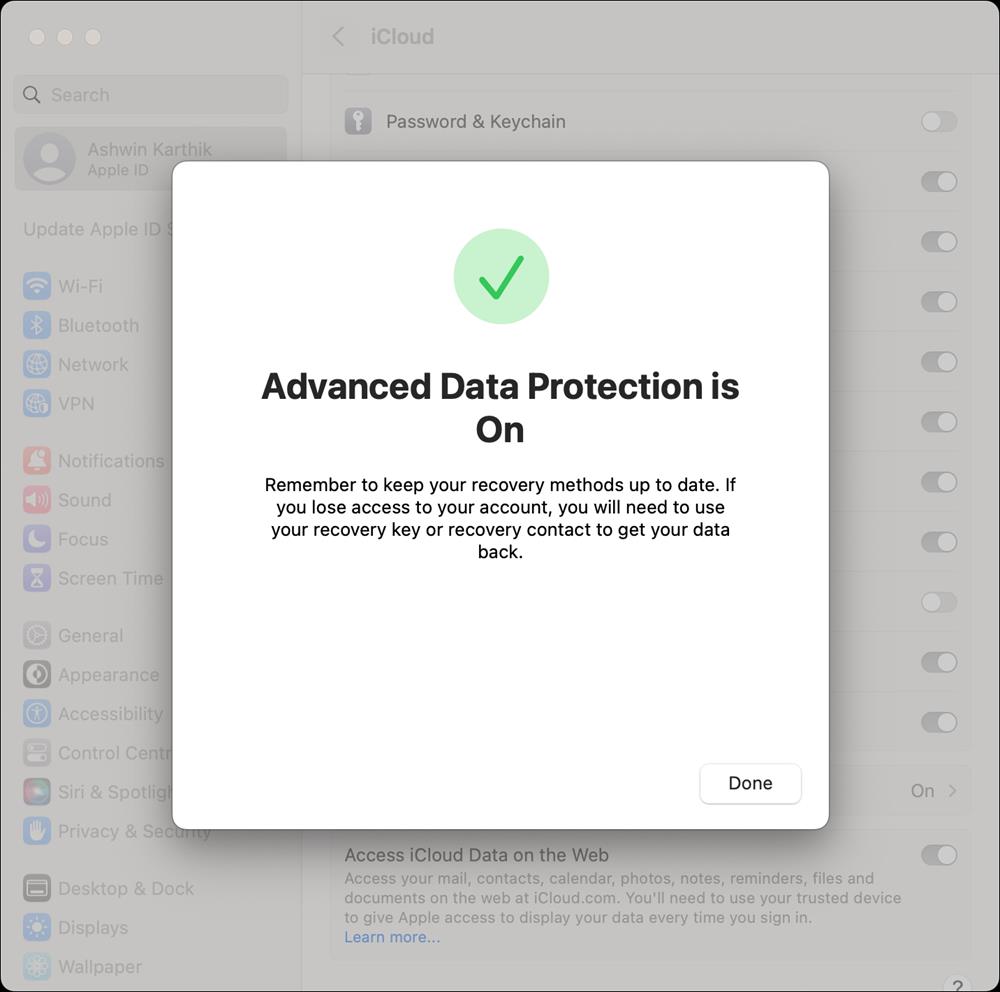
That's it. You have successfully enabled Advanced Data Protection on your Mac. You can follow the same steps to disable Advanced Data Protection, which will make the OS revert to the Standard Data Protection settings. Please refer to the official documentation to learn more about it.
Pay close attention to steps 6 and 10, they can be a little confusing as one requires the Apple account password, while the other uses your device's password.


Thanks a lot. Very important feature. It’s available on my iPhone but not on my Mac due to country rollout schedule. Do you have information about a rollout plan in Europe?
Actually, macOS 13’s Settings does require more clicks than it did before. That’s kind of why they hate the redesign. I get it, things could have been organized better, removing the icon view was kind of silly. But the UI does look better than the legacy panel, and it was time to change things.
It’s basically similar to Control Panel vs Settings, but unlike Windows, macOS’ Settings hasn’t really removed most of the old options, they just moved some of them to different areas than what people were used to. That’s why people don’t like it.
@Ashwin, my bad, I thought it was easier, in fact a friend of mine has one MacBook and she was very fast clicking and configuring options and so forth. She lent me the laptop for a couple of hours and I found it very easy to use. Easier than W11 for those times. I wonder when I can test a MacBook deeply by my own. Thanks for the explanation!
I wonder when Microsoft will release a version of Windows with the amazing easy to watch menus and settings of MacOS. Thanks @Ashwin for the article! :]
John, it’s the total opposite with Apple fanboys, they hate the new Settings app. I find that hilarious.
Thank you Ashwin.
I am not fanboy but I like the new Settings app, clear and colourful. It is easy to find some setting: cmd + space bar or Settings app cmd + f.
Enabling Advanced Data Protection is a good option but it seems difficult, I have to remember some new recovery key. I must adjust to this better.
@Ashwin, my surprise! I think that less is more, that simplicity is beautiful. Probably this is because Apple fanboys didn’t appreciate the calm of be able to see a whole panel, not like in Windows that needs hundreds of clicks to configure something. Apple fanboys need to use more Windows 7/10/11, everyday like me in my home, to really appreciate how to avoid such silly worries about MacOS.
Every new version of Windows has different screen styles, however MacOs is MacOS since the very beginning! :]