What's the fastest way to take a screenshot on Windows 10 natively?
Microsoft added so many different ways to take screenshots to the company's Windows 10 operating system that it has become difficult to find the one that fits best in your workflows.
While you can use good old Print-key to capture the entire screen to the Clipboard, and go from there, for instance by pasting it into an image editor window, other methods are much faster than that.
Note: Please note that most screenshot taking methods below apply only to Windows 10. Some will work on Windows 8.1 as well, and only one, to my best of knowledge, works on Windows 7 or earlier versions of Windows.
As a rule of thumb: screen capturing methods that save the output to a file directly are faster than methods that save the capture to the Clipboard. You can still load the saved file in an image editor for post-processing if that is required. Also, any option that requires you to run a program first is slower than one that does not require you to do that.
So, how do you take screenshots on Windows 10?
The fastest way to take screenshots on Windows 10
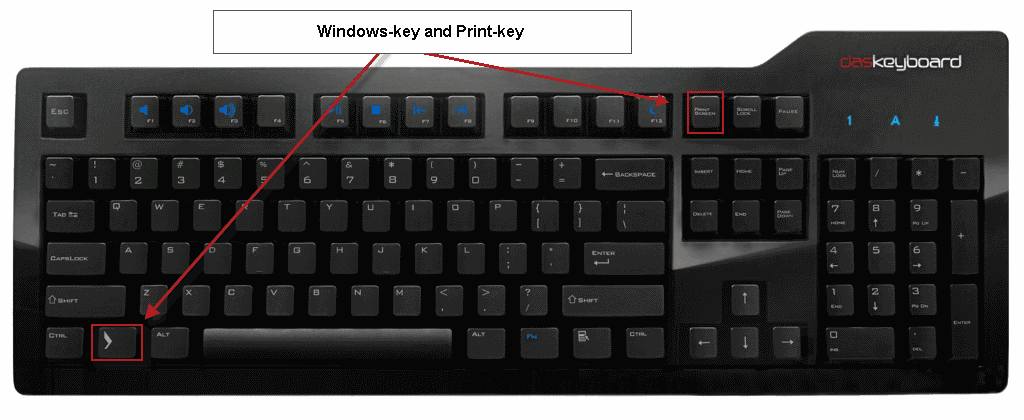
Method 1: Windows-Print

The keyboard shortcut Windows-key plus Print-key captures the whole screen, and saves the output directly as a file to the local system. Laptop users may need to use Fn+Windows+Print.
You find the screenshots under c:\users\username\Pictures\Screenshots\. The images are saved as png image types, and are named Screenshot (1).png, Screenshot (2).png and so on.
The advantage of this method is that it saves the screenshot to the system automatically. Great if you want to capture the whole screen.
Alternatives that are not as fast:
- Print-key: This saves the full screen to the Clipboard. You need to process it somehow, for instance by pasting it in an image editor or other program.
- Windows-Alt-Print: A Game Bar feature that works with all programs. Please note that Windows will mark the application as a game if you make use of it.
Method 2: Alt-Print
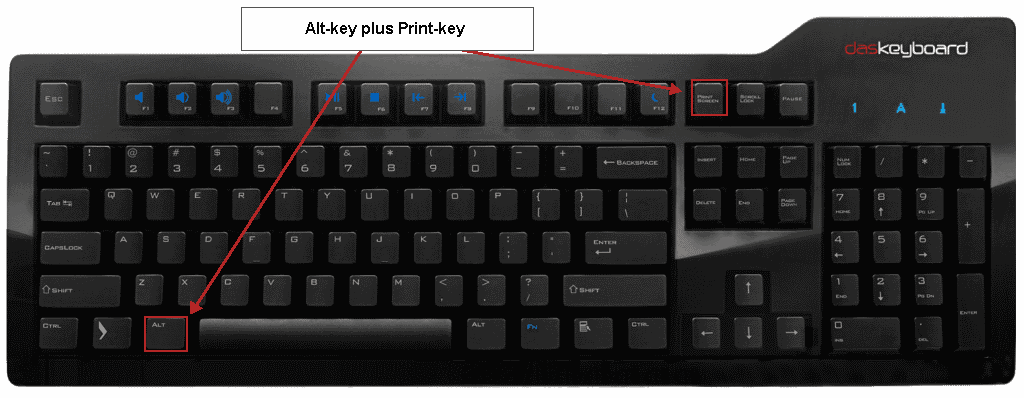
If you use the keyboard shortcut Alt-key plus Print-key, you take a screen capture of the active program window on the desktop. The capture is copied to the Windows Clipboard from where you need to process it further. Laptop users may need to use Fn+Alt+Print.
The main advantage that this method offers is that it captures only a program window, and not the entire screen. If that is what you want, it may be the faster option when compared to the Windows Print method.
While the latter saves the screenshot directly, you'd have to edit the screen capture in an image editor to grab only the desired window (unless it is displayed in full screen mode). While you do have to load the captured window using Alt-Print as well in a suitable program, you may be able to save it directly using it.
Method 3: Windows-Shift-S
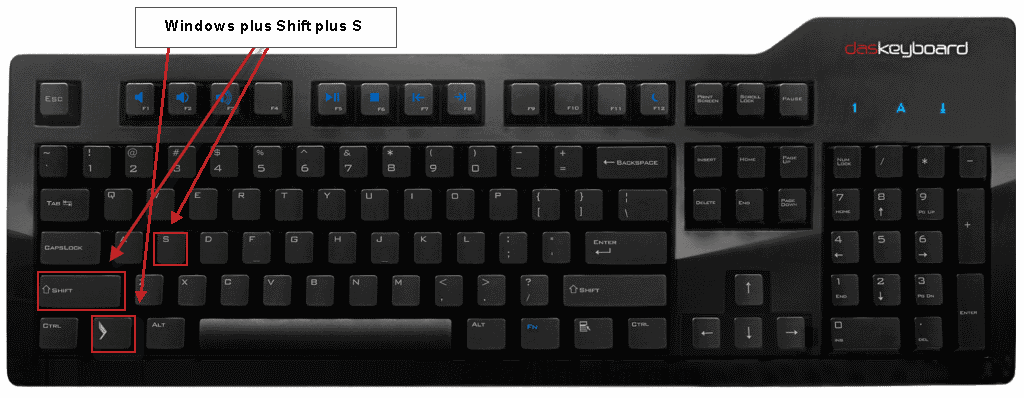
The third option, Windows-key plus Shift-key plus S-key, is a new option that Microsoft introduced in the Windows 10 Creators Update.
If you press the keyboard shortcut, the screen is turned into a drawing board that you can draw a rectangle on. This works similarly to how third-party screen capture programs such as SnagIt or Greenshot handle this type of screen capture.
The native Windows method saves the screenshot to the Clipboard. Advantage of the method is that you can capture an area other than the full screen or a window. Downside is that you need to process the screenshot, as it is copied to the Windows Clipboard.
Other built-in / Microsoft options to take screenshots

A handful of alternative options are available on Windows to capture screenshots on the system. The most prominent option is probably provided by the Snipping Tool. The program is available on all versions of Windows starting with Windows 7.
It resembles third-party screen capture tools in that it needs to be run before you can use its functionality, and that it supports different capture modes that you can switch between.
You can run the tool with a tap on the Windows-key, typing Snipping Tool, and hitting the Enter-key. You may pin the program to the Taskbar or Start on Windows for easier access. To do so, right-click on the icon after you have run it and select the pin to taskbar option.
The program supports the four capture modes full screen, window, rectangular, and free hand. You may also configure it to take the screenshot with a delay.
Screenshots are automatically copied to the Clipboard, but also loaded in the Snipping Tool interface for basic editing options.
You may use the editor to erase parts of the screenshot, highlight others, or add text to it. A save option is also provided to save it to the local system.
PowerShell
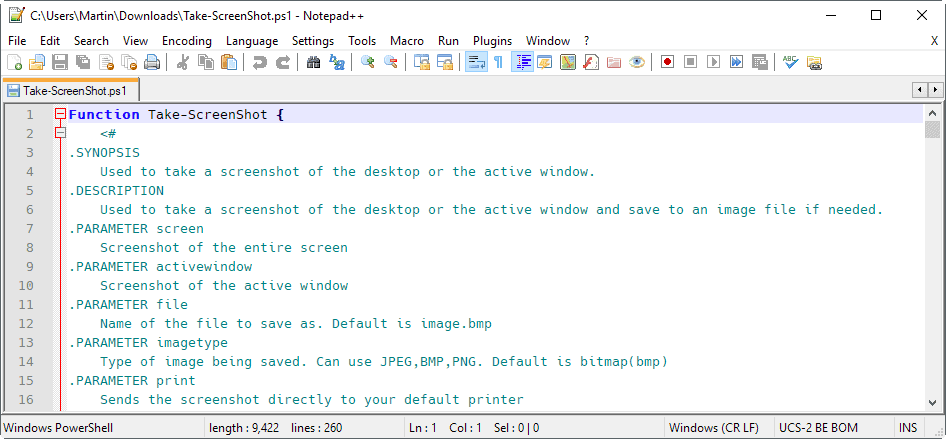
Microsoft created a PowerShell script to capture the entire desktop or an active window when run. It is not built-into Windows, but can be downloaded from the Technet script center website.
The script needs to be run with parameters; all parameters are explained in the script itself. It is definitely more of a specialized solution than something that is really practicable for fast use.
If you use a tablet, hybrid, or mobile device that runs Windows, you may also use the Windows button plus Volume Down combination to take a screenshot.
Windows Ink Workspace may provide another option. It is not as easy to reach as the direct shortcuts, but may be worth a try if you use a digital pen on the device.
Select screen sketch to get started, and use the editing tools that are provided then to edit the screen capture. Once done, hit the save as button to save the image to the local system.
Tips
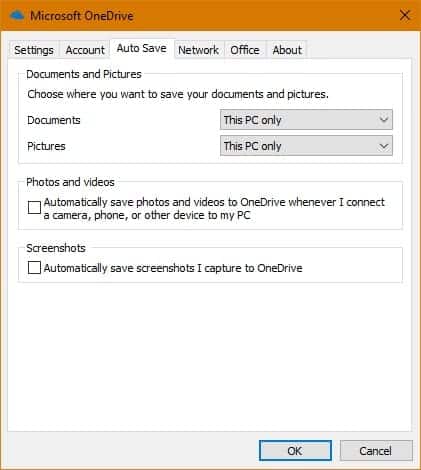
Some file syncing programs, OneDrive or Dropbox, may tap right into the screen capture functionality of the Windows operating system.
You can configure the automatic saving of screenshots to OneDrive, which ships with newer versions of Windows, in the following way:
- Right-click on the OneDrive icon in the Windows system tray, and select Settings from the context menu that opens.
- Switch to the Auto Save tab when the program window opens.
- Check the Automatically save screenshots I capture to OneDrive option on the page.
- Click ok to save the change.
Screenshots that you take from that moment on -- using the Print-key, or the Alt-Print-key shortcuts for instance, are saved automatically to the Pictures\Screenshots folder of the OneDrive folder. Similar functionality is built-in to the Dropbox client for instance.
Comparison of Windows 10 screen capture options
| Method | Capture Area | Save Location | Remarks |
| Print-key | Variable | Clipboard | Needs to be activated, opens Screen Sketch, only on Windows 10 version 1809 and newer |
| Windows-Print | Full Screen | \Pictures\Screenshots | fastest fullscreen method |
| Windows-Alt-Print | Full Screen | \Videos\Captures | Game Bar feature |
| Print-key | Full Screen | Clipboard | |
| Alt-Print | Active Windows | Clipboard | |
| Windows-Shift-S | Rectangle | Clipboard | |
| Snipping Tool | Variable | Clipboard, Local Manual | Needs to be started first |
| PowerShell | Full Screen, window | Clipboard, Local | Needs to be run |
| Windows Ink Workspace | Full Screen | Save As | Needs to be run |
Now Read: The best Windows Screenshot programs.






> The most prominent option is probably provided by the Snipping Tool.
> The program is available on all versions of Windows starting with Windows 7.
… Windows Vista 32-bit SP2 (Home Premium) here, “Snipping Tool” also available and very often used…
https://en.wikipedia.org/wiki/Snipping_Tool =>
> Snipping Tool is a screenshot utility included in Windows Vista and later
Windows+shift+S isn’t working for me, could that be because I’m using Windows 10 Enterprise?
Nice. Didn’t know about the win+print one. I can uninstall screencloud now since the functionality I needed from it is built in natively on win10.
I also found that One Drive can automatically save screenshots, with Ctrl-PrtScn or Alt-PrtScn keys, to the folder OneDrive\Pictures\Screenshots. The screen shots are saved as PNG files named by date, e.g. 2017-04-20.png, 2017-04-20 (1), etc. The auto-save function can be controlled for photos, screen shots and documents via the One Drive tool tray icon.
Ref: https://support.office.com/en-us/article/Save-screenshots-to-OneDrive-automatically-d04df71c-1cb0-4ad6-9f9c-b08494d79d6a
Yes, Win+Shift+S is pretty nice. Combined with the other methods, it should make all other tools redundant for most people.
using classic shell I pinned snipping tool to start menu as its pretty flexible and decent app.
have not mapped keyboard shortcuts to it but its few mouse clicks to do the job
windows + shift + s = totes useful!
Sometimes the image I want is larger than the image I can see even if I run full screen and full window size. A right click on the image and clicking “Copy Image” puts the actual whole image in the clipboard, where it can easily be accessed by your favorite image editor. This gives you maximum flexibility to edit and save the image with maximum quality if desired.
Martin, thanks for your summary here; that is a huge effort you expended. I don’t know how you make the time to do what you do.
Thanks for tips. Rarely do i require a straight screenshot, so im more than happy to continue using my favorite, Fscapsure.
Common Martin…..we do have some wonderful softwares too (3rd party) like pick pick.
I love it a lot.
Thank you! This has always been a mystery to me.
Off topic – Did mozilla remove aurora branch? https://wiki.mozilla.org/RapidRelease/Calendar says n/a for firefox.
Windows ink is easy to reach via win+w and for getting a quick screenshot of a region, it is probably the best on-board tool, even without a pen. And it can copy to the clipboard, too.
Remember to use e.g. exifinfotool to remove meta-data when you upload things into a cloud.
WOW! Amazing, I was tired of using screenshot extensions and softwares. This process is really simple and easy to implement. Thanks for sharing
Keep up the good work :-)