Create Bootable Windows or Linux USB with RMPrepUSB
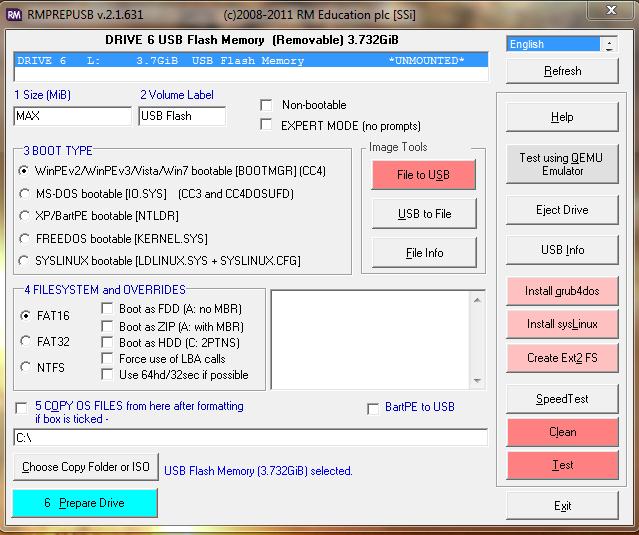
Of the various applications for creating bootable Windows or Linux drives, RMPrepUSB offers some unique features which may be appealing to many users. Advanced users can set specific parameters for the drive if necessary. New and inexperienced users can easily use this application as well. Unlike other similar applications RMPrepUSB has additional features that stand out. There are options for USB formatting in several file systems such as FAT16, FAT32 and NTFS formats. You are able to run a USB speed test, size/speed test, install Grub4dos, SYSLINUX, and even create AXT2 FS on any USB drive. This is much more convenient than creating bootable disks on CD or DVD, as pen drives are much easier to keep track of and less prone to damage.
This application is completely free with no catch and you don’t end up with a dozen different toolbars in your browsers or applications that you don’t want. The download is free of advertizing and so is the installation. You get a quick download in a .zip file and then simply double-click the .exe file to start the installation. This application does not open automatically after installation, but does offer a desktop icon for easy access. You can download RMPrepUSB from this link: http://www.rmprepusb.tk/
The interface is straightforward and fairly self explanatory. If you want an instructional manual, there is one available at the link provided, though you might have to search around a bit. The site gets changed often and updated versions are consistently released. It is best to use the latest version.
In order to create a bootable USB, first do the obvious and insert a blank USB drive into your computer. Using this application is so basic and easy that anyone can do it (yes, really). The interface displays a list of bootloader options to choose from. By default, the Image Tools setting is set for File to USB.
The File to USB option reads the image file content then writes to the selected drive. Only binary images will work and they cannot be compressed. The USB to File option reads file content and then writes it to an image file. With either option, supported image formats are IMG, ROM, BIN, RAW, BMDK, VDI, RAM, QCOW, QCOW2, CLOOP, DMG, VPC, VHD, VVFAT, and NBD. File Info option is included so that you can obtain file information.
Select the desired bootloader and then choose a file formatting system in the field just below the BOOT TYPE list.
If the USB that you are using has any files or portable applications on it, they will be erased once you create the bootable USB. That is why using a blank USB drive is emphasized. RMPrepUSB automatically formats the drive and, as we all know, formatting erases all data.
Once you have selected the format and the bootloader, all you need to do is click Prepare Drive at the bottom pane. This will initiate the process to create the bootable USB for the selected operating system. You will see a warning stating that all data will be erased and it will ask if it is OK to do so and create a new partition.
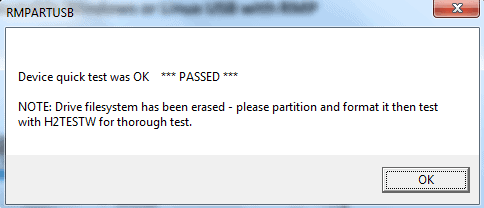
Click OK and the application process will start. When finished, it will show that the bootable USB was created. If you want to test it, there is a Test button in the right pane. The only catch is that testing also erases the USB and you have to start over, but it is good to do this to ensure that it is working properly.
Once tested successfully, start over and then you have your bootable USB.
Advertisement











nice tutorial. Thanks for sharing. you might want to check this article as well
http://www.tipsotricks.com/2011/11/best-methods-to-create-bootable-usb-drive.html
Just found this utility the other day and used it to “fix” a problematic UFD by wiping and restoring the MBR. Worked great.
The instruction manual is included with the program – just click on Help and then click the OK button. The help manual is also in several different languages (English, Spanish, French, German and Indian).
The functions to format a drive are numbered 1-6. The File>USB and USB>File functions are completely separate from the format functions and so should not be described as if they were part of the format function. v631 also has an extra Alt+F2 function which runs a NirSoft utility to take an MD5/CRC32/SHA1 checksum of any file so you can check it is not corrupt.
If you have a new Flash drive you should use the Quick Size Test first as a fake USB drive will fail this test and it is quite quick to run. The website has nearly 60 tutorials on how to create bootable USB drives.
Steve, thanks for your comment. Tutorials are always great.