OneDrive 101: How to use Microsoft's cloud service?

Microsoft OneDrive allows users to easily store, sync, and share their files in the cloud. While there are several online storage sites available, including Dropbox, Box, Google Drive, and iCloud, only OneDrive is directly integrated into Windows. This allows for easy-to-access file storage and syncing across multiple devices.
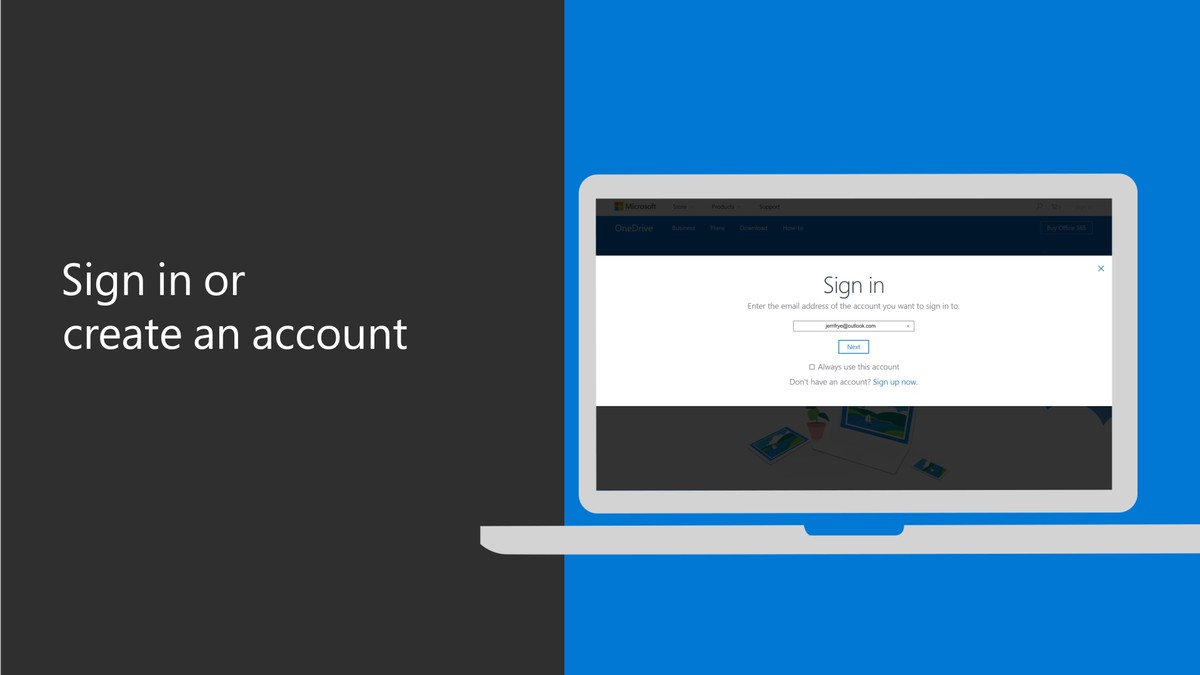
To use OneDrive, a Microsoft Account is necessary, which can be created through the Microsoft OneDrive website using the link here. Additionally, users must select a storage plan that meets their needs. The free version of OneDrive provides 5GB of OneDrive space. But if you need more cloud space, Microsoft OneDrive's plans are as follows:
Basic plan: 100GB of storage for $1.99 per month.
Microsoft 365 Personal: 1TB of OneDrive space for $6.99 per month or $69.99 per year.
Microsoft 365 Family: Up to six users to have 1TB of space each for $9.99 per month or $99.99 per year.
While OneDrive works the same on both Windows 10 and the 22H2 version of Windows 11, released in late 2022, introduced some changes to accessing OneDrive's settings.
Nonetheless, Microsoft OneDrive remains a top choice for users seeking reliable and efficient cloud storage and file-sharing capabilities.
Getting started with OneDrive
Setting up OneDrive is a straightforward process that is available in both Windows 10 and Windows 11. If you missed the prompt to use OneDrive during the Windows setup process, don't worry. You can still access it by looking for the OneDrive icon in the System Tray. Clicking on the icon will give you access to the service.
However, if you don't see the icon, you can manually trigger it by locating the OneDrive exe file in the File Explorer. First, click View > Hidden items. Next, navigate to C:\Users[YourUsername]\AppData\Local\Microsoft\OneDrive\ and double-click on the OneDrive.exe file. This will cause the icon to appear in the System Tray.
Once you've accessed OneDrive, you will be prompted to sign in using your Microsoft account email address and password. You will then see a window for Your OneDrive folder, which will point to the default location for your local OneDrive folder. You can either click Change location to pick another destination or click Next to continue using the default location. The folder will then be created if it doesn't already exist. If it does exist, click the Use this folder button.
The next steps will vary somewhat based on whether or not you are running the 22H2 update to Windows 11. Review the subsequent screens to complete the initial setup, and you may be prompted to open your OneDrive folder.
How to add folders to Microsoft OneDrive?
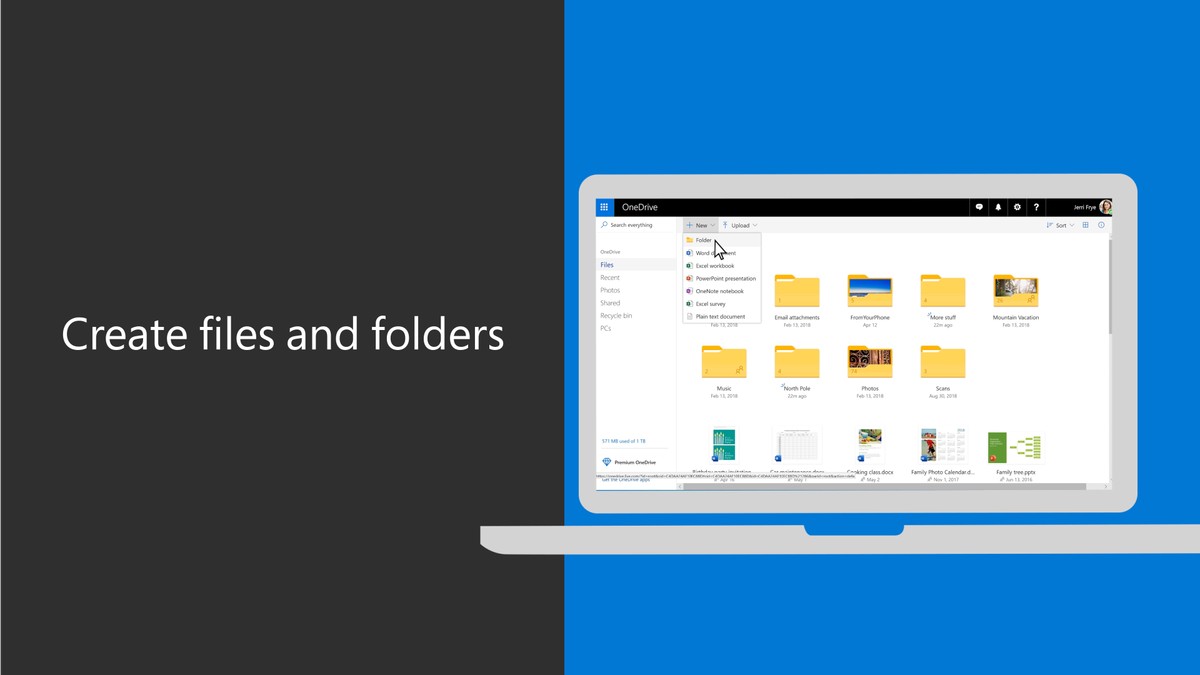
To add folders and files to your OneDrive location in File Explorer, simply select the folders and files you wish to include. For example, if you use a folder called "Powerpoint Documents" for your Microsoft Powerpoint files, move the entire folder into OneDrive.
Follow the same steps for any other folders you wish to include in your OneDrive synchronization. You can also create new folders that you want to sync in OneDrive.
To set up the folders you want to back up and sync to OneDrive, follow these steps in Windows 10 and prior versions of Windows 11. Click the OneDrive System Tray icon, select Help & Settings > Settings, then choose the Account tab and select Choose folders. Here, you can view all the files and folders stored in your OneDrive folder.
If you wish to sync everything stored in your OneDrive folder, click the checkbox for "Make all files available" (or "Sync all files and folders in OneDrive" in Windows 11 22H2).
Alternatively, you can select individual folders that you want to sync and uncheck any folders you do not want to sync. Any folders that you leave unchecked will remain on OneDrive but will be removed from your current PC. With these simple steps, you can easily set up and manage your OneDrive folder and sync your important files across all your devices.
How to backup your files on Microsoft OneDrive?
With OneDrive up and running, you can easily use it to back up important folders and files. To do this in Windows 10 and earlier versions of Windows 11, open the OneDrive settings menu and click the Backup tab. From there, you can select to back up your desktop, pictures folder, and documents folder. Simply check the items you wish to back up and click Start backup.
Additionally, you can enable options that will automatically upload photos, videos, and screenshots to OneDrive storage. In Windows 11 22H2, select the Sync and backup category and then click the Manage backup button. Turn on the switches for the folders you want to back up, such as Documents, Pictures, and Desktop, and then click Save changes.
Syncing your files on OneDrive
By default, once your files are uploaded to OneDrive, they are deleted from local storage on your computer. However, the files you decide to remove from local storage will still appear in File Explorer. When you double-click on the icon to access it, the file is downloaded on-the-fly from OneDrive to your computer.
You can change this option in Windows 10 and earlier versions of Windows 11 by opening OneDrive settings and clicking on the Settings tab. The Files On-Demand setting to remove your OneDrive files from local storage on your computer should be enabled by default. In Windows 11 22H2, you can access this setting by going to the Sync and backup category and clicking on the drop-down link for Advanced settings. Turn on the switch next to Files On-Demand if it is not already turned on.

While this feature can save space on your hard drive, it also means that you will need to be online to access your files. We recommend turning off this option if you have plenty of drive space, but enabling it if you are running low on storage. You can also decide on a case-by-case basis, allowing you to store certain files online only while others are stored both online and locally.
To set this up, you can do one of the following:
- Right-click on a folder or file stored only in the cloud and select "Always keep on this device" to permanently keep the file on your PC
- Right-click on a folder or file stored locally and select "Free up space" to remove the file from your PC and store it online only. With these options, you can easily manage your storage preferences and keep your most important files accessible at all times


Microsoft actively spies on OneDrive contents (and their other evil partners can access this too).
Use only client-side encrypted online storage, that the provider can’t access.