How to Recalibrate Your Laptop Battery
From time to time, you may notice that your laptop’s battery doesn’t stay charged as long as it should. This is sometimes due to the user constantly keeping the battery on mains power, or allowing it to only drop to 50% before recharging. Modern batteries are usually quite good at dealing with this, but every so often it’s a good idea to recalibrate your battery to get the best out of it.
You might want to check you’re laptop’s documentation, or check with the manufacturer to see how often you should do this. Sometimes they will say it’s not necessary, and sometimes they will say once a month, or once or twice a year. The response often depends on whom you speak to at the company and there isn’t a defined best practice. However, you can’t do any harm by performing a manual recalibration, so why not give it a go and see if it makes a difference?
Recalibration involves charging your battery to 100%, and then discharging it completely to 0%. Once that’s done you charge it back to 100% to complete the calibration.
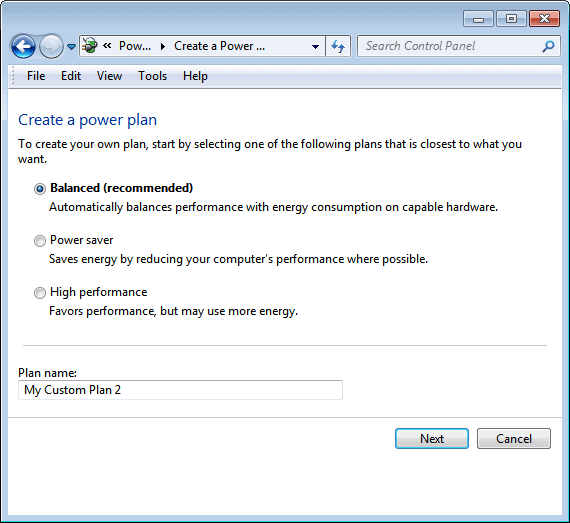
The way to do this is easy. Begin by creating yourself a custom power plan in your windows power settings. You’ll find the power options in your control panel, and once you’re in the power options screen, click on “create a power planâ€.

On the next screen you’ll want to choose “high performance†and give your new power plan a name. For the purposes of this exercise, let’s call it “calibrationâ€. Click next, and you’ll get the opportunity to choose the settings for your new power plan. Make sure you change all the dropdown lists to “neverâ€, so that your laptop doesn’t power anything down. Now make sure that your calibration power plan is selected and in use. You can find out by hovering your mouse over the battery icon in the taskbar of your computer.
Okay, now we’ve done this, the first step of the actual calibration is to charge your battery to full power. So plug your laptop into the mains and wait until the battery power meter reads 100%. If you hover your mouse over the power meter icon, it should read “fully chargedâ€.
The second step is now to remove the power cord from your laptop and making sure your power plan is set to the calibration plan we created earlier, wait until the battery power reaches 0%. When your laptop reaches this, of course it will shutdown. Be sure that you aren’t running any software when you do this, otherwise you could potentially lose some work, although usually laptops will automatically save it’s current state before shutting itself off.
Finally, the last step is to completely recharge you laptop again back to 100%. So plug in your AC adapter, turn on your laptop and wait until the battery is fully charged again to 100%. Don’t turn off your computer while this is taking place to make sure you get a full charge. You should now have a recalibrated battery that will hopefully last a little longer.
Advertisement











what the -f- is this ? this is like windows 7 or something. I don’t use that I use the real stuff – windows xp of course.
Although Li-Ion are supposedly impervious to the memory effect, they can get weak over time and not hold their charge for the full length of time that they once did when new.
Worse yet, they can do this with little warning; and as far as I know, there is little one can do to bring them back. I back these statements with over 10 years of personal experience with Sony Li-Ion Pro Camcorder batteries. Let’s just say that I have been burned figuratively a few times….and was thankful I had more batts than I needed.
I have heard from more than one source that heat can cause this, especially that found in laptops. I don’t know if it’s true based on my own experience. And I don’t know how you can keep the heat from laptop batteries.
Also, some laptop (and electric car batteries) are NiMH, not Li-Ion. NiMH are close cousins to NiCads and while they are more resistant to the memory effects; it still happens more often than we would like it to. Again, I base this on personal experience.
DrTrunks
He isn’t referring to the memory effect. All modern battery’s have on-board computers that tell the battery how much life it has and reports this to whatever its plugged in. Well over time the computer can get off to how much it actually has so you are recalibrating the computer, not the battery. Here is an article about it that even links to apple talking about it. There are many more if you do a little searching.
http://www.tuaw.com/2008/07/30/battery-calibration-recommended-by-apple-why-no-utility/
and do not* suffer from the memory effect, battery effect, lazy battery effect or battery memory .
*sigh*
The memory effect (http://en.wikipedia.org/wiki/Memory_effect) to which you are referring does NOT apply to Li-ion batteries.
It only applies to Nickel Cadmium batteries, you know the kind of batteries you use for your TV’s remote control or maybe an old phone.
Laptops and electric cars use expensive batteries that do not have to be fully discharged or fully charged and do suffer from the memory effect, battery effect, lazy battery effect or battery memory .