Maintain your GNOME registry with gconf-editor

The Windows operating system is not the only operating system with a registry. And I do realize that many of you cringed when you read the words "Windows" and "registry" in the same sentence. But don't worry - the GNOME registry isn't such a beast that can take your machine down with a single, poorly executed change. The GNOME registry is an XML-based configuration file (or registry) that stores all settings for the GNOME desktop. So instead of having to work with multiple tools to configure GNOME, you could, effectively, use only one tool to handle the configuration of your desktop.
But don't think this is as easy as using a standard GUI configuration tool. Although this "registry" can be edited with the help of the outstanding gconf-editor, it is often considered best left to power users. So, for those power users who want to know how to tackle the GNOME "registry", you're in luck. In this tutorial I am going to introduce you to the gconf-editor tool, so you can manage the GNOME registry without having to open up that XML file and edit it by hand.
Starting the tool

Fortunately there is no installation needed. If you have GNOME installed, you have gconf-editor installed by default. You will not find a menu entry for this tool, and with good reason. The GNOME developers prefer to keep gconf-editor out of the hands of the new user. So to start up this application hit the <Alt>F2 combination and enter the command gconf-editor in the run dialog. Or you can open up a terminal window and issue the command from your bash prompt. Either way you will be greeted with the main gconf-editor window (see Figure 1).
In the main window you will notice two panes:
Navigation tree (left pane): Where you navigate into the various configuration files of various applications.
Editor window (upper right): This is where you actually edit the values for the GNOME registry.
The lower right section will display give you the details of each key you edit in the registry.
Now the fun begins. As you can imagine (looking at Figure 1), it's pretty easy to figure out where a registry entry for a particular GNOME configuration would be. If it's an application, it's going to be in apps and if it's a general GNOME configuration, it's going to be in desktop. The schemas section should be left well enough alone. The system section is for any underlying system (such as sound).
Let's say you want to fine tune your mouse. Although some of the mouse configurations can be handled via a preferences tool, you will quickly see that you have far more options through the gconf-editor. To get to this section expand the following:
Desktop >Â Accessibility
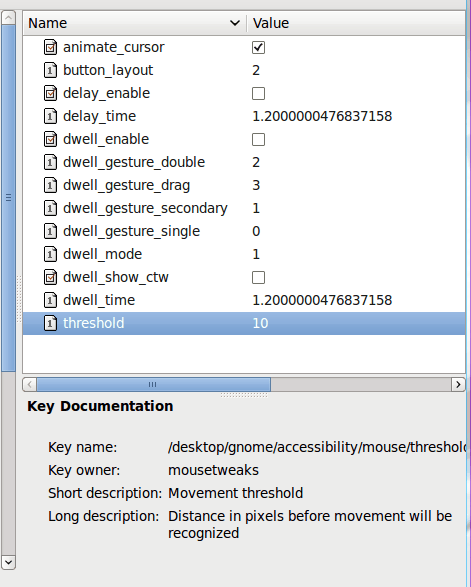
Once here click on the "mouse" entry (no quotes). When you open up the mouse options you can then click on each option to make a change (see Figure 2).  Notice there are options available here that do not show up in the regular mouse configuration. For example, the final option, threshold, allows you to configure how many pixels are considered the minimum for mouse movement to be picked up. To change this option you would only have to double-click on the value and click Enter. That's it.
Add a bookmark
If there are sections of the registry you know you will be revisiting you can always add a bookmark for that section. Do this you:
- Navigate to the section you want to bookmark.
- Click the Bookmarks menu.
- Select Add Bookmark.
This will come in handy for those hard to find sections of the GNOME registry.
Recent key view
If you're curious to see what keys you have edited recently you can go to the Edit menu and select the List Recent Keys entry. This will place all of the most recent key edits you have made in the lower pane. This is handy for troubleshooting or just revisiting a key you didn't bookmark.
Final thoughts
Although this registry editor seems like it's a breeze to use, I always recommend it only be employed by those more advanced users of the GNOME desktop. Although it won't take your computer down, it can directly effect your desktop (which means it is capable of "breaking" your desktop). This tool is very handy and can get you out of tricky situation, should you accidentally configure something to the point where you can no longer get back to the tool that allowed the mis-configuration.
Advertisement


To me it is easier to just enable gconf-editor in the “Applications” menu.
In “System -> Preferences” open “Main Menu”, in the left pane click on “System Tools” and in the right pane click the box next to “Configuration Editor” (This will put a check mark in it).
Now gconf-editor is available in the “Applications” menu in the “System Tools” section and you never have to drop to the CLI.
Wow, I’ve been using gconf-ed for a long time now, since like 2005/6-ish.
Well I didn’t do an article on it, but I’m glad you did.
Thanks, this will let me as a KDE user change some Gnome settings that affect some applications (like Zim).