Install OpenGoo for in house collaboration tools

Do you use Google for your collaboration tools? Gmail? Google Documents? Contacts? Although the Google suite is a very nice suite of tools that has grown exponentially in popularity, there is something to be said about keeping your collaboration tools in-house. There are plenty of tools that will allow you to set up such a collaboration suite. Some of these tools are costly, some of them are overly-complex to use or install, and some of them just don't offer all of the tools you need.
And then there's OpenGoo. OpenGoo is an open source collaboration tool that is fully web-based, easy to use, simple to install, and free to use. But is OpenGoo for you and your company? This tutorial will show you how to get an OpenGoo installation up and running so you can kick the tires and find out if it is exactly what you need.
Update: OpenGoo is now known as Feng Office.
Features
OpenGoo offers all of the standard features of a business-level collaboration suite:
- Text documents
- Spreadsheets (coming soon)
- Presentations
- Task Lists
- E-mails
- Calendars
- Web Links
- Contacts
All you need to install an OpenGoo server is:
- Apache >= 2.0
- MySQL >= 5.0 (5.2 recommended)
- MySQL >= 4.1 with InnoDB support
Now, let's get on with that installation.
Install
This installation will be done on a Ubuntu 9.10 setup. I have installed this on both desktop and server installation, but regardless of which you have installed, you will need a LAMP server running.
The first thing you need to do is to download the zip file from the OpenGoo download page. I downloaded and installed the 1.6 beta version which works nicely.
Once that file is downloaded, move that file to /var/www. Now, change to the /var/www/ directory and then unzip it with the command:
sudo unzip opengoo_1.6.beta-2.zip
NOTE: If you downloaded a different release, edit that command to reflect the release number.
Once that files is unzipped rename the directory with the command:
sudo mv opengoo_1.6.beta-2.zip opengoo
Now change into the /var/www/opengoo directory and issue the following commands:
sudo chmod -R ugo+w /var/www/opengoo/config
sudo chmod -R ugo+w /var/www/opengoo/cache
sudo chmod -R ugo+w /var/www/opengoo/upload
sudo chmod -R ugo+w /var/www/opengoo/tmp
With all the right permissions in play, it is time to create the database. I like to use PhpMyAdmin to make database creation simple. For more information about installing this tool check out my article "Install PhpMyAdmin for easy MySQL administration". Use this tool to create a database called "opengoo" (No quotes).
Time to begin the web-based installation.
Fire up your browser and point it to:
http://IP_TO_SERVER/opengoo
Where IP_TO_SERVER is the actual IP Address of your OpenGoo server. You will be greeted with usual welcome screen that will tell you exactly what is going to happen during the installation. Click the Next button to continue on.
The second screen will run the environment checks. If everything gets and OK (and it should be if your LAMP server is up and running and you've taken care of all the permissions) click the Next button to continue on.

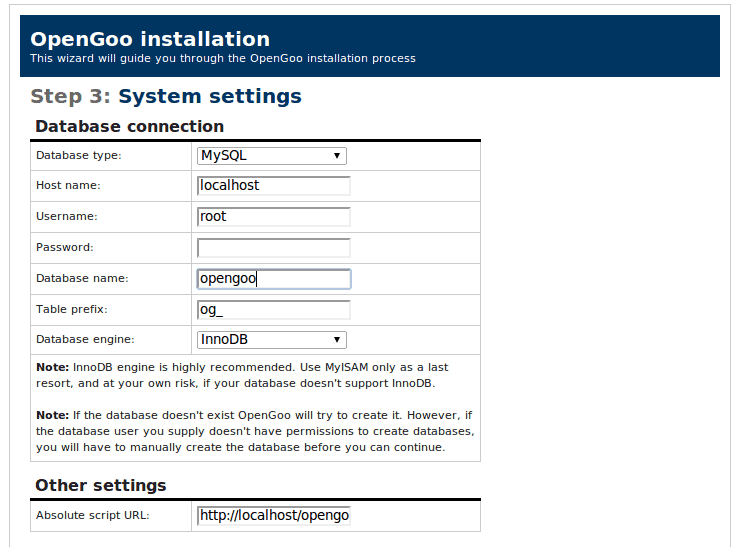
The third page of the installation (see Figure 1) is the first step that should require you to input any data.
The information should be fairly self explanatory. There is one point of note: If you plan on allowing access to your local LAN you will need to change the Absolute script URL to reflect the proper IP address (or domain).
Once you have all of this information in place, click the Next button which will take you to the congratulations screen where you only need click the Finish button to assume you've completed the installation.

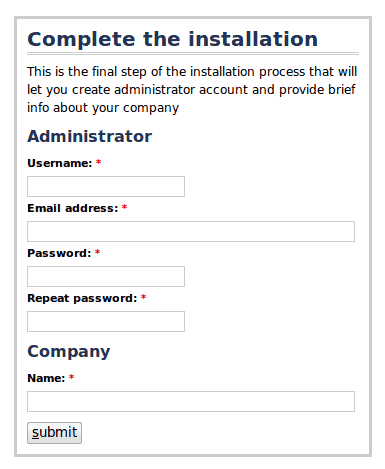
Ah, but there is one more step. Figure 2 shows the final step for the installation. Here you need to create an administrator for your installation.
Setup your administrative user and click Submit. You can now log in to your OpenGoo server with your administrative user.
The basic interface
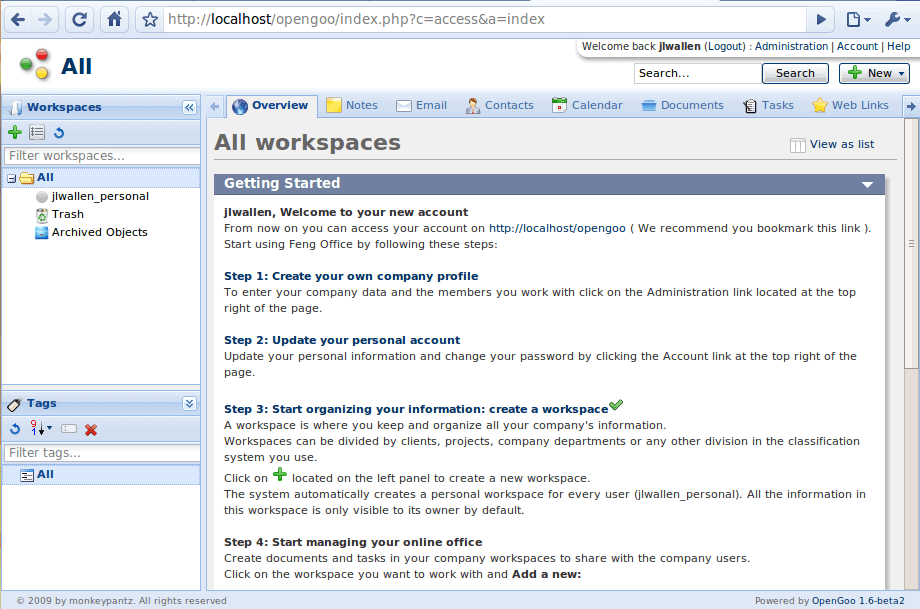
You will log into your OpenGoo server by entering the same address you did for the installation. When you log in you will be at the OpenGoo Getting Started Page (see Figure 3).

The OpenGoo installation will offer a very simple information page that will help you get started on your decision. But as you can see, the interface is laid out quite well. The tools are accessible and very user-friendly.
After using OpenGoo for a while I can assure you if you like Google's suite of tools, you will like OpenGoo.
Final thoughts
If you are looking for a very cost effect collaboration solution look no further than the open source OpenGoo suite of tools. Not only is it easy to use, it's simple to install, and free of charge.
Update
OpenGoo is no longer available, the project seems to have been abandoned.


Your requirements have a typo. It should read
* Apache >= 2.0
* PHP >= 5.0 (5.2 recommended)
* MySQL >= 4.1 with InnoDB support
You’ve got mysql twice :)
FYI, v1.6 beta2 was just rls’d a few days ago.
There is another good one…
SOHO > http://www.zoho.com
I use a lot Google apps.
Thanks for this info.
I have done this via XAMPP just for personal use and to play around, works nice and I really should be using it more.