Add brushes to The GIMP

The GIMP has a ton of tools for the user to take advantage of. From editing tools to drawing tools to filters to script fu to a whole host of other possibilities. One tool that many don't take advantage of is bushes.
Brushes in The GIMP allow the user to extend The GIMP's flexibility by creating different ways to draw with effect or style. Brushes can be any number of styles from either standard drawing tool brushes to more artistic brushes.  Regardless of the type of brush you want to add (you can even create your own), you have to know how to add them, before you can use them. In this Ghacks article I will show you how to add new brushes to The GIMP in Linux.
Where to find brushes
Obviously you have to have brushes in order to add them. If you are not creating your own brushes, you will need to find them online. There is a wealth of resources for The GIMP on line. Here are some great sites to find brushes to add to The GIMP.
TechZillo: One fine collection of artistic brushes. This site includes blood splatter brushes, grass blade brushes, scratch brushes, grunge brushes, and more.
deviantArt: A small collection but includes spiderwebs and firework brushes.
Free Brushes: A site dedicated to free brushes for not only The GIMP but also Photoshop and Paint Shop Pro.
1000 Free Brushes: That's right, 1,000 free brushes for The GIMP.
Installing brushes
When you download a brush (or set of brushes) you are going to find either a single .gbr file or an archive of collected .gbr files. Once you have downloaded the file(s) (we'll assume they have been downloaded to ~/Downloads) open up a terminal window and unpack the file (if needed). Now, from the terminal window follow these steps:
- Make sure The GIMP is closed.
- If you are using a distribution that requires you to su to the root user, do so first.
- Issue the command ls *gbr to make sure you are in the correct directory and the files are there.
- Issue the command sudo mv *gbr /usr/share/gimp/2.x/brushes Where x is the release of The GIMP you are using. NOTE: If you are using a distribution that does not require sudo leave that portion out of the command.
That's it. You can now fire up The GIMP and begin using the new brushes. Let's see how this is done.
Usage
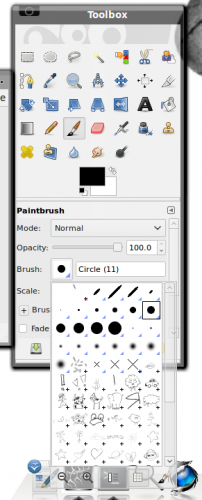
I have downloaded a fun set of brushes called Doodle 2. After installing the brushes, I open up The GIMP and when I click the Brushes button, I can see all of the new Doodle 2 brushes in the tool (see Figure 1). As you can see, near the bottom of brushes window, the Doodle 2 brushes are there. All you need to do is click a tool that can use brushes, like the paintbrush, and then select the brush you wan to use.
Final thoughts
That's it. Adding new brushes really is a great way to make The GIMP easier and far more useful. And don't forget, you can also create your own brushes for The GIMP.
Advertisement


