Get to know Linux: Window Maker

Continuing with our introduction to old-school Linux window managers, I would like to bring to you Window Maker. The Window Maker window manager was designed to look and feel like the old NeXT GUI (which was spearheaded by Steve Jobs after he was forced out of Apple.) Window Maker is another entry in the long list of lightweight, snappy window managers that can bring new life to old computers. Window Maker is a very stable desktop for the Linux operating system and is often considered one of the most universal and useful window managers available.
Window Maker makes many changes to the standard desktop metaphor as we know it today. Gone is any semblance of a panel. Instead Window Maker offers a number of interesting features.
Features
The Window Maker feature list includes:
- Menu: Like Fluxbox (Covered recently in my Get to know Linux: Fluxbox article) the main menu can be accessed with a right mouse click on the desktop. This menu contains pretty much everything you need to work with.
- Dock: This is where dockable applications live. This includes the Window Maker configuration tool.
- Clip: This is an extension of the Dock. The click allows you to move between workspaces, configure aspects of the desktop, attract icons so they automatically add themselves to the clip.
- Graphical Configuration Tool: This saves the new user from having to hand-edit a configuration file.
- Themes: Window Maker has a lot of configuration options for the desktop look and feel.
- On the fly changes: No restart necessary when changes are made.
- Animations: Windows can do 3D flips as they minimize to icons.
Of course that is not an exhaustive feature list. To get the complete list head on over to the Window Maker website.
Getting and installing
Fortunately you will find Window Maker in your distribution's repositories. So open up your Add/Remove Applications tool, do a search for Window Maker, select the results, and apply the changes. Once Window Maker is installed, exit from your current session, select Window Maker from your log in screen, and log in.
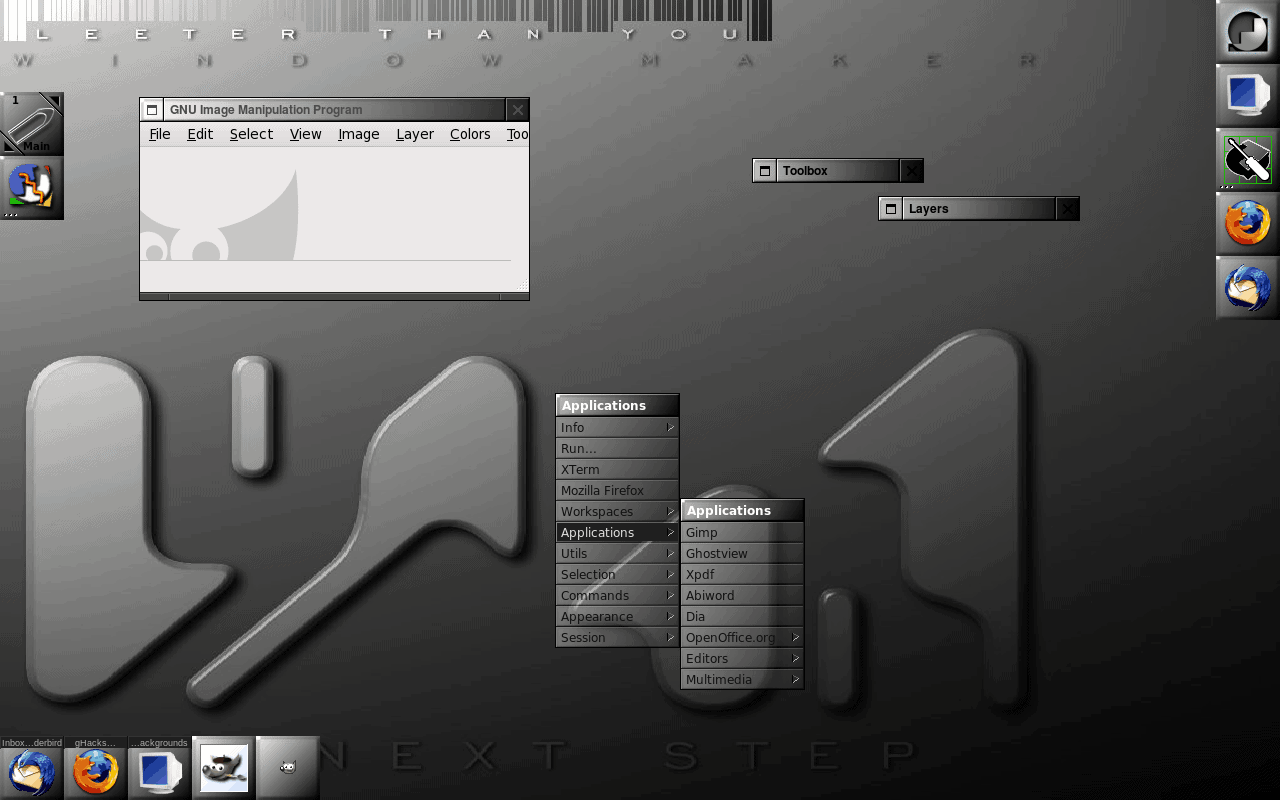
What you will see is something similar to that in Figure 1. What you can see in this image is:
- Clip: Near upper left with one attached icon (OpenOffice).
- Dock: Upper right with two added dockable apps (Firefox and Thunderbird).
- Minimized icons: Bottom left.
- Mouse menu: Near center
Configuring the menu
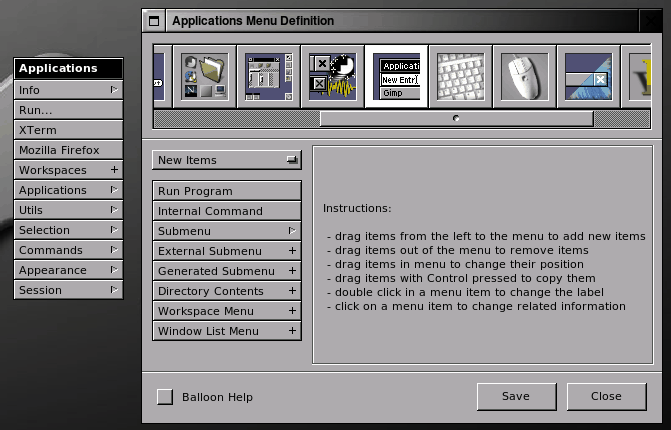
One of the aspects of Window Maker that trips up people at first is adding new items to the menu. Window Maker has an interesting take on this task. The first step is to open the configuration window. Do this by double clicking the icon in the Dock third from the top which will open the configuration window. You will see a drag bar under the icons. Drag that bar to the right to reveal the Menu Editor icon.
You can see (in Figure 2) the Menu Editor icon is highlighted with a white box. Click on this to open up the tool.
To add an item to the main menu click on an item from the menu in the Configuration window and drag it to the menu that will open when you start the Menu Editor. You can also move menu entries around by clicking and dragging them.
If you click on the drop down you can select different types of entries to add to the menu. You can select from:
- New Items
- Sample commands
- Sample submenus
You can also change the name of a menu entry by double clicking the on menu entry and typing the new name.
If there is a menu entry that you want to remove simply click and drag that item off the menu. Once you are done working with your menu, click Save, and then click Close.
Manipulating windows
There are various ways to manipulate a window in Window Maker. Here are the main methods.
Shade: If you double click a title bar the window will roll up into the title bar. You can unshade by double clicking a shaded window.
Miniaturize: This basically the same as minimizing, only it turns the window into a small icon at the bottom of your desktop. You do this two ways: Click the square in the upper left corner of the window, or Right click the title bar and select Miniaturize. You undo this by double clicking the associated icon.
Maximize: Maximize a window by right clicking the title bar and select Maximize. You undo this by right clicking the title bar and selecting Unmaximize.
Move: You can move a window by clicking and dragging the title bar.
Clip
The Clip is an interesting tool. The most important aspect of the Clip is to serve as the desktop pager. By default there is only 1 desktop. To add more desktops do a middle mouse click on the Clip and select New. The new desktop will automatically appear.
Another neat aspect of the Clip is the ability to attract icons. What this will do is allow you to add an icon to the Clip simply by clicking Attract icons. Any application that is miniaturized will be attached to the Clip. Remove the icons you don't want by right clicking the icon and select Remove icon. If you don't "keep" an icon on the Clip, the icon will disappear when the application is closed. If you want to be able to launch the application from the Clip, right click the icon and select Keep Icon. Now, even when the application is closed, there will be a clickable icon on the Clip that will open the application. when its icon is double clicked. One nice aspect about this is that the added icon will remember options for the application. Say, for instance, you run the aterm application with the following options:
aterm -tr -fg white -bg black +sb
When you attract the icon with those options, and you "keep" that icon, any time you double click the Clip icon for that application it will run it with those options.
Final Thoughts
Window Maker is one of the old school desktops you can spend hours playing with and will ultimately discover an incredibly useful desktop. Give this a try and let ghacks know what you think.
Advertisement


Very good guide, I’m doing a guide on this subject (I love WM) but I must admit that due to time I have not finished … although mine is in Spanish xD
Bye