The simplest way to make a LiveUSB from within GNU/Linux

I change distributions like people change socks, because I’m stubborn and refuse to test things through virtual machines and would rather run it pure and dry off my hardware.
I have this one unbranded 8gb USB stick that I literally bought (a handful of others of, all lost or dead) out of the back of a van, that I have continued to use for my LiveUSB’s for about five or six years now, and it's still kicking.
Thankfully, doing this change from distro to distro is incredibly simple, with the use of just a couple quick terminal commands. This will work from within any distribution.
Checking the mount point of the USB drive
Before you can put your ISO of your desired distribution onto your USB, you first need to know what mount point your system has given the device, so we later can tell the tool we use to copy the files over, where to copy them.
The command we need to use is
lsblk
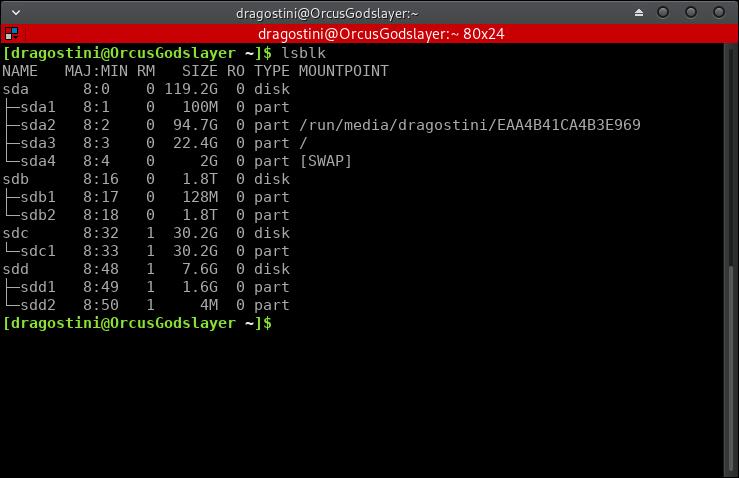
The command should show you an output similar to this screenshot.
As you can see, there are a few devices hooked up:
- sda - the 120GB SSD in this laptop
- sdb - the 2TB External drive
- sdc - 32GB SD card for my DSLR
- sdd - my 8GB USB thumbdrive
If you run lsblk without any parameter, you get a list of all block devices returned. You need to identify the USB Flash Drive or SD card that you want to copy the Linux distribution to.
The easiest option you have is to check the size of any listed device and find the device that matches the size of the Flash Drive or SD card.
It is very, very important you don’t mix up what device, is what. You MUST know the correct answer, or you run the risk of completely blanking the wrong drive (like a 2TB external, poof, gone.)
Copying the ISO to USB
The next step, is to use the dd command to transfer the contents of the ISO onto our USB in a bootable fashion.
sudo dd if=/path/to/your/file.iso of=/dev/sdX bs=4M status=progress #Replace X with the proper letter from lsblk or be doomed
Using the above command, there will be no warning, no question, it will simply run and will show you the progress as it does.
Once it is done, you can simply reboot, select your USB as the bootable device (mine is listed as my primary device...) and boot into your LiveUSB you desired. Quick, painless as long as you heed the warning above, and should generally only take around 5 minutes or so.
Good luck!


Image Writer for Debian and Ubuntu users
https://sourceforge.net/projects/septor/files/repo/pool/main/f/fd-image-writer/
Hi Martin & Mike, hallo Mädels, ich hätte da auch noch ein bisschen von meinem Senf zum Thema Live-USB-Stick zu verteilen. Wie war das doch gleich? Es geht das Gerücht, dass die Linux-User doch per natura bequem sind (vlt. auch etwas faul …, oh, man weiß es nicht). Nun gut, ich benutze gerne GUIs. Für Live-Systeme per USB-Stick benutze ich schon seit langen „http://multibootusb.org/“. Viele Distributionen lassen sich auch persistent so gut testen. Alternativ kommt auch noch „http://liveusb.info/dotclear/“ zum Einsatz. Beide sind ggf. in den Paketquellen (Ubuntu/LinuxMint etc.pp.) enthalten. Gutes Gelingen!
I hate to be a killjoy but the “simplest” way to create a bootable USB is to use YUMI by https://www.pendrivelinux.com. So effortless even an IT manager could do it…
There is no Linux version of YUMI. Yes, I’m aware it can be used in WINE, but that doesn’t make it as simple as using dd natively.
I thought that you created a Linux installion on a hard disk, and now you want to create an ISO file,from that disk installation. Your live ISO that you can distribute to others.
When installing from the flashdrive and the installer program prompts for partitions I make use of sudo blkid /dev/sd* for a list of partitions on the drives. I get all the UUID, Label, information that I might need to add other disks that I want to mount at boot time.
I love using this method, makes me feel like a real hacker! :P
Google Search for ‘Creating EFI-Bootable USB Drives’ & rodsbooksdotcom.
The various ISO burning/writing programs for USB flash-drives have their own peculiarities. Those for DVDs seem more reliable, eg Imgburn.
Why would you not use Etcher (https://etcher.io/)? Etcher pretty much protects you from selecting the wrong drive or device, and makes the whole process dead simple.
Since it’s not in most repositories, I keep forgetting about it :-(.
I totally agree with Ralf! Why risk mistyping and wiping out the wrong drive when there is a safe GUI available?
Because it’s built with Electron.
I’m no stranger to the Linux command line but I like the safety of a UI such as Linux Mint ‘USB Image Writer’, Ubuntu ‘Startup Disk Creator’ or the quirky UNetbootin.
BTW the blkid command will usually show the USB stick label and gparted will make the device id more obvious. You DID label the USB stick, right? :-)
“I change distributions like people change socks, because I’m stubborn and refuse to test things through virtual machines and would rather run it pure and dry off my hardware.”
So do I. I to rather use them directly gainst my hardware.
How do you make your persistent partition?
You can create 2 or more partitions on the usb before installing so this
sudo dd if=/path/to/your/file.iso of=/dev/sdX bs=4M
would possibly look something like this
sudo dd if=/path/to/your/file.iso of=/dev/sdb1 bs=4M
and then sdb2 could become your persistent partition.
Gparted worked good for me. Currently have a 16gb flashdrive with 4 equal partitions used to hold my Linux backups.
Maybe I am dense, but why wouldn’t you just use “Startup Disk Creator?” It will start with the most likely .iso and destination already displayed. If they are not what you want then it is simple to navigate to where you like.
— Unless of course one enjoys pain and suffering, then the CLI is certainly the preferred go-to. :)
I’d not heard of the Startup Disk Creator, but from my Googling, this looks like an Ubuntu thing. Is it limited to just Ubuntu users? If so, then it’s not generally applicable.
Nice tutorial!
I keep such an installation on a USB stick on my keychain, filled with utilities that are useful when people ask me to fix their computers. It’s so much easier to repair them (particularly Windows installations) when you can boot into a good Linux install and work from there.