How to download and install a recovery image for your Microsoft Surface device

So, I got a Microsoft Surface 4 Pro the other day and one of the first things I did was to set up full disk encryption on the main drive.
I used the same software, Disk Cryptor, that I'm using on my desktop PC running Windows 10.
Unfortunately though, I failed to realize that the encryption software is not compatible with systems that don't use a MBR so that I ended in an endless "attempting automatic repairs" loop as the Surface tried to access the system but could not because of the encrypted hard drive.
All options to resolve the issue using the automatic repair options were fruitless, and since I could not reset the PC either because the data was still encrypted on the drive, I had to grab a recovery image manually and use it instead.
Doing so in advanced may be a good option, especially if you don't have access to another Windows PC that you could use when the Surface device won't boot anymore.
Note: A reset will remove all data on the disk. If you still have access to the data on the drive, you may want to use a backup program to back it up before you reset the PC.
Download the recovery image
The process itself is straightforward and the requirements are that you need to have a Microsoft account (which you can create if you don't), the serial number of the Surface device and a USB Flash drive with at least 8 Gigabyte of storage.
- Open Microsoft's Surface recovery image hub on the official website.
- Sign in to a Microsoft account.
- Select the Surface device you need the recovery image for, e.g. Surface 4 Pro.
- Enter the serial number of the device. You find it on the back usually. In my case, it was under the kickstand.
- Click the download button. The file is a 5+ Gigabyte zip file.
Prepare the USB recovery drive
Since the Surface has no optical drive, you need to use a USB drive instead to make the recovery image available on the device. Make sure the drive has a size of 8 Gigabytes or more.
- Right-click on the drive in Windows Explorer and select Format.
- Keep all settings and make sure it is set to Fat32.
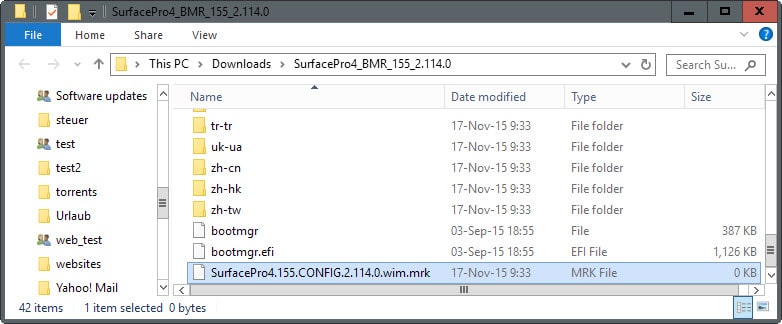
- Once formatted, extract the zip drive to the local system, and copy all of its files to the root directory of the USB Flash drive.
Using the USB Recovery drive to set the Surface
All that is left now is to connect the recovery drive to the Surface and perform the following steps afterwards:
- Plug the Surface into a power outlet to avoid any power related issues during the operation.
- Press and hold the volume-down button.
- Press and release the Power button.
- Release the volume-down button as soon as the surface logo appears.
- Alternatively, if you get a "automatic repair" screen on boot, select Advanced Options.
- Select System Image Recovery from the options and then the USB drive the recovery image is on.
- Depending on the version of the Surface, you may also get "Use a Device" to select the USB device there then.
- Windows will use the data on the drive to reset the PC.


I’ve moved the contents of the zip file to my USB drive after formatting it to FAT32 with default everything else. The drive isn’t recognized by my Surface tablet at all. I’ve confirmed the drive is viable in another computer.
I finally got my surface pro 4 to recover after days of failed attempts. A couple of notes:
1.Absolutely be sure to choose default allocation size when formatting the usb drive.
2. Use the built in windows software to extract the zip file image
hi i have probleme i coudn’t download a rcovery image for surface pro 2 size 6.7 gb
is there any solution to do it
pleas help
the file has downloaded and it is only 8.7 GB but it says that it is too big for my 14.4 GB usb. what can I do?
Is your USB FAT32 or NTFS? FAT32 does not support files this large.
it’s all about that expanded size. they need to be fat32 it wont recognize as ntfs
I am glad I found this as the site doesn’t really explain what to do with the files once you have downloaded from Microsoft. My Problem is that I have extracted the files to the USB Drive. I can even boot into the Recovery, but when I select to use the USB Drive, it just crashes (it seems but no errors) and the Surface just reboots again. It will continue this unless you remove the USB Drive. Do you have any suggestions?
You know what? Its Late….. and I just had a DUH! Moment… So for those who misread like I do might get something out of this… So Don’t choose Recovery from USB Drive… Do TroubleShoot -> Reset Your PC… So Now I get why it was rebooting. I was telling it to look at the Drive for installer which caused it to flip out and reboot the process…. :-( I am good now :-)
This Might help: https://www.microsoft.com/surface/en-us/support/warranty-service-and-recovery/usbrecovery?os=windows-10&=undefined
hi, is there any download managers that can download from microsoft site? I`ve had many several failed attempts because this file is huge and 5.7GB, it can`t be download with explorers.please help me. thank you.
Hey Siavash, trust me I believe everyone has gone through what you’re feeling right now. Thing is I came to realise that no download manager can initiate that particular download from the Microsoft website, so personally I had to stay up all night and try redownloading it when the internet was stable. I finally was able to get down to it but after a countless futile attempts. At the moment, my internet is crap but I’ll try and upload it on google drive or dropbox in a couple days time then maybe send you a link. In the mean time hang in tough, I know……I almost gave up on it myself. All the best buddy.
Hi Martin Brinkmann, any chance you might have downloaded the 8.7 Gb SurfacePro4_BMR_155_6.6.0.zip file since I’ve had several failed attempts. If so, would you be so kind to seed it to me as a torrent file or maybe google drive it to me. Regards
James, I have not unfortunately. Sorry.
I would have thought the USB drive should be formatted for NTSB, not Fat32. Is this documented somewhere for a recovery USB? Does Windows 10 use Fat32 by default? Please excuse my ignorance on this.
Just an addition Martin, having used this process for an Acer laptop, ASUS tablet and a Surface Pro 2, the recovery process can take a few tries to get it to boot to the USB drive with the new image on it.
I now just go straight to a Command Prompt from tapping the F8 menu at boot up. Find the drive and look for “Setup.exe” and double click that. It saves a lot of messing around cajoling windows into booting from the USB.
btw you cant f8 with win 10. they “disabled it” to speed boot times. you have to manually enable it before your system borks or your sol.