How to Automate the Disk Checking Utility in Windows 7
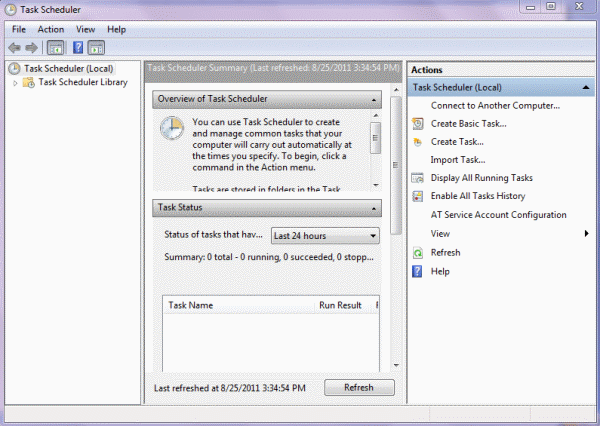
Windows allows you to check your hard drive for errors so that these errors can be repaired. This is called the chkdsk.exe or Check Disk utility. This is a task that can be easily automated with Task Scheduler. This does require rebooting to complete, so it is probably ideal to simply trigger the disk checking utility manually from time to time. If this is something that you are not going to remember or care to do on a regular basis, perhaps it will be useful to schedule it to run automatically at set intervals.
Windows Task Scheduler is a useful tool to manage automation of various tasks that need to be periodically performed on a Windows PC. It is a hands-off method to schedule tasks so that you do not have to concern yourself with them. Cleaning the hard drive, defragmenting the hard drive and running chkdsk.exe are just a few of the maintenance tasks that the Windows user needs to perform to keep their computers running smoothly. This article focuses on creating an automatic schedule for chkdsk.exe to run. You will need to create a Task Scheduler job to run chkdsk.exe automatically.
Keep in mind that chkdsk.exe will not be able to run if the drive is being used.
Open the Task Scheduler by typing “Task Scheduler†or “Scheduler†in the search box in the Start Menu. Select Task Scheduler from the menu and press Enter.
Select “Create a Task†and name the task along with a description in the appropriate fields. In this case, it is not necessary to specify a location for the task. It is necessary to “Configure for†the version of Windows being used.

Click the Actions tab. The following screen will be presented.

Click New.
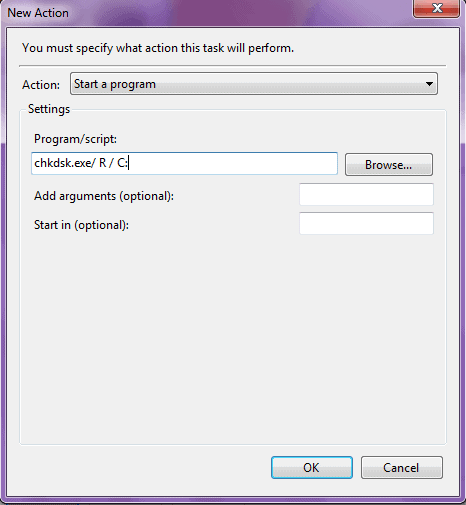
When you enter the Program/script, go ahead and enter the argument /R after chkdsk.exe. This will ensure that the computer restarts and performs the disk check on the appropriate drive. Otherwise, your computer will simply shutdown and you will have to manually turn it on for the disk check to start. Remember to indicate the disk to be checked. In this example, the drive is C:.
The full command is chkdsk /R c:.
Click OK and you will be asked if you wish to include the arguments. Click Yes. Notice that the action is completed along with the arguments in the proper order. Now click the General tab. Be sure to configure for the operating system that you are using. In this case, it is Windows 7.
Now click the Triggers tab to set the frequency of the automatic disk check. Monthly is probably sufficient. You can select just a few months or all months. Next you will have to specify the day of the month. You also need to specify when you want this trigger to start. By default, it begins immediately. Set the time of day for an hour when the computer will be on but you will not be using it.

Click OK. The next screen shows that the task is scheduled and enabled. Click OK. When you are finished, you see the main Task Scheduler window again. You will see the task listed in the Task Scheduler Library if everything was done correctly.
Advertisement










Hi,
Still not correct. /R does NOT restart…it (R)ecovers during the chkdsk operation. Please proofread the original post.
And a user will still need to restart the computer manually….or run a command such as this:
echo y|chkdsk C: /f /r
shutdown /r /f /t 00
The Echo command answers Yes to the ‘chkdsk’ prompt to run on next reboot.
I’d put this in a batch file and redirect the Task Scheduler to the batch file vs. running these as separate Tasks.
TD
Not accurate. Your parameters are not formed correctly. There isn’t a space before the letter, and the slash does not get added onto the end of chkdsk.
/R is not a chkdsk parameter that restarts a computer. “R Locates bad sectors and recovers readable information (implies /F).” http://technet.microsoft.com/en-us/magazine/ee872425.aspx
And I’m not sure what / C: is accomplishing. You just put C: not with the /. So it should be chkdsk /R C:
You are right, I have added clarification to the guide.