Creating a New Hard Drive Partition using Windows 7
Windows 7 has a built-in utility to create, resize, or delete hard drive partitions. No third party software utilities are required.
You are able to expand or condense partitions after creating them using the inherent function rather than blowing cash on a third party utility that is simply going to perform the actions in this step-by-step tutorial.
The process is fortunately simple and useful if you are ready to add a different operating system option with a hard drive partition. Whatever your purposes are, Windows7 actually makes is easy.
To begin, go to Start > Right-click Computer > Manage (or enter computer in the search and run box and select Computer Management from the results listing).
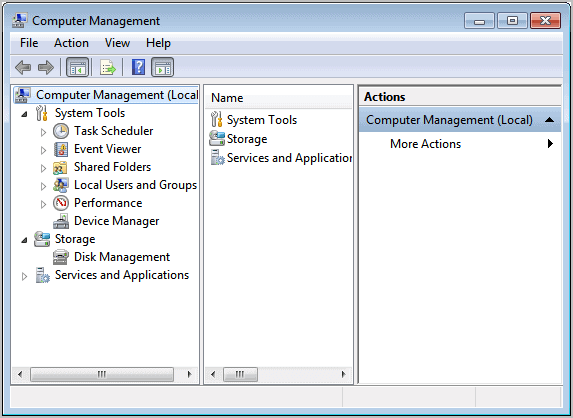
This is the computer management window which will open. Remember, this is a right-click to get the Manage option. Click on Storage > Disk Management. This is how you will be able to select the drive you want to partition. You should see a similar listing of all connected disks and drives after a scan of the system drives.

Choose which drive that you want to partition. There may be, of course, more hard drives on the system. External hard drives can be partitioned as well, but that is another matter. The focus will remain on partitioning an existing internal hard drive. Right-click on the drive that you want to partition and click Shrink Volume.
A query for available disk space will commence and next a window will be presented to demonstrate the size of the hard drive and what space is available for shrink. You will need to enter the amount that you want to shrink, or the size of the new partition. Obviously, it cannot be more than the amount of space available and the amount of space needed should have been carefully considered. There is no need to create an excessively large partition if it is not going to be used.
The "Enter the amount of space to shrink in MB value needs to be set. This basically cuts the selected amount of Megabytes from the current partition and makes it available for another one. Please note that you need to enter the amount in Megabytes in the menu. 1000 Megabytes are one Gigabyte, for 100 Gigabyte you would enter 100000 in the form.
Click Shrink after entering the values and the operation will take a period of time to complete, depending on the drive size and shrink amount selected. When it is complete, you will see an unallocated space representing this size selected.
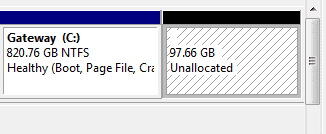
Select this unallocated space and right-click and choose New Simple Volume. The setup Wizard will appear. Follow the steps and fill in the partition size. Typically, this is the same size as that selected for shrink, but may differ by a few megabytes.
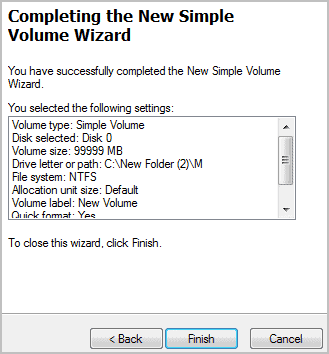
Click Next and assign a drive letter of your choice. It is irrelevant which drive letter you choose as long as it is not already assigned. In this example, the drive letter M is chosen for this new partition, but you are free to select another free driver letter instead. Select NTFS and enter a name for the drive. Simply click finish and the partition has been created.
It is usually not necessary to use third party partitioning software under Windows 7 unless you run into error messages.






Ok; this was the best explanation of the process. I have read many other directions but this was the best.SW
sir, while making partition i found a problm,,
when i click finish for making partition ,it says there is not enough space in the disks..
while i have 269gb free in allocated disk
As for me Windows 7’s computer management is no option. I’ve had twice troubles with it during resizing a partition. Both times the partitions rendered unrecoverable, on time even the whole disk’s data was lost. Luckily I had backups.
The only tool I use now is EASEUS Partition Master. It’s free (although I’ve started using the payed-for version recently), more feature-rich and never gave me any problem.
This is typical of many of the Microsoft tools, they provide the basics that leave you wanting just a little bit more. In my case my priority is cloning my boot partition as a backup, this is not supported in disk management.
Nor am I happy with the shrink function, it told me that I could save 81MB … but I have 52GB of free space on that drive. Any other tool out there could have resized the drive reducing it’s size by 52GB.
I have seen a few articles describing this but yours is far and away the best. Clearly written and concise but all points covered. Even a complete novice could follow that.
It is the fine standard of your coverage that has me coming back daily. Thank you.
There are a few important bits still missing from Windows 7’s capabilities, that third party software (commercial or open source) can fill.
Windows 7 cannot “clone” partitions — copy the exact content of a partition from one disk to another.
Related to this, and often bound up in the same functionality in other packages, is the ability to back up a partition to an external file, on another drive or over the network.
Last in my requirements, Windows 7 cannot move partitions on a drive — if your free space happens to be at the start of the drive and your partition is in the middle, Windows 7 cannot get it to the beginning of the drive where you can then resize it.