Windows compressing your high quality desktop backgrounds? Try these fixes

If you like to set high quality wallpapers as background images on your desktop you may have noticed that Windows compresses the pictures automatically when you do. What the operating system does is compress the image, likely to save space so that the system loads faster after sign in.
Most Windows users may not even notice that Windows is doing so, as it depends highly on the selected wallpaper image and operating system used. The compression is used in all operating systems starting with Windows Vista, but the way it is implemented has changed significantly with each system.
There is no switch to turn the feature off in Windows, but there are a couple of workarounds that you can try to avoid that your wallpaper images get compressed in the process.
Take a look at the following two screenshots. They show the same picture set as the background in Windows 8. The first shows clear signs of artifacts, while the second does not.

I have used the same source image both times, so why the quality discrepancy? The first image was set directly from Internet Explorer 10 with a right-click on the image and the selection of "Set as background" from the browser's context menu. The second was saved first to the computer, and then set as the background from Windows Explorer.
The images have not been modified in any way or form prior to this.
Solutions
1. Save to desktop first
Instead of using the browser's set as background option, try to save the picture to the local PC first. Use the default file manager to set it as the background, or the personalize screen. This resolved the issue on the Windows 8 PC that I tested various options on.
While this may work at times, it did not work out for all users who encountered the issue.
2. Convert to PNG or BMP
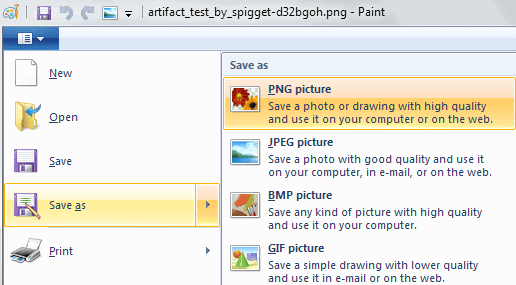
If your source image is a jpg, try converting it to png or bmp format instead before you set it as your background wallpaper. You may need to experiment with various ways to set it as your system's wallpaper though. Some users reported that you need to load it in Firefox or another browser (the local converted image), to set it as the background image without compression.
You can use Paint or any other image editor to convert the jpg image to png or bmp. Just right-click it and select Edit. In the image editor use the Save As option to save
3. Replace the compressed wallpaper
Windows saves the compressed wallpaper image that it creates in the C:\Users\%USERNAME%\AppData\Roaming\Microsoft\Windows\Themes folder on the system. It is stored as TranscodedWallpaper in the folder.
- Rename TranscodedWallpaper to TranscodedWallpaper_old
- Rename the original image that you want to use as your background image to TranscodedWallpaper.
- Make sure you remove the file extension of the picture.
- Move it into the theme folder.
- Right-click on the desktop afterwards and select refresh from the context menu.
4. Make sure the resolution fits exactly
You best use an image that has the exact same resolution as the screen resolution of the connected monitor. What you can try as well is to set the DPI setting to 72.009 dpi and 8bit.
You can use programs such as Adobe Photoshop, Irfanview or XnView for that.
Closing Words
Some images are not affected by the compression regardless of their original format, while others seem to be compressed no matter what you try. It may take quite some testing and trying out before you find a solution that works for the images that you want to set as your wallpaper on your system.
Have you encountered the issue before? If so, did you manage to resolve it?
Advertisement


THANK YOU SO MUCH!!!!!!!! Turning my image into a .png made my background 1000 times more crisp. Whoever wrote this article, I love you.
Nothing seems to work for me, I am not a computer guru , all high definition images I transfer from internet to my wallpaper are not clear resolution.
NB! Just leaving this here for any Windows 10 users like myself, who don’t want to download a separate program for setting PNG’s as wallpapers.
As stated in the article, use paint to convert images to PNG, but…
You should ONLY OPEN THE PNG IMAGES WITH THE BUILT IN WINDOWS 10 APP “PHOTOS” AND NOT “WINDOWS PHOTO VIEWER” (which is windows 7’s default program) when setting it as your background, otherwise you will still get artifacts regardless of it being in PNG format.
Alternatively you can right click the PNG image icon (without opening it in any program) and “set as desktop background”.
Hope this helps :)
> Open with Paint > File > Set as Desktop Background > Fill
No tricks needed. This works for me. Windows 8.1 x64
Converting to .png did the trick for me! Thanks alot! Using Windows 8.1 Pro and it works as of 23/9/2014
There is very simple solution, just use IrfanView to set wallpaper. IrfanView does its own transcode, similar to the one that Windows does, but its transcoding to lossless BMP and sets this as wallpaper. Artifact test image looks perfect that way.
Also I’d like to add, though I solely work with and save all images in PNG format. Most who know about it don’t know it has a limited compression ability that doesn’t save mega space, but it is directly correlated to space versus time constraints.
The higher the compression, the long it takes to save, the lower the compression, the faster it will save. Unlike JPG’s which can be compressed by percentage factors. PNG’s have a preset 1 < 9 system I'm not entirely sure what the percentage/factor is but I do know the end result image size in general so it gives me a ball park figure to work with.
I use the *XnView* image browser and shell extension to view, edit, modify and compress PNG's. The basic rule I use for size comparison for JPG to PNG, at factor 9 (highest) compression is x10. Without compression, I would use x13 as a general rule to figure out how large the resulting image would be. Unlike JPG's, there is no loss when compressing PNG's. Only time to save is effected.
**I did use another image browser/editor before but my other one (Graphic Workshop Professional v3) though better in terms of bulk editing of files, filters, effects and more, it didn't have a detailed image view, Only large thumbs, small thumbs, large text and small text modes.
It wasn't a problem when I was in XP and used the detailed view mode in Explorer, but I'm now using Windows 7-64b and Windows became stupid and removed the details I need for graphic editing from their details panel. Though it has columns to display size, dimensions etc… they are blank and nothing shows up in them ever. So I use detailed mode in XnView. Now only if XnView had the filters / tools from Graphic Workshop I'd be one happy camper, but alas… it doesn't…
Addition: Time to save an uncompressed (0) PNG file in comparison to their highest factor (9) can be mere seconds, to a couple of minutes. My largest file to date was a 34M uncompressed loss-less JPG I transferred to PNG prior to working on it. It took 7 minutes to compress at factor 9 and just shy of 5 minutes in factor 0. The end result in terms of size was 343M for factor 9, and 443.1M for factor 0.
In general I don’t usually work with 34M JPG images, it was a one time deal, but on average I work with 2-6 megapixel images. Time to save per file can be 2-15 seconds depending on the resolution of the image. Size wise, I have a 1Tb drive with a 12Tb RAID1 home server solution. Sadly I still have a 2x Blu-ray writer and need to upgrade to the current 6x system… *sigh*
If I export an image as *.png using GIMP, and then set it as background using IrfanView, I have no problem under Win7 x64.
Oh my god yes! Thank you soooooo much!!!!!!!!!!!!!!
I am using Picasa photo viewer to open my game screenshots, and to set the files as desktop background, I need to right click them. They are ALWAYS compressed and horribly washed out and blurry.
Now I got IfranView, the quality is ridiculous! It’s just what I’ve been looking for, thanks so much for sharing!
You can control the quality of an image on your PC, but you can’t control the software an emailed user has installed. I avoid this problem for a recipient by emailing a *.tif . If his ISP and email client don’t object to the large size of the image, this solution works for both of us so far.
I set my desktop background through Firefox.
Apparently, it’s saved in \AppData\Roaming\Mozilla\Firefox
I also need to view graphics with gradients in it since the default image viewer sucks.
I tried using “Set As Desktop Background” in Firefox, and it was done without compression. I think it is more easy than replacing the compressed wallpaper. :)
So Microsoft bought Skype, and we can all see how well that turned out. Now Microsoft buys Mojang, the makers of Minecraft, and we wonder… I’m not surprised Windows keeps inexplicably compressing certain background images.