How to share an optical drive in a local network

Most desktop PCs ship with an optical drive, usually either a DVD drive or a Blu-Ray drive while mobile PCs may not always ship with one. Especially tablets, netbooks and other low cost or small form factor devices do not ship with one usually.
If you need to access files stored on a DVD, drivers for example, tools, or media then you have two main options to achieve that.
You can either move the files to an USB Flash Drive or online storage before you connect that drive to the mobile device, or share the optical drive over a local area network.
It is actually pretty simply to do so, provided that you have already set up a local area network. If you have not, you may want to check out Microsoft's guide on the topic to get started.
One of the easiest ways to get started is to use the operating system's Homegroup feature which is available on Windows 7 and newer versions of Windows. It is explained in detail on the Microsoft Support website.
Sharing a CD, DVD or Blu-Ray drive
Do the following to share the optical drive of one computer on a local area network:
- Open Windows Explorer on the PC that has the optical drive.
- Locate the drive, right-click it, and select Properties from the context menu.
- Switch to the sharing tab in the properties window.
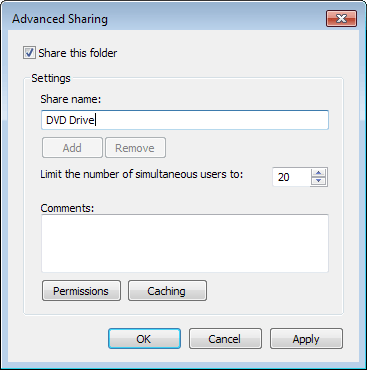
- Click on the advanced sharing button.
- Check "Share this folder".
- Type a descriptive name under "Share name", e.g. DVD Drive.
- The remaining settings are all optional. You can limit the number of simultaneous users, add comments, or define permissions or caching in detail. It is usually not required to make any changes here.
- Click ok.
Head over to the computer that you want to access the DVD drive on. Open Windows Explorer, and there the network listing. you should see the new shared folder here. Simply click on it to access its contents and work with the files stored on the disc.
Setup is not complicated and unless you make changes to your home network, it should work from that moment on directly without you having to modify anything anymore. The only requirement is that both systems need to be online and connected to the same network to share the optical drive.
It is often easier to share the DVD drive than to move files on optical discs to another location to access them on computer systems without optical drive. This is especially the case if you need to access discs frequently and not just once in a lifetime.
Advertisement


Worked for me to install office 2007 on a new laptop which lacked a CD drive. Great idea thanks. I used this method after I had bought an external dvd/CD drive which could not read code.
I need to be able to burn files to a shared DVD drive set up as instructed here on a Windows 10 network, but when I try it tells me the disk is full. (It isn’t, btw. Plenty of space for what I need to do.) Help?
Haven’t you heard, “no buddy uses DVD drives these days”. I wouldn’t be able to go without a drive for week, I also like how the newer cases that’s hitting the market don’t even include a 5 1/4 bay for the optical drive. It was like.. what two years ago that everyone was on this kick about optical drives and how they were dying, witch was really funny when you stop and think about it.
Thanks for the little tutorial, tell you the truth I never did try sharing a optical drive over the network, but the principles apply the same for files and folders. I just noticed that the optical drives don’t show up in the command prompt using the net share and the Shared Folders fsmgmt.msc weird. So the only way to share a optical drive, as I can see is using the GUI.