Change the number of rollback days for Windows 10 feature upgrades

When you install a new feature upgrade of Windows 10 on a computer or upgrade from a previous version of Windows to a newer one, you get options to rollback for a certain period of time.
Windows keeps the files of the old systems on the drive for a period of time to give users and admins options to roll back to the previous version. There are plenty of reasons for wanting to do so, from broken functionality or programs to removed or modified features.
The rollback period was set to 30 days initially but Microsoft reduced the period to 10 days with the release of the Anniversary Update for Windows 10.
Good news is that you can modify the period to increase it again or even decrease it. How that is done is revealed on Microsoft's Doc website.
The following commands are useful in this regard. Note that you need to open an elevated command prompt and run the commands from there.
To launch an elevated command prompt tap on the Windows-key, type cmd.exe, hold down the Shift-key and Ctrl-key, and select the cmd.exe (may also be listed as Command Prompt) result from the list of returned items.
Tip: Use DISM to fix issues that SFCNow can't fix.
Change rollback period on Windows 10

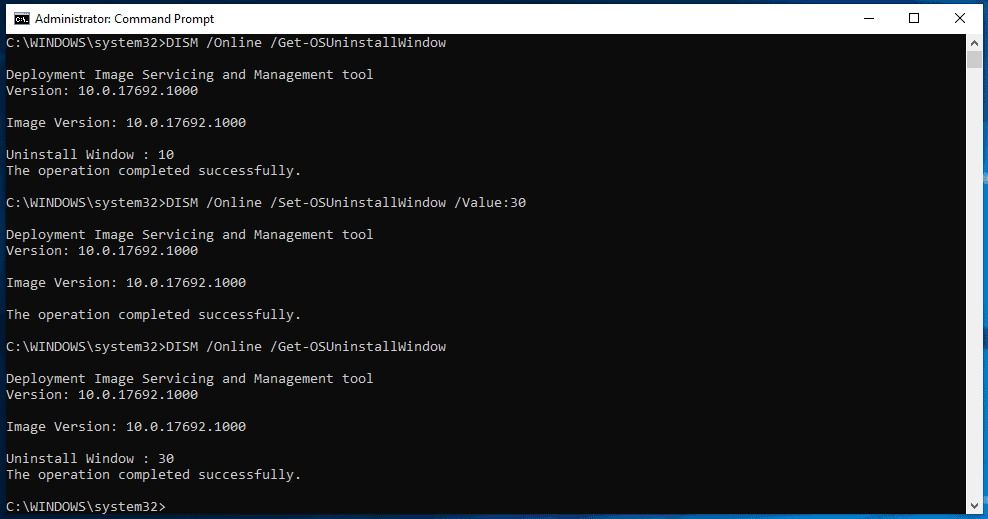
The first command that you may want to run is DISM /Online /Get-OSUninstallWindow as it returns the current rollback period in days. Just run the command and check the value displayed after "Uninstall Window" in the output.
The second command, DISM /Online /Set-OSUninstallWindow /Value:30, modifies the rollback period. The command listed in the last sentence changes it to 30 days which means that you will be able to roll back to the previous version of Windows up to 30 days after installation of the new version.
You can change the value to a maximum of 60 days. Note that Windows will keep the files of the previous version of the operating system on the device for the selected period.
Microsoft's DISM tool supports two additional commands that you may find interesting. The command DISM /Online /Remove-OSUninstall removes the previous version of Windows when executed so that the system cannot be rolled back anymore.
The command DISM /Online /Initiate-OSUninstall initiates a rollback from the command line.


Back in May 2018 I did an upgrade to Windows 10 from a disk that I had made when Windows 10 first came out. After having it four days I clicked settings and went to the rollback to 7 but it wasn’t there. I had read you could do a rollback if your other Windows were still installed and it shows it is still there but one folder it showed to go to was empty but there were files in it that you could roll back but not now. There has to be one update on windows 10 that it seems you could delete so you could roll back at anytime. Microsoft doesn’t want people to roll back at all but make you stay with 10. A friend of mine that build computer starting from windows xp ran a check on every file and it shows up Spyware in a windows update that will not delete. That file is where they can spy on your computer and see everything you do and go online. I have 937GB’s of movies on my hard drive I do not want to have to delete if I only have a choice to format my HDD. Any other help to this matter?
“You can change the value with any other value, e.g. 60 or 90 days.”
60 is max. I had already set mine to 60 and decided to try the 90 but it reset me to 10 and had to run the 60 again.
Thanks Roger, corrected!
Worked like a charm for me thank you.
It appears that this options need at least version 1803.
I also get error 87 option unknown in Win10 Enterprise 1709.
I ran the commands on my Windows 10 Pro at work with no problems. Then I ran the same on my home laptop – also Windows 10 Pro – and got an error 87 “get-osuninstallwindow option is unknown”. In both instances, I simply cut-and-pasted the commands from your article and into the Administrator command prompt windows.
Entering “DISM /?” doesn’t show a “Get-OSUninstallWindow”. Hmmmmm
Windows 10, in the Type here to search box, type: cmd then hold Ctrl and Shift with left hand and press Enter with right, launch command prompt in Admin mode.
There is a boo boo
DISM /Online /Initiate-OSUninstall initiates a rollback from the command line.
Thanks Mike!