Disable or customize Windows' Internet Connection test to improve privacy
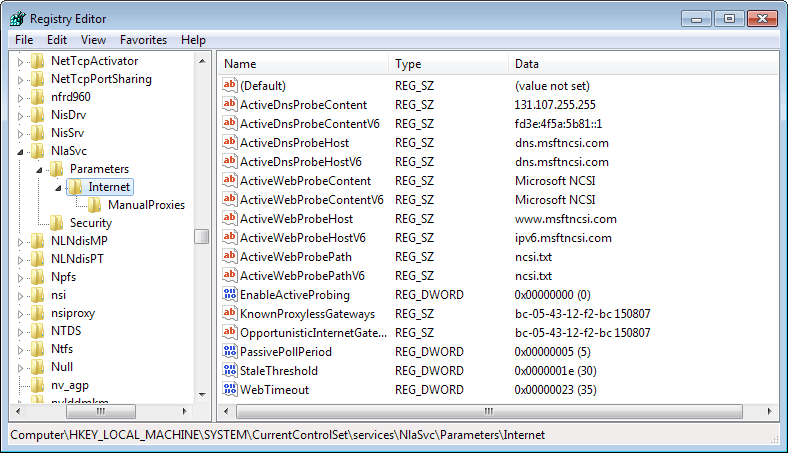
Whenever you start a PC running Windows, an Internet connection test is run automatically to test the Internet availability.
The test tries to connect to a Microsoft website -- http://www.msftncsi.com/ -- to download the ncsi.txt text file from the server the website is hosted on.
Windows knows then if your computer has Internet access, local area network access, or no network access at all.
To be precise, NCSI, that is the Network Connectivity Status Indicator, tries to connect to the domain name to check the contents of the text file.
It will also make a request for the DNS name resolution of dns.msftncsi.com and expects the result to be 131.107.255.255.
The text file itself does not contain lots of information, just the text Microsoft NCSI to be precise, but since a connection attempt is being made, it can be recorded by the server.
So, whenever Windows checks for Internet connectivity successfully, the time of the connection and the IP address is recorded by Microsoft's server.
This is confirmed on this Microsoft Technet page where the feature is described in detail:
IIS logs are stored on the server at www.msftncsi.com. These logs contain the time of each access and the IP address recorded for that access. These IP addresses are not used to identify users, and in many cases, they are the address of a network address translation (NAT) computer or proxy server, not a specific client behind that NAT computer or proxy server.
According to the information, the IP address that gets recorded by the server is not used to identify users.
A -- not so recent -- post on the Superuser forum highlights two options to block the testing of the Internet connection and the sending of data to Microsoft's server.
The first disables the check in the Windows Registry, the second changes the server to a custom hosted one so that checks are performed on a server under your control.
The Registry
This is the easier option. All it takes is to change the value of a single Registry key and be done with it for good.
- Use the Windows-R combination to bring up the run box on your system.
- Type regedit and hit enter.
- Confirm the UAC prompt that appears.
- Navigate to the following folder: HKEY_LOCAL_MACHINE\SYSTEM\CurrentControlSet\services\NlaSvc\Parameters\Internet
- Double-click on EnableActiveProbing and change its value from 1 to 0.
- This disables the feature. Should you wish to enable it again at a later point in time, change its value back to 1.
The custom server
You can modify the values that you find here to use a custom server instead for the look-ups. This requires that you have access to such a server.
- First thing that you have to do is save the nsci.txt file and upload it to an Internet server. Make sure it can be accessed as a plain text file.
- Then it is necessary to change the following values that are all listed under the same Registry folder as above.
- ActiveWebProbeHost needs to be set to your web host that you want to use.
- If you use IPv6, you need to change ActiveWebProbeHostV6 as well.
- Change ActiveDnsProbeContent to the DNS server IP used by your domain.
- Change ActiveDnsProbeContentV6 to the IPv6 address of the DNS server used by the domain.
- Make sure that EnableActiveProbing is set to 1.
Group Policy
Yes, there is a third option available that is not mentioned in the guide. If you have access to the Group Policy Editor, you may modify the feature there as well.
- Use Windows-R to bring up the run box.
- Type gpedit.msc and hit enter.
- Navigate to the following folder: Local Computer Policy > Computer Configuration > Administrative Templates > Network > Network Connectivity Status Indicator.
- Here you find five settings.
- Corporate DNS Probe Host Address defines the expected address of the host name used for the DNS probe.
- Corporate DNS Probe Host Name defines the host name of a PC known to be on the corporate network.
- Corporate Site Prefix List defines the list of IPv6 corporate site prefixes that you want monitored for connectivity.
- Corporate Website Probe URL defines the address of the website that you want to perform an active probe against.
- Domain Location Determination URL defines the HTTPS url of the corporate website used to determine the domain's location.
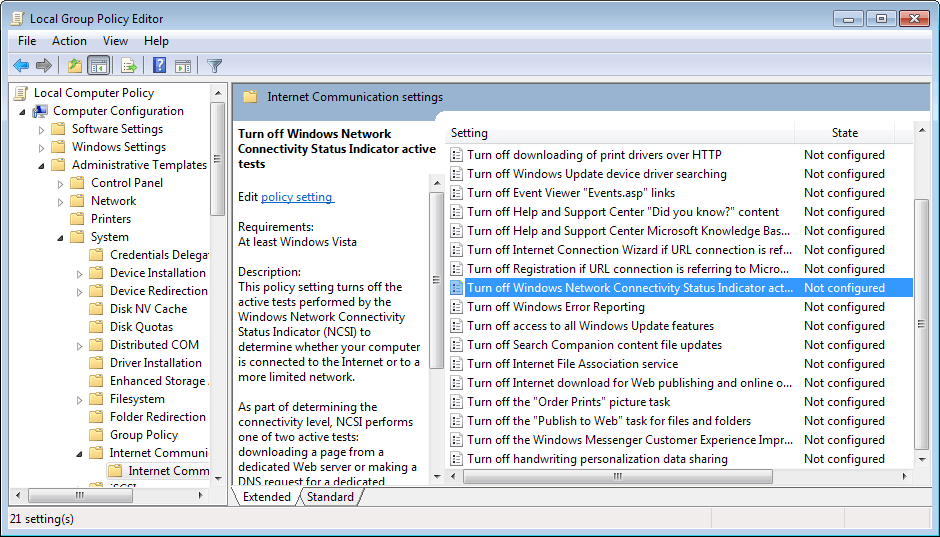
- To simply turn off the feature, you need to navigate to another folder:Â Local Computer Policy > Computer Configuration > Administrative Templates > System > Internet Communication Management > Internet Communication Settings.
- Here you find Turn off Windows Network Connectivity Status Indicator active tests.






Martin! I think I love you! I had foolishly edited my registry which put my wifi icon into a permanent “Disconnected” status (even though I WAS connected. Programs apparently “read” the icon and were continually telling me I was disconnected. I copied the registry at the beginning of this article and voila! All is back to normal now!
We’re rolling out Windows 10 in our company (streamed image – Citrix). We regularly have the yellow “No Internet Access” icon which impacts license management of our Office products.
To avoid this, in the Windows 10 image, we set the “EnableActiveProbing” registry key to ‘0’. Unfortunately, after a while, the yellow icon again pops up.
We now tried to change the registry keys to internal checks: “EnableActiveProbing” is again set to ‘1’, we configured an internal machine for DNS checks and a txt file on a webserver with a predefined text in it. With this last set-up, the yellow icon is there from the first boot on. Does anyone have thought or ideas on how to overcome this? Thank you.
its realy easy to fool the NCSI.
Example my network is 192.168.31.1 and my router has the domain router.lan
in the local dns server is a record of router.lan A = 192.168.31.1
now i have set
ActiveDnsProbeHost = router.lan
ActiveDnsProbeContent = 192.168.31.1
the windows machine will check that the dns record for router.lan is 192.168.31.1
if pass will go the the next step
now the web server test
ActiveWebProbeHost = web.lan in my case
ActiveWebProbePath = text.txt
ActiveWebProbeContent = Connect Test
so the second test is simple the client connect to http://web.lan/text.txt
and loads the web page and if the message Connect Test appears then its a success and you have ipv4 internet.
What is this “Network connection interrupted. Check the upstream connection or contact your ISP to resolve problems”
The network requires me to Sign in but how can I sign in into Msftconnectest.com/redirect if I am not connected?
Please help me.
Thank you, Martin.
This – and all of your tutorials – are greatly appreciated!
– L.
I wonder if it is possible to keep the status of connection with the internet always online even without being connected to the internet in an ad hoc network. I would like to trick the Windows to it believing that we are connected
Hi
I want the exact same thing.
I have a LAN network in my university, which requires in-browser authentication.
According to the explanation, NCSI is prevented from connecting to the mentioned addresses and so the yellow asterix sign is placed over my connection.
Now , the problem is:
log in to microsoft account (either when logging into windows 10 or signing into office products such as OneNote) is not possible. It seems windows does not even try to connect when there is a limitted connection.
Please, inform me if there is a way to remove the yellow sign! How exactly can I host the NCSI server internally? please post a step-by-step procedure,as I am not a IT student and i don’t know even the basics. sorry.
note: I can’t host a website.
Great info, but my XP machine doesn’t have “HKEY_LOCAL_MACHINE\SYSTEM\CurrentControlSet\services\NlaSvc\Parameters\Internet”. There is only HKEY_LOCAL_MACHINE\SYSTEM\CurrentControlSet\services\Nla\Parameters\(Default) & \ServiceDll. Any idea why? Thanks
I think this has been introduced in Vista.
Hi Martin
You wrote “The test tries to connect to a Microsoft website — http://www.msftncsi.com/ — to download the nsci.txt text file from the server the website is hosted on.”
But it should say “the ncsi.txt” :)
You are so right, corrected!
So I would only have to do step 1 : The Registry & not do steps 2 & 3 : The custom server/Group Policy ?
Yes that is right.
Is this of any use to people who don’t have any access to a server ?
Well you can disable the testing completely without a server.
Good article..Today I will give you some tricks with which you can reduce unnecessary usage of packet data by Windows 8 apps.
First of all, turn off the live tile for those apps which use internet every time you connect the internet like “News, Finance, Travel, Facebook apps etc. But it’s not necessary to turn live tile off for music, video, photos. To do that just go to start menu>right click on the app and click on Turn live tile off .
you have to stop all the background process which uses a lot of packet data and download for updating other software. (To update software make it manually). To stop the background download process go through the following steps: Start the task manager>>Select more details (if not selected)>>Click on services tab>>Click on Open Services at the bottom>>a new window will come>> Find Background intelligent Transfer Service and right click over it and stop it. Now close the window and you are done.
Now another fact that system reserves 80% of your total packet data bandwidth and provides 20% for your use. You can change this by following this instructions. For doing this follow the instruction:
At first go to Run>> Then type gpedit.msc and press enter>> you will see a tab Local computer policy and under it see Computer configuration>> Now click on Administrative templates >> now double click on Network on the right side>>> double click on QoS packet scheduler >> then double click on Limit reservable bandwidth>> now a new window will come>> now select Enabled >> make the bandwidth limit to 0%>> now Apply and OK.
Try it and u will surily cut nearly 80% of your data usage..EnJoy
Strange that the connectivity status indicator sends and receives datagram via TCP just to test network connectivity! This can simply done using an ICMP protocol.
Registry option looks good to me. May be a stupid question but I am just wondering in case it can affect the automatic updates.
No it won’t.
But what about: ” Wenn Sie diese Richtlinieneinstellung aktivieren, führt NCSI keinen der beiden aktiven Tests aus.”
Translated: “If you activate these Option,there will be no active Test”
What is this? maybe “Kryptogerman” ???
llorc
It means that if you enable the policy, no tests will be run.
What is this: ” Wenn Sie diese Richtlinieneinstellung aktivieren, führt NCSI keinen der beiden aktiven Tests aus”
meaning: ” If you activate it, there will be no active Tests”
what about this ?
is it “kryptogerman” ?
llorc
Hello,
in the german Vesion (windows7) you can read at: “Turn off Windows Network Connectivity Status Indicator active tests” following:
” Wenn Sie diese Richtlinieneinstellung aktivieren, führt NCSI keinen der beiden aktiven Tests aus. Dadurch wird möglicherweise die Fähigkeit von NCSI (und von anderen Komponenten, die NCSI verwenden) zur Feststellung des Internetzugriffs eingeschränkt. Wenn Sie diese Richtlinieneinstellung deaktivieren oder nicht konfigurieren, führt NCSI einen der beiden aktiven Tests aus.”
How is this to understand ?
llorc
While I cannot say for certain, the “one of two” probably refers to IPv4 or IPv6.
About option 1 – Setting EnableActiveProbing to 0
Quote from http://superuser.com/questions/688049/windows-shows-limited-connection-when-it-isnt :
Setting this value to 0 will disable active probes. A potential side effect is that, the machines may determine that they don’t have internet connectivity and display a or exclamation “!†on the network icon and “limited†connectivity in the network UI.”.
Is this true ? I’m not at all a techie and I’m cautious, over-cautious sometimes for this reason.
Also, my EnableActiveProbing value is 4 (at this time), and not 0. I’ve been trying to find out the meaning of values > 0 for EnableActiveProbing, unsuccessfully. Thanks for sharing your knowledge.
I never ran into issues here, but that does not mean that there are not any situations where this may be true.
I think that is that this is the least of worries about Microsoft spying on us. Microsoft can remotely hack into any Windows PC without users notice, just like it did a couple of weeks ago, hacking Windows PCs and stopping TOR browser (all in the name of users benefits) : http://www.wired.co.uk/news/archive/2014-01/20/microsoft-removes-tor Microsoft has 70+ services sending users Windows PCs data 24/7, again, for the benefit of the users . Such like : Activation, Customer Experience Improvement Program (CEIP), Device Manager, Driver Protection, Dynamic Update, Event Viewer, File Association Web Service, Games Folder, Error Reporting for Handwriting Recognition, Input Method Editor (IME), Installation Improvement Program, Internet Printing, Internet Protocol version 6 Network Address Translation Traversal, Network Awareness (somewhat), Parental Controls, Peer Name Resolution Service, Plug and Play, Plug and Play Extensions, Program Compatibility Assistant, Program Properties-Compatibility Tab, Program Compatibility Wizard, Properties, Registration, Rights Management Services (RMS) Client, Update Root Certificates, Windows Control Panel, Windows Help, Windows Mail and Windows Problem Reporting. These are the main features and services in Windows that collect and transmit user data to Microsoft. the identity of Internet users sending X.509 standard encrypted information, The Malicious Software Removal tool will report straight to Microsoft with both the findings of your computer scan, but also any potential errors.Hashes of your Peer Name tied to your IP address… The list is just a sample as there is much more data sent to Microsoft.
If by “hacking into” you mean “released a new version of the malicious software removal tool” and “updated Windows Defender malware definitions”, then, sure, they “hacked into people’s computers”
https://web.archive.org/web/20140113082254/http://blogs.technet.com/b/mmpc/archive/2014/01/09/tackling-the-sefnit-botnet-tor-hazard.aspx
Excellent tutorial! I always wondered if you can change this behavior in Windows. Thanks Martin!
I knew Windows was doing this… Thank you Martin.