Setting Up The Content Delivery Network MaxCDN In WordPress
Back in 2010 I started to use a content delivery network in WordPress to speed up the delivery of pages to users from all over the world. The basic issue without a CDN is that all data is transferred from one server. If your location is close to that server, you will experience fast speeds and everything is golden. If you are located across the ocean, things change a lot as response times drop, and so do the times it takes to transfer data to the user. This can add hundreds of milliseconds if not seconds to the transfer.
While you might say that this is not an issue, studies have shown that milliseconds can improve conversions, more revenue on commercial sites or reduced bounce back rates or user initiated disconnects.
The setup back then was time consuming and not the easiest thing to do, especially for new or inexperienced webmasters who have never worked with content distribution networks before. The following guide looks at an alternative that is a lot easier to setup. We use the CDN provider MaxCDN for that, and the WordPress plugin WP Super Cache.
MaxCDN
First thing that you may want to do is sign up for the service over at Max CDN. The company is currently offering a 1 Terabyte data transfer and 250 Megabyte storage package for $39 which is valid for one year. Depending on the site's bandwidth requirements, this may be all a small or medium sized website may need for the year, while high traffic sites may require additional packages.
The following prices are currently charged for additional bandwidth, storage and other requirements.
- Additional 10 Gigabytes of storage cost $9.95 per month
- First 10 TB of excess traffic cost $70 per Terabyte
Webmasters who know they will exceed the bandwidth can buy a monthly billed 5 TB bandwidth quote instead for $199 to save money on that. This is profitable if more than 3 Terabyte of traffic are needed per month.
Registration should not pose a problem at all. Note that you do not sign a long term contract, and that you can basically quit at any time and only pay for what you have used up until that point (if it exceeds the 250 Megabyte storage / 1 Terabyte transfer package). There is also a 30-day money back guarantee.
You can pay using PayPal or a credit card. Setup is near instant, and a confirmation email is send to the email address that you have entered during setup. Just confirm the account and log in with your email address and account password.
Once you are logged in, you need to create a Pull Zone in the admin interface. This is not complicated, so no worries here. MaxCDN has a support page up that guides you through the setup.
Setting up the Pull Zone
Go to the Manage Zones menu in the admin interface on the MaxCDN website. Here you see a menu with different types of zones that you can create.
A Pull Zone will automatically pull the data from a location that you specify upon the first request for the file. The files are served to the end user from either a subdomain of netdna-cdn.com or a custom domain (sub domain) of your choice that points to the CDN. The data is automatically purged from the server after an customizable amount of time.
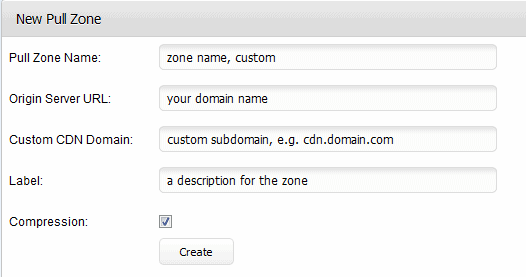
Click on the Create Pul Zone button there to load the pull zone creation menu.
I have entered the following values for ghacks.net:
- Pull Zone Name - ghacks
- Origin Server URL - https://www.ghacks.net/
- Custom CDN Domain - cdn.ghacks.net
- Label - ghacks
- Compression - yes
Click create and wait a few minutes until the creation process has been completed. You will now see information on the screen that is telling you to create a new CNAME record to point the selected Custom CDN Domain to the hostname that has been created by MaxCDN during setup.
Here is the video that demonstrates the setup until this point.
Create the CNAME record
You create the CNAME record either at your domain hosting, or your web hosting admin interface depending on which DNS you use. I explain how you set it up using Godaddy domain hosting. If you have issues with this, contact your web hosting companies technical support to sort it out.
Visit the Godaddy website and enter your username and password in the log in form at the top. Click on Domains > Domain Management afterwards. This opens a list of all domains currently hosted there. Click on the domain that you want o configure the CDN for.
Locate DNS Manager on the screen, and click on Launch to open it. If that option is not available, it usually means that your DNS is hosted at your web hosting company or a specialized DNS hoster.
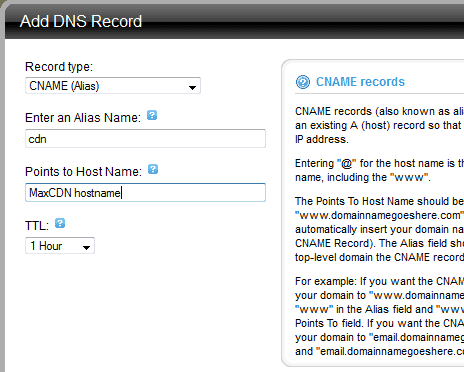
Click on Add Record at the top and make the following selection in the new window:
- Record Type: Cname (Alias)
- Enter an Alias Name: cdn (if that is what you selected on the MaxCDN site)
- Points to Host Name: The MaxCDN hostname that is displayed to you after the creation on the site.
- TTL: Keep at 1 hour, or reduce to 30 minutes
You should see the new CNAME in the list now. Keep in mind that DNS propagation may take a while before it is completed.
WP Super Cache
Install the caching plugin in WordPress. If you are using a different caching plugin, I suggest to disable it to avoid compatibility issues. Once you have installed the plugin activate it in WordPress, and make sure it is configured properly. The plugin will notify you about that under Settings > WP Super Cache.
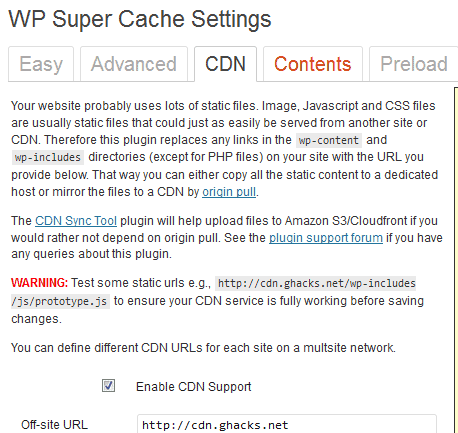
Once the caching works, switch to the CDN tab, and fill out the following fields properly.
- Off-site URL - Enter the CNAME url, e.g. http://cdn.ghacks.net
Check the Enable CDN Support box to enable the CDN on the system.
Grand Finale
If everything has been configured properly, your CDN starts to work automatically from that point in time. You can test that by opening your site, and looking at the url of the images that get loaded there. If you see your content distribution network url, it is working properly.
I'd suggest to keep a good eye on the traffic and reporting on the MaxCDN website and your own website, to avoid running into a situation where the costs for the CDN exceed what you are willing to pay for it.
As a user of the service, I'd criticize two things. First that there are no Asian datacenters right now (some are planned), and second that some information, like the remaining bandwidth or disk space usage, are not updated in realtime.
The support on the other hand is top notch from what I can tell, with response times in the 15 to 30 minute range for the requests that I had.
Advertisement




Interesting choice of CDN, I am working along well with Amazon Cloudfront and W3tc as a cache plugin. It is more expensive, but also more ubiquitous. What made you choose MaxCDN? Price?
I decided not to use W3tc as it has not been updated for a long time.
I did some research and the service receive good reviews across the board.