Setting Up A Content Delivery Network In WordPress
In order to improve connections for users from all over the world, Ghacks enabled a content delivery network (CDN) yesterday.
A CDN basically stores files and information on mirror servers all around the world in order to serve data to users from locations closest to them.
This speeds up the connection process noticeably. In its simplest form a content delivery network is nothing more than additional servers that are serving data necessary to access the website.
The first part of this tutorial describes how to use a content delivery network in WordPress. It details the requirements needed to install the CDN properly. The second part will cover the configuration of the CDN in WordPress.
Setting Up A Content Delivery Network In WordPress
WordPress does not have options to enable a CDN, however plugins and third party tools can be used to enable that functionality. Here are the scripts and services needed to configure the content delivery network as we did here at ghacks.net:
- Install the WordPress plugin W3 Total Cache. This plugin is one of the best caching plugin available for WordPress, with lots of options that other caching solutions - such as WP Super Cache - do not offer. This plugin adds CDN support to the WordPress blog. The support is disabled by default but can be activated and configured relatively easily. Note that there are other plugins available that allow you to use a content distribution network such as CDN Enabler, Easy PageSpeed, or WP Fastest Cache.
- W3 Total Cache supports Amazon S3, Amazon Cloudfront, self hosted and other CDN distributions such as VPS.net, Akamai, MaxCDN and Rackspace. These solutions cost money, and the price can range from $0,10 to $0,25 per gigabyte of traffic served. The cost per gigabyte usually goes down if the website has lots of traffic. Amazon Cloudfront users, for instance, pay $0.15 per gigabyte for the first 10 TB but only $0.03 per gigabyte for every gigabyte over 1000 TB.
We have selected Amazon Cloudfront as our content delivery network. It may not be the cheapest available, especially for webmasters with low traffic websites, but it is easy to configure and maintain with the help of the W3 Total Cache plugin.
The first thing that system administrators need to do is to create an Amazon S3 account. It can take several hours before the account becomes activated. In the meantime, the system admin can install the WordPress plugin W3 Total Cache and verify that the blog is working as it should be.
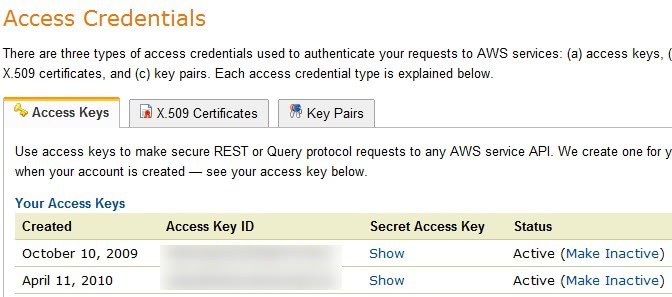
Although we only concentrate on the CDN configuration in this article and not the caching configuration, you may want to configure the caching as best as you can. Retrieve the access key and secret key from the Security Credentials page once it has been activated. Make sure the status is set to active there.
WordPress Configuration
Open the WordPress settings, switch to the W3 Total Cache configuration and change the CDN network to Amazon Cloudfront.
Do not enable the CDN yet. Now switch to CDN settings and enter the access key and secret key in the settings. A bucket needs to be created in the next step, which is basically a folder on the Amazon Cloudfront network.
As this did not work for us from within WordPress, we used the Firefox add-on Amazon S3 Firefox Organizer to create the bucket. If you have used a third party tool to create the bucket then enter it's name in the bucket field now.
AWS Management Console
Now switch to the AWS Management Console and create a new distribution. Select the bucket that has been created earlier as the origin and enter a CNAME that you plan to us for the CDN.
This is necessary if you want your users to see a URL such as cdn.yourdomain.com instead of dx7ffewrewr.cloudfront.com when connecting to your website. You can pick any CNAME you want at this stage. Keep all the other parameters in their original state.
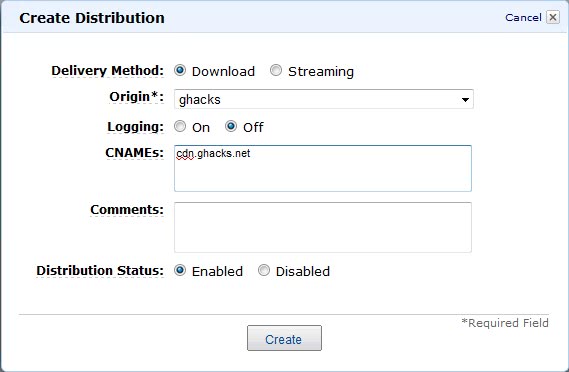
The new distribution should appear in the listing. It is ready when the status reads enabled and the state deployed.
Web server or host
Switch to your web host or server now. We need to create the new CNAME for the CDN. We are going to show you how it is done if the domain is hosted at Godaddy.
Update: Godaddy recently changed it homepage to a new design and layout. The functionality provided is still available, but in different places.
Once you have signed in to your account, you need to click on Domains to display the list of domains. There you need to find the domain and click on manage to open its control panel.
Switch to DNS-Zone on the page that opens and select the add record option. Pick CNAME (Alias), enter dns under host and the cloudfront domain under points to. End
Log into your Godaddy account and click on Domain Manager once the overview page has loaded. This is the page that is displayed after login. Click on the D icon next to the domain name that you want to configure the CDN for. This opens the dashboard for that domain. Select More Settings and click on the Manage button next to the Total DNS / MX entry. Select to Add a new CNAME and enter the same name that you selected during the distribution creation in the AWS Management Console. If you followed our example it would be cdn.
Enter the domain name shown in the distribution console in the Points To Host Name field. This will basically redirect requests to cdn.domainname.com to the Cloudfront url.
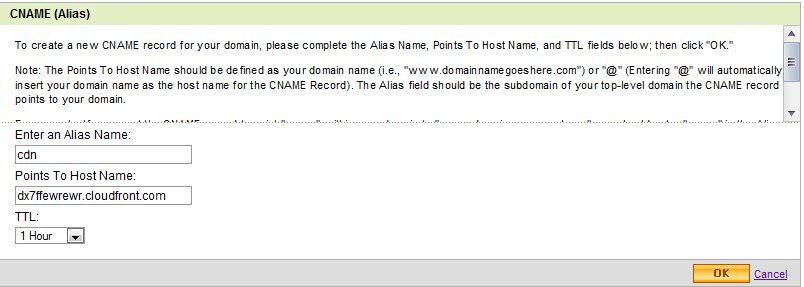
It takes some time before the redirection becomes active. You can use this tool to check if the CNAME is active.
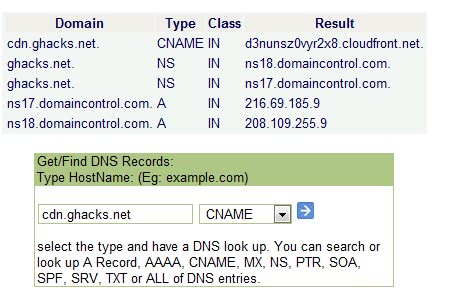
Enter the cloudfront domain name and the CNAME in the CDN configuration in the WordPress blog. Save the settings before continuing.
Recap
So far we have performed the following steps:
- Created an Amazon S3 account
- Installed the W3 Total Cache plugin
- Copied the access and secret key and entered it into the CDN configuration screen of the W3 Total Cache plugin
- Created a bucket
- Created an Amazon Cloudfront distribution
- Configured a new CNAME pointing to the domain name of the new distribution
Once this has been done, it is time to test the configuration by clicking on the Test S3 Upload button. If this returns that everything is running fine then you are ready for the final step. If not, you need to retrace the steps done so far to find the problem.
Transferring files to the CDN
If the upload test was successful then you are ready to transfer data to the CDN. Now transfer your media library, include files, theme files, minify files and custom files to the CDN. This is done in the WordPress admin interface. Depending on the amount of data that needs to be transferred, this can take some time.
Activate the CDN
Switch to the General Settings tab once all the data has been transferred to the CDN. Place a checkmark in the Enable CDN box to activate the content delivery network. You should now test the blog to see if everything is up and running as it should be. This includes accessing various blog pages, leaving comments and using proxies to connect from other locations around the world.
Conclusion
It takes between one and six hours to configure and activate a CDN on the WordPress blog. Most of the time is spent waiting for the DNS to propagate, the account to become active and the data to be transferred. Webmasters should check the speed of their website in Google Webmaster Tools (or other tool) to see if the changes have decreased the load time for the users of the site. They should also monitor the costs over at Amazon.





Great Tutorial..Thanks…Hope blog loads at lightning speed..
Thanks for this. My CNAME setup is done. However, I don’t just want
http://mysite.com/wordpress –> to become
http://cdn.mysite.com
I want internal folders to become CDN links. For instance:
http://mysite.com/wordpress/wp-includes/themes –> to become
http://cdn1.mysite.com
W3TC cannot do this. The WP_Regex_Replace plugin can do what I want, but then W3TC doesn’t work as it goofs up all other plugins.
What else? Many thanks!
thank you for the article. I find pretty simple to do it. My question is on using Amazon AWS to create a WordPress network (Multi-site).
Which modifications would be necessary in this rather more complex case?
Thanks for your help.
The buttons weren’t being generated dynamically.
But, I was trying out different versions of the button at one point, which may have lead to the proliferation of new links/buttons were created.
In any event, I wiped out the buttons and buckets in Amazon and rewrote the links on my end. If they seem to be multiplying again, I may revisit the subject.
But, I think I’m in the clear for now.
Thanks again!
I love this post. I’ve been stuck on the CDN part of W3 Total Cache for two days until I found your walkthrough and re-did it from scratch.
Just one question, if you have a moment. I’m using this exact set-up–W3 Total Cache and Amazon Cloudfront for a CDN.
After I got this up and running I noticed that it creates several versions of my icons. For example, I have an Amazon button (amazon.png) that turns up in every post where I write about something that’s available on Itunes.
And, although this is how I write the link in the post–W3 creates a new filename every single time I use it. So my bucket at Amazon now holds amazon.png…amazon1.png…amazon2.png and so on.
Just wondering–is this normal? Or should the this CDN combo be serving the same amazon.png image throughout?
Like I said, if you have a moment, I’d be curious. If not, it’s still an excellent tutorial that ended a lot of headaches for me.
Thanks again!
Chris, if you upload the button again as a new file then it will be synced as a new file. The CDN does not compare uploads with already existing files. What you need to do in this case is to re-use the old button that you have already uploaded before.
Oh, if the button is generated dynamically, it may also be the cause for it to be uploaded multiple times.
Probably it’s evident, but I meant to say that the Amazon button links to everything I feature that’s available on Amazon–not Itunes, as I wrote above.
I’m stuck at the CDN configuration. I created my Amazon S3/Cloudfront account, a Bucket and the distributions. I created a CNAME in Hostgator. I input my access key and secret key. Under “Replace site’s hostname with:” I used the doman name created in Cloudfront that ends in cloudfront.net (it’s just a bunch of numbers and letters). Am I supposed to include the “.cloudfront.net” in the box or just the first part of the name (I’ve tried both)?
Under Bucket I put in the name of the bucket I created in in Amazon S3. I didn’t use any third party plugin, just the Amazon site.
When I click Test Cloudfront upload I get an “Unable to resolve domain: my CNAME” error. I tried the CNAME I created in Hostgator on the DNS Lookup and it looks like it’s working. It shows my website as the Domain and the Result as a hostgator.com
Obviously I’m doing something wrong. I hope you can help.
I am also experimenting some problems with this plugin. Well it a a Iittle different because every time that I want to configure my CDN which I know for sure that all my configurations are correct in the right place, however as soon as I saved, it sent me to a blank page with a 0 character on top of the page. Any idea what could cause this issue? In the end it doesn’t.
I’m having issues with the plugin. The bucket is created, my settings are in but whenever I click “Upload includes files” or any of the other options, I get an error. I look in S3Fox and can see the files are created – or at least, some of them – but the upload bar never moves beyond 0% and I just getting told “Status: request failed (retry in Xs)” which is driving me to distraction! Anyone got any ideas?
Thanks for this thorough post!
I followed these directions with some ease, though I found the part about CNAME settings a little opaque, both here and especially on Amazon Help pages.
One thing I don’t see mentioned and was a game-stopper for me is setting permissions on uploaded files at the CDN. The S3fox add-on for Firefox calls is “ACL” settings.
After uploading, I noticed that all files were blocked to Everyone for Read. This caused the site to load improperly with CDN enabled in the W3 Total Cache plugin.
To fix, the easiest method, though time-consuming on all the files in the bucket, is to navigate to the root folder or “bucket” at the CDN and right-click the folder then select “Edit ACL”. I left all others alone and checked “Read” for “Everyone”.
This cured all of the issues for me. Thanks again for the great post!
That’s exactly the same issue I ran into… I can’t believe they would leave out such an important piece to this process… I guess I should be thankful for the good write-up though.
Every Amazon S3 related blog gives you an impression that there is only one Amazon S3 client available – S3 fox. However there are many more freeware clients which are much superior. For instance, S3HUB for Mac (http://s3hub.com) and CloudBerry Explorer for Windows (http://s3.cloudberrylab.com/) . With the latter you can not only upload files but also manage CloudFront distributions of all types (HTTP, Streaming, Private Content).
Andy, would you be interested in writing an overview? I would publish it on my blog if it is reviewing several options (and not just the service you are offering).
simplecdn.net works very nice, also.