Install and use Ubuntu One
Recently I previewed the up and coming release of Ubuntu, Karmic Koala ("Ubuntu Karmic Koala Preview".)
In that article I covered some of the new features in the upcoming release. Once of those features is the new Ubuntu One. Ubuntu One is much like the familar DropBox that people of nearly all platforms enjoy. Ubuntu One allows you to share and sync files between Ubuntu desktops. But don't think you have to wait until 9.10 is released to enjoy Ubuntu One. If you are enjoying a 9.04 release, you can certainly take advantage of this outstanding service.
Much like DropBox, with Ubuntu One you do have to sign up for a service. And, as I mentioned in the previous article, Ubuntu One has two levels:
- Free: The free account offers 2 Gigs of storage space.
- Paid: The paid account offers you 50 Gigs of storage space for $10.00 USD per month.
Once you have signed up with an account, you can then install the client, and finally enjoy all the syncing between Ubuntu computers you need. In this article you will see just how to install the client and begin using Ubuntu One.
Signing up
Before we get to the installation process, we must first visit the sign up process. It's actually quite easy. Go to the Ubuntu One Plan page and select your plan. Once you have signed up for your plan, you then can proceed to the installation process.
Installation
After you have signed up you can then install the software. I will assume you are using Ubuntu 9.04 for this installation. The first thing you need to do is make sure your 9.04 is up to date. So run the Update Manager (found in the Administration sub-menu of the System menu). Once that is done you need to add the correct repositories to your /etc/apt/sources.list file. There is a very simple way to add these repositories to your sources file. If you click on this link allow GDebi to install the .deb file which will create a file in /etc/apt/sources.list.d called ubuntuone-beta-sources.list with the following contents:
# Ubuntu One Beta PPA sources

deb http://ppa.launchpad.net/ubuntuone/beta/ubuntu jaunty main

deb-src http://ppa.launchpad.net/ubuntuone/beta/ubuntu jaunty main
Or you could add the above code to your /etc/apt/sources.list file.
I would suggest going with the automatic method, because it will also add the GPG key for you.
Once you have done that you can open up Synaptic (Not the Add/Remove Software tool) with the command sudo synaptic and follow these steps:
- Search for "ubuntuone-client-gnome" (No quotes).
- Accept all of the dependencies.
- Click Apply to install.
Once installed you fill find the Ubuntu One entry in the Internet sub-menu of the Applications menu.
Using Ubuntu One

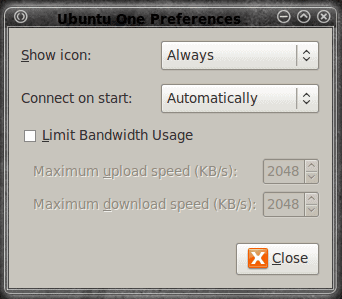
When you start Ubuntu One for the first time it will also start your browser to the Ubuntu One page. From this page you will need to create an account or sign in to your account. After you sign in you will then have to add the computer you are using to the account. You can add as many accounts as you need. After you add the computer the Ubuntu One icon residing in your GNOME panel will appear, show your files being updated (if there are any), and then the icon will disappear. If you want the icon to remain on the panel you just need to start the application again where you can then configure the icon to appear at all times (see Figure 1).
Here you can also configure Ubuntu One to start upon login as well as limit bandwidth usage.
If you find that the Ubuntu One icon does not show up after the initial sync, make sure you have it set up to connect automatically on start, log out, and then log back in. You should then see the Ubuntu One icon in your panel (see Figure 2).

The Ubuntu One icon you see in Figure 2 is the second from the left (between the Google Desktop icon and the DropBox icon).
You are ready to use Ubuntu One. You will find a new directory created in your ~/ directory called Ubuntu One. Any file you place in this folder will be sync'd with your Ubuntu One account. As soon as you add a file to this folder you will see it automatically start to sync with your Ubuntu One account.
Final thoughts
Ubuntu One certainly one-ups DropBox for simplicity. This tool will make using Ubuntu on the business level all the more easier. You will be able to easily sync all of your files between home and work. Give Ubuntu One a try.









I think Ubuntu One is a great start. However, I would like to be able to sync my folders without having to drop them in a “central” folder. Any word if that feature will come?
Trinae – Quite a few people have already posted bugs on the Ubuntu One Launchpad project with that exact same request. It’s something we’re considering for the next round of development. Thanks.
Thanks for covering Ubuntu One. Canonical is very excited to offer the service and has been very pleased with the community feedback throughout the ongoing beta. In addition to back-up, sync, and file sharing, the development team is working extremely hard to complete syncing for Firefox bookmarks, Tomboy notes, and Evolution contacts. 9.10 will be awesome!