Enhanced Anti-Spoofing for Windows 10
Microsoft's Windows 10 operating system supports a whole array of biometric login and authentication options.
Instead of having to log in typing a username and password, Windows 10 users can use their fingerprint, face, or other biometric information to sign in.
Microsoft calls these biometric sign in options Windows Hello, and they are only available if the device's hardware supports them.
For instance, to sign in using facial recognition your device would need access to a (IR) camera, while a fingerprint reader would be needed to sign in using your fingerprint.
Configuring Windows Hello
You need to do the following to configure Windows Hello functionality on a device:
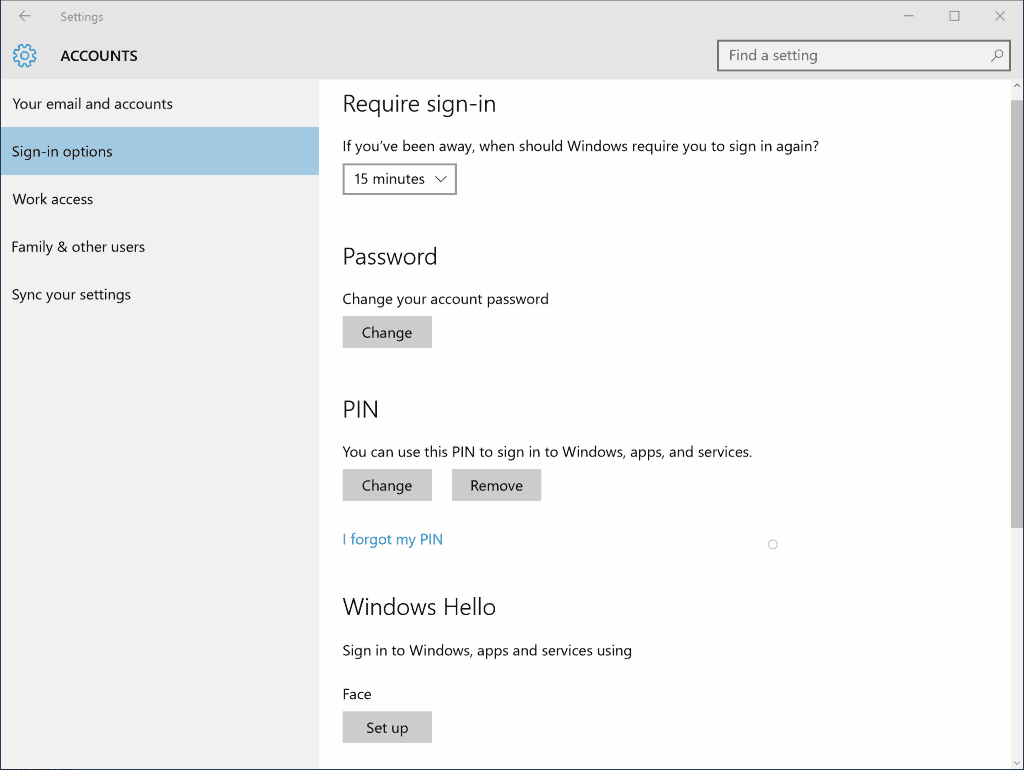
- Tap on the Windows-key, and select the Settings application link from the options displayed to you. Alternatively, use the shortcut Windows-I to open the Settings app directly.
- Navigate to Accounts > Sign-in Options.
- First thing you need to do is set a new PIN as it is used as a fallback option in case the biometric sign-in fails.
- Locate Windows Hello on the same page afterwards, and click on set up next to one of the available biometric authentication options.
- Follow the instructions on screen to complete the setup. For facial recognition, simply look at the camera when instructed to do so to complete the process.
Depending on your device's hardware capabilities, you may see none, one or multiple options to use biometric identification to authenticate on the device.
Please note that you can only enable Windows Hello if the device supports at least one option, and if the feature has not been disabled by a system administrator.
As far as what is happening in the background during the set up process: Windows creates a representation of the captured data, encrypts it, and stores it on the device. This data is not the photo of a user, the iris or the fingerprint, but data that is used to recognize it.
You can read more about Windows Hello and privacy on Microsoft's website.
Enhanced Anti-Spoofing for Windows 10
Enhanced Anti-Spoofing is an optional security feature that is not enabled by default. Facial recognition on Windows 10 uses algorithms to determine if what's in front of the camera is a photograph or a real human being.
You may improve the detection by enabling enhanced anti-spoofing options provided that the device supports those.
You have two options to improve the security of the biometric sign-in process: using the Group Policy or the Windows Registry.
Enable Enhanced Anti-Spoofing: Group Policy
You may enable the security feature using the Group Policy Editor.Please note that the Group Policy Editor is only available on professional or Enterprise versions of Windows 10. If you get an error message launching it, skip to the Registry method below.
The following steps are required:
- Tap on the Windows-key, type gpedit.msc and hit enter.
- Use the hierarchy on the left to navigate to the following folder: Computer Configuration > Administrative Templates > Windows Components > Biometrics > Facial Features
- Double-click on the policy "Use enhanced anti-spoofing when available".
- On the window that opens, switch the policy to enabled, and click on the ok button afterwards.
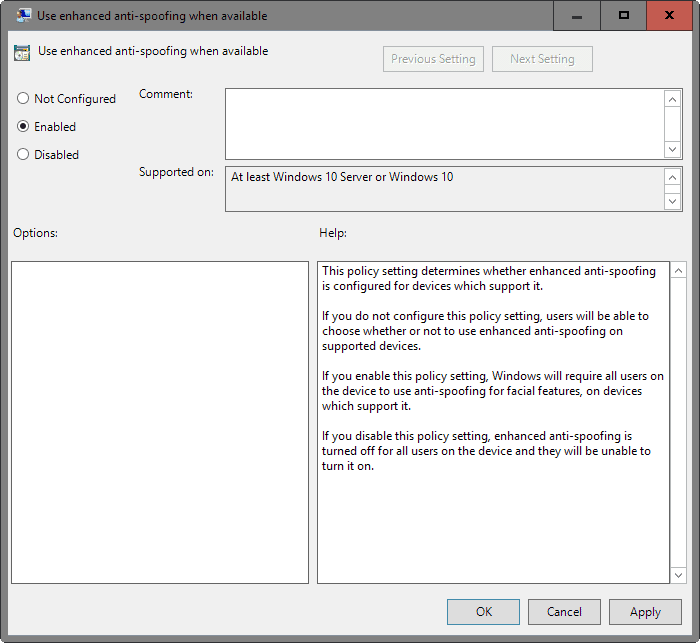
This enables the feature, and Windows will make use of it from that moment on provided that the device supports it. There is unfortunately no indication whether that is the case or not.
If you enable this policy setting, Windows will require all users on the device to use anti-spoofing for facial features, on devices which support it.
If you disable this policy setting, enhanced anti-spoofing is turned off for all users on the device and they will be unable to turn it on.
To turn the feature off again, repeat the steps outlined above but switch the status of the policy to disabled, or not configured.
Enable Enhanced Anti-Spoofing: Windows Registry
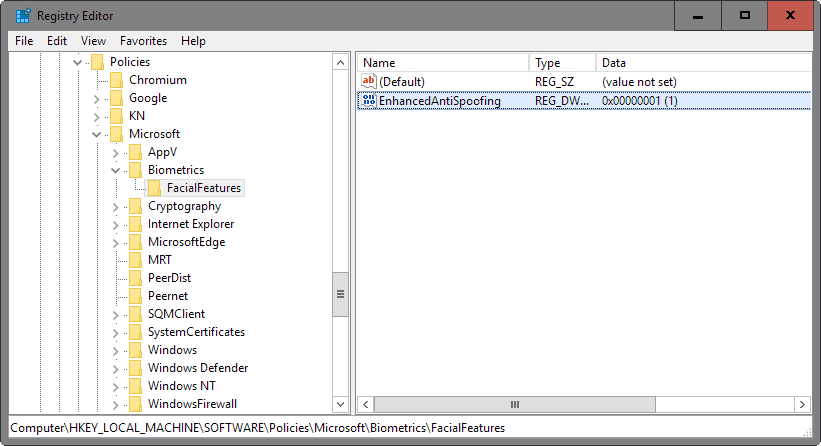
The feature can be enabled using the Windows Registry as well.
- Tap on the Windows-key, type regedit.exe and hit the Enter-key.
- Confirm the UAC prompt that is displayed.
- Use the key structure on the left to navigate to the following key: HKEY_LOCAL_MACHINE\SOFTWARE\Policies\Microsoft\Biometrics\FacialFeatures
- If Biometrics does not exist, right-click on Microsoft and select New > Key from the menu. Name the key Biometrics and hit enter.
- If FacialFeatures does not exist, right-click on Biometrics and select New > Key from the menu. Name the key FacialFeatures and hit enter.
- Right-click on FacialFeatures afterwards and select New > Dword (32-bit) Value.
- Name it EnhancedAntiSpoofing.
- Double-click the new preference afterwards, and set its value to 1.
This enables enhanced anti-spoofing using the Windows Registry. To undo the change, delete the key again or set its value to 0 instead of 1. (via Make Tech Easier)




How ’bout an “Enhanced Anti-Microsoft-Spying” for Windows 10…?!
Welcome to Big Brotha-ish Brave New World….
I don’t think faces are secure enough. If I were sitting on my scanner in the most natural way, could I use that instead of my face?
I already have fingerprint check on boot. In my country everyone (18+) already has gave fingerprint to police.
…ha…ha…ha…
So basically you exchange your personal bio-metric information with a Corporation who’s in bed with US gov/CIA/NSA for a bit more vague sense of security?
No thanks!
Well, feel free to stop using anything by Google, or the Internet in general then. Don’t forget your Tinfoil hat and reality check on the way out.
Chyeah seriously. I’ve always looked at Windows Hello and Cortana as a way they encourage you to use your camera and microphone so they can spy on you in your own home. Creepy McCreeperville!
According to Microsoft, the data is only stored on the local device.
“Your identification data—the representation of your face, iris, or fingerprint that’s created when you enroll—never leaves your device. “