How to install VMWare tools if the option is grayed out

VMware is a set of tools that allows you to efficiently and effortlessly manage files, programs, and installations between your different virtual systems and allows you to control everything from your primary computer. It’s absolutely essential for anyone interested in virtual machines.
Typically, I use VMware Workstation Player to mainly run Linux as my virtual system. However, a few days ago, I wanted to install a virtual copy of Windows 10 to test out some of the new upcoming features.
This is exactly what virtual machines excel at—being able to run and test out operating systems or applications with a virtual setup that can be put together quickly and won’t affect existing installations and processes with the primary system.
So, I grabbed the ISO I needed using Martin's guide on Download Windows and Office ISO images, and the installation went smoothly. At least, it almost did.
For some reason, it didn’t install VMware tools as it should have. It had prompted the option to download it, and I had chosen yes. It even displayed in the log that I had successfully downloaded the tools, so I wasn’t sure what the issue was.
When I clicked on Manage, however, the option to install VMware tools was grayed out.
Why is installing VMware tools greyed out? This happens when you try to install VMware tools on a guest machine either with the function already mounted or in the case the system doesn't have a virtual optical drive.
I began looking for a solution. I found VMware’s official support documentation and looked through any suggestions they had. According to the page, the virtual CD/DVD drive should have been set to “Auto Detect” in order to let the user install VMware Tools. For me, the option was set to use my Windows 10 ISO, and I couldn’t change the setting.

So, I tried fixing my issue. I ejected the Windows ISO in the hopes it would free the drive and let me install the tools. I disconnected and reconnected my virtual optical drive, and added a second CD/DVD drive. However, after everything, I just kept getting SATA0 errors.
After a crushing defeat, I began searching for a new solution on the VMware forums. That’s where I found this thread. They were experiencing the exact same issue as I was. After combing through replies, I managed to figure out the solution to my problem.
For anyone facing this same issue with their VMware installation, here’s the solution in a pleasing format. Even though I was doing this for Windows 10, this isn’t limited to Windows installations and should work regardless of the virtual operating system.
How to install/reinstall VMWare tools grayed out
- Shut down the virtual machine.
- Open VMWare Workstation Player and right-click on the VM. (Don't start the VM)
- Select the "Settings" option to edit the hardware settings.
- Highlight the CD/Drive on the left sidebar under the Hardware tab and click on the remove button.
- Repeat the above step to remove the Floppy Drive. (Technically optional, but this is what fixed it for me. Courtesy: AskUbuntu forums)
- Click on the "Add button" and select "CD/DVD" Drive and select finish. The right pane should now have the option "Use Physical Drive > Auto Detect" enabled. (Previously, it had the Windows ISO selected)
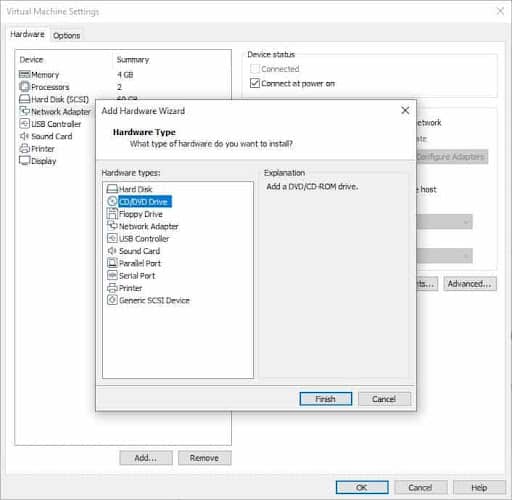
- Click on "OK" to close the window, and Start the VM as usual.
- Once it has booted to the desktop, click on the menu at the top left corner and go to "Player > Manage > Install VMWare Tools".

The option to install VMware tools should no longer be grayed out. Click on it to begin the VMware installation. You will also see a new tab at the bottom of the screen prompting you to install the tools.

If the above steps didn't help you, you can try to install the software yourself.
How to download and install VMWare Tools installer manually
- Run VMWare Workstation Player and start the virtual machine that you want to install VMWare Tools in.
- The company provides the latest version of the software on its official website. I'll guide you through the process of downloading and installing it.
- Visit this page in your web browser, and click on Windows. The file that you need to download is an ISO. For example: The current version of the package has the filename VMware-tools-windows-12.2.0-21223074.iso. You can ignore the other files on the web page. Note: If you're running a Linux virtual machine, choose the Ubuntu folder on the page and then click on Dists. Select the one that fits your VM, and go to the next sub-directory to get the binary file (.DEB)
- Open File Explorer, and navigate to the folder where you saved the VMWare Tools ISO to.
- Double-click on the file, and the ISO should be mounted in a virtual DVD drive in Explorer.
- Switch to the virtual drive's folder, and look for the Setup.exe file in it. Run the set up to begin the installation process.
- Follow the on-screen instructions to install VMWare Tools.
- You will need to reboot the virtual machine to complete the installation, otherwise the changes will not take effect. If you chose to install the Enhanced Keyboard, you will also be required to restart your host machine.
Note: Your host PC may be a 64-bit machine, but your guest operating system could be a 32-bit one. You can choose to download the specific version that you want by clicking on the x64 or x86 folders, as the ISO file in this directory will be slightly smaller. If you're unsure whether you have a 32-bit or 64-bit VM, you can play it safe and get the universal installer from the main page in step 3. The installer will select the appropriate version for your virtual machine's architecture.
Hopefully, this helped you fix your installation, just as it did for me.


Thank you!!!!!!
This reminds me of the internet in the 90s before everyone was trying to make a buck.
I followed these instructions exactly as describe. They worked for me. Thank you. :)
Awsome. Worked perfect to me
Great, Removing and adding again worked fpr me.
Thanks man! This one had me scracthing my head for a while, but your walk through worked a treat!.
Much Kudos for sharing!
Thanks, this worked!
Excelente, me ayudó bastante y funcionó a la primera. Gracias!
Thanks, this worked perfectly!
Fantastic. Stupid VMware forum nothing to be found… The d*mn old floppy needs to GO! Great.
On VirtualBox: it runs reasonably well and of course really free but not as nice as VMWare. And DON’T run vmwares with Virtualbox, for instance XP vms get corrupted. Works as Designed I’m told. Stop bashing Virtualbox I’m told. Yeah yeah.
Thank you Ashwin. I am very grateful
A solution that actually works! wow. Thanks Ashwin
thx a lot, solved it for me.
Two and a half years after the original post and this is still resolving the problem. Thanks, I was glad to find this!
I was very frustrated and not finding the right ‘this is the fix’…until yours. Thanks and VM-on!
Thank you for the help. That did the trick.
Worked Perfect! I’m 50 and I’m trying to remember how we did things before the internet. I guess we spent a lot of time on the landline talking to tech support.
I’ve tried this but I cannot load the virtual machine, it is Windows 7 and that appears greyed out in the list when I try to load it. Any suggestions please?
thank you!
Thanks for the tip! It helped my issue. I have Windows 7 VM
Thank you so much for this. It worked perfectly. I am using VMware Player and although my CD/DVD settings looked as they should (did not show an iso file), my “Install Tools” button was still grayed out. I used your method and when I restarted Player, I was able to easily install Tools. Now I can copy/paste between virtual machine and host.
thank you so much
Thanks! did the trick.
Problem solved. Thanks a lot
Great, working fine..
Thanks for the tip.
I work with Windows 10 and Ubuntu VMs. I flip between them on a Mac Pro. Even though I was in a Windows VM, the CD was pointing to Ubuntu. So in Settings, set the CD to AutoDetect. On boot, it will detect Windows.iso and it will work.
I had found out the removal of the CD allright to kick out the windows but that didnt help. removal of the floppy though did the trick. Great!! (and what a suckers at VMware).
On virtualbox: Vbox corrupts XP vmdks so stay away from Vbox for existing VMware XOP images.
it works. thank you ! – maxzinks
Thanks really helped mate
Thank you sir. You are the bomb diggity bomb.
Thank you. How hard they want it to make.
Okay so on mac I was trying to create a win 7 vm machine using vmware fusion on MacOS obviously.Â
I had the same issue and what I did was I disabled cd/dvd and restarted the machine, this re-enabled “install vmware tools”.
How to disable
Open the specific vm screen > go into the virtual machine drop down > settings > then under “Removable Devices” click on CD/DVD (SATA) > Uncheck “Connect CD/DVD drive”.
This should re-enable the  “install vmware tools”. Thanks
thanks, worked for me, excellent ! Bula from Fiji
Thank you
Thank you very much! It’s been driving me nut.
works! thanks
wow thx
Massive thanks ! I have spent hours trying to get VMWareTools installed.
I must say that I think that the effort required to install is ridiculous. I could not find any decent information on the web explaining how to install the tools (the method is completely obscure), or even how to verify they were installed. This is by fare the worst thing about VMWare.
thanks a lot
Thak you very much. This really works! Saved me hours of frustration.
Thanks a lot, got it working by following your guide.
Thanks sir, I was worried.
It worked like charm so I couldn’t stop myself to comment 😊
Same here , lot of thanks u just saved my day :-)
Thank you very much. Worked perfectly for my installation of a Windows 7 VM under VMware 16.1 (Windows).
I had the same problem in Vmware Workstation pro 16. The guest os being windows 7 x32 bit. Tried all the above methods. They didnot work. Then after much research found this page:
https://my.vmware.com/web/vmware/downloads/info/slug/datacenter_cloud_infrastructure/vmware_tools/11_x
Registered my name and downloaded vmware tools separately. Details
VMware Tools packages for Windows
File size: 125.33 MB
File type: zip
Name: VMware-Tools-windows-11.2.0-16938113.zip
Release Date: 2020-10-15
Build Number: 16938113
VMware Tools packages for Windows
VMware Tools packages for Windows. These packages support the following operating systems: Windows 7 Service Pack 1 (SP1) or Windows Server 2008 R2 Service Pack 1 (SP1) and later
MD5SUM: 409742dfcd24bee8798e7596430fd259
SHA1SUM: e257e07a9e2899f882cf3dde30acbe8e195982f5
SHA256SUM: 3659f65af38d704914bb566d790043678275c694d87b4fc8fb485a2a164cd952
Extracted the *.iso file. Mounted the *.iso file to cd/dvd drive in the vmware console. The vmware tools exe was seen inside the guest os and installation was as usual.
P.S.: Sometimes software companies try to test whether their end users are intelligent or not by making their lives miserable and sending them in wild goose chase. I think it was one such attempt. Worst of all it worked.
You Sir, are a legend
It works!
It works perfectly for fusion
Worked a treat, thanks for posting
thanks
it works perfect
Really, Thank you sooooo much
Worked for me! Many thanks !!
this fantastic even the vendor has no solution
GOD! Thanks!
Thanks a lot! Enabling CD-ROM totally missed out of my mind. And I struggled a lot for accessing shared drive inside guest. Now it is working after enabling CD-ROM and installing VMWare tools.
Thanks!
Thanks, this worked perfectly
Thank you so much for your guide! Now it work.
worked first time! thanks again
I have an OS X Mavericks (10.9.5) VM under VMware Fusion 11.5.5 under MacOS Catalina 10.5.5
on a 2019 16″ Macbook Pro.
Unity is greyed out.
Of course I have tried uninstalling/installing VMware Tools. Looking at the installation logs there were no
issues, and all files are there in /Library/Application Support/VMware Tools/
The two symlinks are also fine:
ln -s ‘/Library/Application Support/VMware Tools/mount_vmhgfs’ /sbin/
ln -s ‘/Library/Application Support/VMware Tools/mount_vmhgfs’ /Library/Filesystems/vmhgfs.fs/Contents/Resources/
I have even removed and re-installed ‘VMware Fusion’.
This has, so far, defeated VMware support. Mind you they didn’t realise
‘Library/Application Support/VMware Tools/’ was root and not the user,
so I am not sure she knows enough!
Thanks bro, i was really about to give up
Thank you – exactly what I needed!
Thank you … the steps mentioned here work as is…
THANK YOU SO MUCH!
This works very well!
Thanks a lot, I spent hours tying to find a fix.
This really helped a lot. Thanks!
Thank you very much! Followed your instructions to a tee to remove the CD/DVD and Floppy drives on my Windows 7 VM. Much appreciated!
Removing the floppy disk did it for me, thanks!
It saved me so much time instead of reinstalling the entire VM.
I have tried the Removing the CD solution , it will work if you add a CDRom drive again.
if there is no CDROM you can’t install the tools
Thanks a million!
Thank, Ten seconds to find your tips and five sends to fix my issue.
thanks
Appreciate it. It was useful.
May cause an issue with the IDE device configured as a slave. See, for solution:
https://kb.vmware.com/s/article/2010477
Thank you so much – really helped me out of a problem
This procedure really helped me.
It worked! Best solution
Thank you so much. You saved my time!
thanks. Worked instantly
Very Helpful! Thank you
Thank you so much. This got me out of the few hours rant of frustration.
Thank you. This article helped me. My issue was my 2019 MacBook Pro doesn’t have a CD/DVD so my VM image never had a CD drive. Adding the CD to the VM allowed the VM to boot with CD in a disconnected state but it was there. Then the option to install VMware Tools was not grey! hurray! Got my VMware tools installed and was then able to use the features such as sharing a drive with my VM.
Thanks for the tip of adding a CD drive. I never realized this before because all my other VM hosts had CD drives. This should allow my other Kubernetes VM’s to also get the tools now. I’ll try that next.
Same with mine. A newer dell with no CD drive. Added that and done. Thanks
These days the most important and most valuable product of Oracle is VirtualBox! Nobody cares about Oracle Database, Oracle eBusiness Suite and the like anymore.
VMWare Workstation Player also requires some VMX file editing to tweak some of the features not available via GUI.
Why not just use VirtualBox instead?
Because VirtualBox is dead. It hardly receives any development resources, is stuck on the x86 platform (no support for ARM for instance) and is quite buggy compared to VMWare. I moved over to VMWare in 2017 after a decade of VirtualBox blue screens. No more.
Good to find a non-enterprise user of VMware. Several years ago I considered getting up to speed on it but VMware reportedly laid off the development staff of Workstation (or Player, or whatever they call it this week :().
Say, what do they call it now and what version is it?
Is the free version hard to find and are there any significant limitations compared to Virtualbox or KVM?
TIA, Mike
helped a lot . thx very much
VMware Workstation free version =
https://www.vmware.com/products/workstation-player/workstation-player-evaluation.html
I prefer VirtualBox simply because it works well with any distro. I rather doubt Ashwin’s problem would occur on VirtualBox.
Yet, when it works and one does whatever is necessary, I find VMware to have a more polished look and feel.
One will eventually encounter a problem with either tool which will require a bit of research–no “real” problems, though.
Windows Hyper-V works fine.