Bitdefender: Linux antivirus made simple
We've covered a few Linux antivirus tools here on Ghacks (see "Install Avira Antivirus on Linux" or "Rescue that infected Windows drive with Trinity Rescue" or the articles covering ClamAV). All of those solutions are solid, but none of them offer the Windows-like ease of use that Bitdefender offers.
Now, before you begin this journey with Bitdefender, know that this tool is not free, nor open source. The Linux port of Bitdefender is proprietary and you will have to pay for a license. There is a trial license to use to see if this tool is worth purchasing. I think, after using it, you will find it is worth the purchase price.
In this article I will show you how to install and use Bitdefender on Linux.
Before we begin
You might be asking yourself Why would I purchase a proprietary antivirus software for Linux?" I have often advocated one of the best solutions for disinfecting a Windows drive is to remove that drive and attach it to a Linux machine and run an antivirus software on the mounted drive. Bitdfefender is a perfect solution for that task. With a proprietary software you will remain up to date on virus definitions as well as have the support of the company that makes the software. These are must-haves in the world of business. Why not have them at home as well?
Installation
The installation of Bitdefender is simple. Download the executable binary installation file and save it in your ~/Downloads directory. Now follow these steps:
- Open up a terminal window.
- Give the newly downloaded file executable permissions with the command chmod u+x BitDefender-Antivirus-XXX.run Where XXX is the release number.
- Issue the command sudo./BitDefender-Antivirus-XXX.run (Where XXX is the release number)Â to install the software.
- Agree to the license.
- Allow the installation tool to install the GUI package.
- That's it. You are now ready to run BitDefender.
Usage
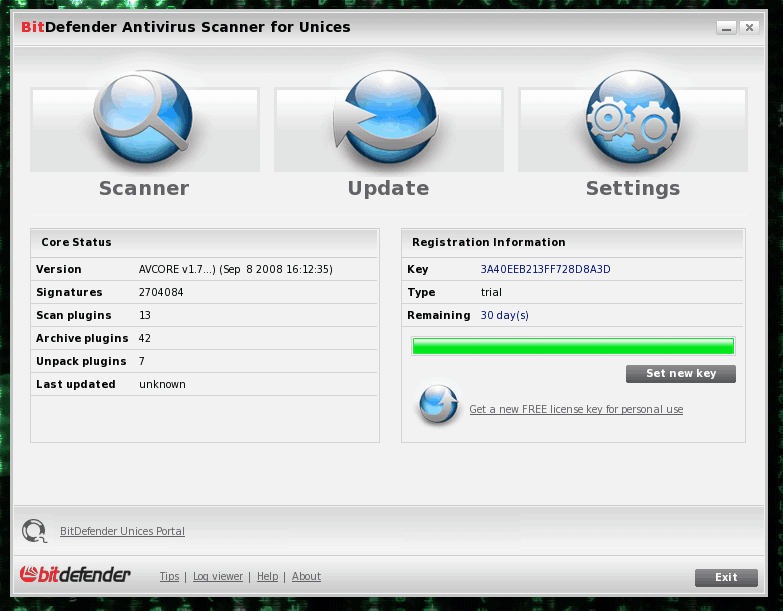
To run the BitDefender GUI you can issue the command bdgui, which will open up the main window (see Figure 1). As you can see, the GUI is very reminiscent of any given Windows antivirus GUI.
One of the first things you should do is run a definitions update. This is done by clicking the Update button. When you do that a small window will open giving you the progress of the update. The download can be fairly large so give it plenty of time to finish.
To run a scan you simple click on the Scanner button and then, in the new window, select the directory you want to scan. Of course, should you want to scan your entire Linux machine you would select / (the root directory) for scanning.
I will warn you. On my systems I tend to retain a lot of distribution ISO files (for testing and  so on). These take a LONG time to scan, so you might want to set the *iso extension as an exception to scanning (if you trust your iso sources of course).
Final thoughts
Outside of that, you will find the BitDefender antivirus solution as simple to use as its Windows counterparts. The GUI is well designed and the product works exactly as you would expect. If you are looking for an antivirus that is user-friendly and reliable, but for the Linux operating system, BitDefender might be your tool.





Its free for personal use.
Bitdefender can also be run from the command line as super-user (root). It’s a lot faster to keep a rolling scan going over say the last two weeks worth of new files than to constantly scan your entire disk everytime
As root
cd
find . -atime -14 print0 | xargs -0 bdscan –no-list
this will find all the files in your home directory that have been accessed in the last 14 days and then scan only those particular files ( hence piping the results of the find command through xargs). The print0 and xargs -0 means that files with strange names eg those with spaces in them will also be scanned. The –no-list option means that only the results (and any possible infected files) will be shown, not all the files accessed in the last 14 days. For some reason the -mtime option doesn’t work as well though theoretically it should be the preferred option.
This could be run as a cronjob, but i tend to do it as a regular part of my day to day sysadm maintenance.
It is right that bitdefender is proprietary.
But for home use it is still free (as free beer).
You just have to request a free licence here:
http://www.bitdefender.com/site/Products/ScannerLicense/
http://www.bitdefender.de/business/antivirus-for-unices.html