How to copy command prompt outputs to the Windows Clipboard

The Windows command prompt or line is not really something that many Windows users need to work with on a daily basis, or at all, anymore. While it can still be helpful at times, for instance to quickly look up your IP address or display open connections, it is probably fair to say that the majority of Windows users have little to no command prompt experience.
That's not necessarily a bad thing depending on what the computer is used for. If you are just using it to browse the Internet and use Office, then there may never be a need to dive deeper into the inner workings of the system.
I have to admit that I'm also not using the command prompt that much anymore. I do use it occasionally but not regularly anymore as I do not really need to use it for the things I'm doing.
I learned a couple of tricks over the years though, for instance that you can write the output of any command to a text file by adding > textname.txt to the end of the command.
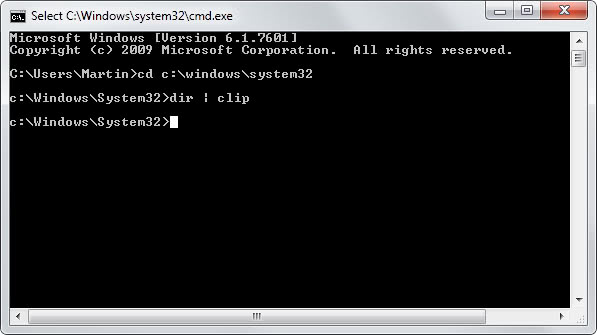
There is however another possibility, and that is to write the output to the Windows Clipboard. This is done with the clip command that you add to your command that you want executed.
Basic examples of how this looks like are dir | clip to write the contents of the directory to the Clipboard, or ipconfig | clip to write the ipconfig information to it instead.
You can use parameters in the command as you see fit which are executed just as before.
It depends on the data output if you should write the output to a file or the clipboard. If you want to paste it in an online forum, chat or other program then you may want to use the clip command to speed things up. If you need more control over it then a text file may be more appropriate.
There is also an option to write text file data directly to the clipboard. This is probably only useful for batch files though as you can open the document to copy its contents as well in the Windows gui.
Anyway, to copy the contents of a text document to the clipboard use the clip < textname.txt command.
Advertisement


Nice trick, didn’t know that way to copy/paste text to/from the clipboard in a command prompt window. Thanks :)
Be careful while writing the output from a command to a file using “>”, as it will overwrite the file without warning if it already exists. By the way, if you want to append the output to a file (without overwriting previous contents), you can use “>>”.
awesome, this is “three in one” tip :)
Also : pclip.exe, prints the clip-board TO STDOUT so it can be used by a command line filter program.
Handy when used with gawk.exe for ad-hoc processing of text.
Here : http://sourceforge.net/projects/unxutils/ open UnxUtils.ZIP and navigate to the usr\local\wbin\ folder
Example usage to sort multiple lines of text stored in the clipboard:
pclip | sort | clip
Hi,
Swapnil, even better..
Why bother having to “select Mark” when you can can simply just right click the text to copy it to the clipboard. :)
1.) Simply open a command prompt.
2,) Turn on “QuickEdit Mode” via:
A.) Click the icon in the upper-left corner of the Command Prompt window, and then click “Defaults”.
B.) On the “Options” tab, click to select the “QuickEdit Mode” and “Insert Mode” check boxes. “AutoComplete” is nice too while you are at it. :D
C.) Click OK.
So now any time you open a command prompt you can simply highlight the text you wish to copy, and right click to copy it to the clipboard.
No more having to waste time by having to “mark” it first. :)
Enjoy,
Will
Did you take clip.exe from Server 2003/XP x64 or the Resource Kit?
I use Snap 6 from Ashampoo.
bob
Great “two-in-one” tip(s)! “clip” and “mark” are now ensconced in my command window vocabulary. Many thanks!
I like a much simpler method.
When you have the output, right-click in the command prompt window and select Mark. After marking just press Enter key to copy it to clipboard.
I have always wondered what Mark was for, thank you for the command prompt screen shot tool. kinda cool…
Works on Windows XP to Windows 8.
Yeah thanks. Didn’t know that one…
I’m a command line fan and I didn’t know this.
Thanks!
Any alternative for Windows XP?
Here you go: http://www.petri.co.il/software/clip.zip
@Martin Brinkmann dropping clip.exe in the windows system32 folder did the trick… thank you! thank you!
ok i download the file… now what?
looks like I have to run clip.exe first every time I start the command prompt for me to be able to send anything to the clipboard.
is there a way to keep clip.exe running all the time?
what i really want to know is why wasn’t this (send to clipboard) included in XP as a default?
any help greatly appreciated!
I thinkg you need to place it into a folder included in your path, e.g. system32 to use it directly.