Linux Back In Time: Backup made easy
In my recent trend of covering Linux backup tools I have, so far, covered Flyback ("Quick and easy backups with Flyback") and Backerupper ("Simple GUI backup tool Backerupper").
Both tools are GUI tools that make the process of backing up your Linux files and folders a simple task. This time around I want to add to this growing list of user-friendly backup tools Back In Time.
Back In Time offers two GUI versions: One for GNOME and one for KDE. If you want to run the KDE version of the tool, you will have to be running KDE >= 4.1.
The difference between the GUIs is minimal, and there are no features on one that are on the other (it's all in the different widget sets used.)Â In this tutorial, you will learn how to install and use the Back In Time backup tool.
Installation
Installing Back In Time is simple. Go to the applications' download page and download the necessary files. If you are installing on Ubuntu you will need:
backintime-common
and either:
backintime-gnome
or
backintime-kde
Before you can install this application, you will need to first install the meld tool. To do this issue the command:
sudo apt-get install meld
Once Meld is installed you can install Back In Time. To do this, you just need to open up a terminal window, change to the directory you downloaded the files into, and issue the command:
sudo dpkg -i backintime*
Which will install both necessary files.
After the application is installed, you are ready to start backing up.
Usage
To start up Back In Time go to the System Tools sub-menu of the Applications menu. There are two entries: Back In Time and Back  In Time (root). You will want to run the non-root entry to back up your standard files.

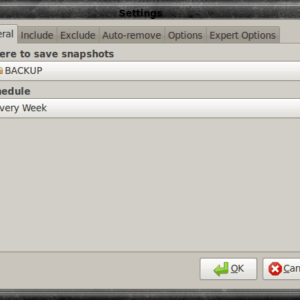
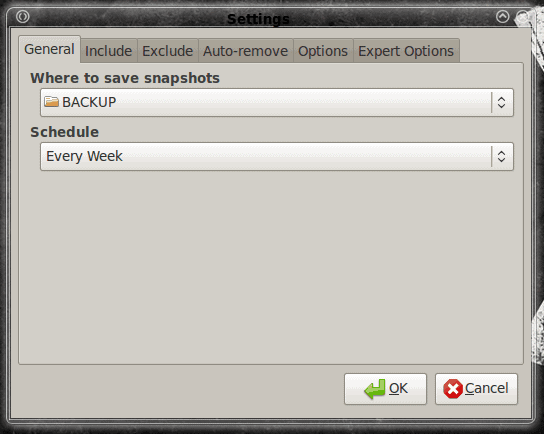
When you fire up Back In Time for the first time you will be greeted, not with the main window, but the Settings Window (see Figure 1). Â Before you can set up a back up, you have to configure a backup directory. This is done in the General tab of the Settings window.
By default, the Schedule will be disabled. This is fine if you want to do a one-time backup. But for scheduled backups, you will need to select a frequency from the Schedule drop down.
You will also have to add at least one folder to back up. To do this go to the Include tab and add a directory to be backed up. You can, of course, add more than one directory to back up.
From within the Auto-remove tab in the Settings window, there is a setting I highly recommend. If you check the "Smart Remove" check box Back In Time will:
- Keep all snapshots from today and yesterday.
- Keep one snapshot from last week and one from two weeks prior.
- Keep one snapshot per month for all previous months of the year.
- Keep one snapshot per year for all previous years.
If you have any need to retain snapshots, this is a fairly safe bet.
From within the Exclude tab, you can configure Back In Time for folders and files to not include in the backup. You can also add patterns to exclude, which can include wildcards.
After you have all of your settings taken care of click OK and Back In Time is set up and ready to go.
What about that scheduled backup?
Here's the deal - Back In Time does not have a Panel icon to keep the application running in the background. So unless you plan on keeping the application open, you have to have another means to make sure your backups happen. Â To do this you have to know the command line portion of the tool. And then you will need to add the right command as a cron job. Without getting too complicated, the command to run Back In Time from the command line will be:
backintime -b
Which will back up any necessary job you have created.
With that in mind, you can set up the backintime command to be run from your crontab. Say, for example, you want your backintime job to run every Sunday. You could enter a cronjob (started by issuing the command crontab -e) and enter a job like:
* * * * 7 /usr/bin/backintime -b
Save that cron job, and it will be set up to run every Sunday.
Final thoughts
Back In Time is just as user-friendly as the other backup tools and adds a command line tool for added flexibility. I highly recommend Back In Time for your simple desktop backup jobs.
