Quick and easy backups with Flyback
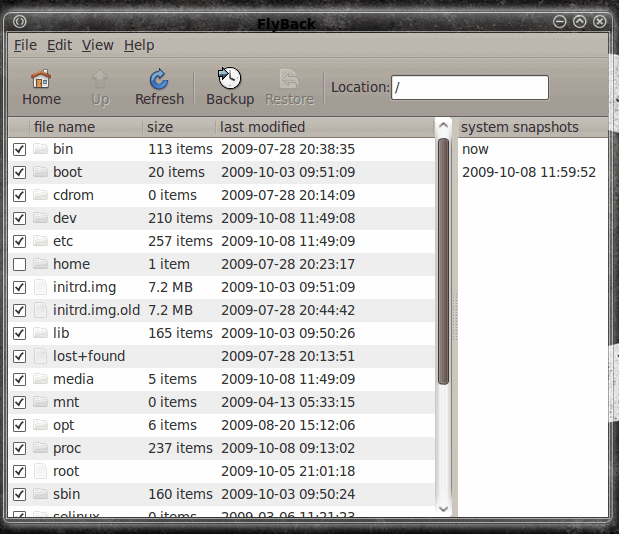
If you're looking for a tool for really simple and quick backups Flyback might just be the tool for you. Compared to Apples Time Machine (on the web site at least), Flyback allows you to create specific backs that can be run manually or automagically with a very simple GUI and not much time or effort involved.
Flyback is based on rsync and creates successive backup directories mirroring the files you set up to back up. In order to save space, Flyback hardlinks any unchanged files to previous backups. With Flyback you can backup to either a networked drive (so long as it is mapped), a usb drive, a thumb drive, or a directory within the file system. One thing you want to certainly avoid is backing up to a directory that is also being backed up. In other words, if you are backing up /home/jlwallen you would not want to back up to /home/jlwallen/BACKUP. Instead you would want to back up to something like /BACKUP. But we're getting ahead of ourselves. Let's first learn to install and use Flyback.
Installation
Installing Flyback is fairly simple. You will not find Flyback in any of your repositories, nor can you add repositories so that Fly can be installed with apt-get or any GUI tool. You can, however, install all of the dependencies with apt-get. To do this open up a terminal window and issue the command:
sudo apt-get install python python-glade2 python-gnome2 python-sqlite python-gconf rsync
You might find that apt-get will return that everything is already up to date. If so, you're ready to go. If not, let the installation process happen and then you'll be ready to go.
After you have issued the above command you can then download the Flyback file with the command:
wget http://flyback.googlecode.com/files/flyback_0.4.0.tar.gz
Now unpack the tar file (from within the directory the file was downloaded) with the command:
tar xvzf flyback_0.4.0.tar gz
which will create a new directory flyback. The next step is to change into the newly created directory and start up the application.
Starting and using Flyback
In order to start the application you will issue the command (from within the flyback directory):
python flyback.py

When the main window opens (see Figure 1) it might seem like a number of directories and/or files are already marked for backup. This is not the case. You have to actually add the files/directories from with the Preferences window. So the first thing you will want to do is click on the Edit menu and select Preferences. From within the Preferences window (see Figur 2) you will need to take care of a few tasks. The first task (and you might get a warning about this) is to configure the backup location. This is fairly
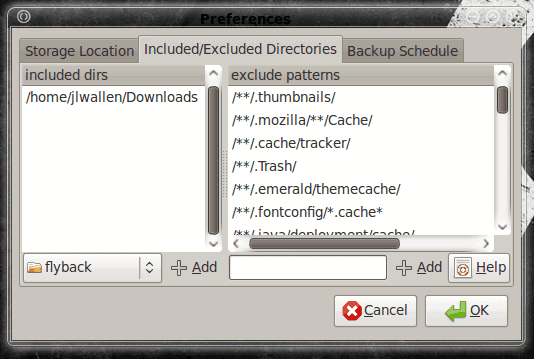
straightforward - just click on the Storage Location tab and then click the drop down to select  your backup location. After you have configured this click on the Include/Exclude Directories tab. From within that tab you select the directories you want to include in your backup from the drop down and then click the Add button. In order to delete  a directory from the backup you simply right click the directory from the "Included dirs" pane and select Delete.
Once you have all of your directories set up, you can then create exclude patterns. Fortunately the application includes a great Help file on creating exclude patterns. To get to this file click on the Help button just above the OK button. This will give you all the information you need on creating excluding patterns.
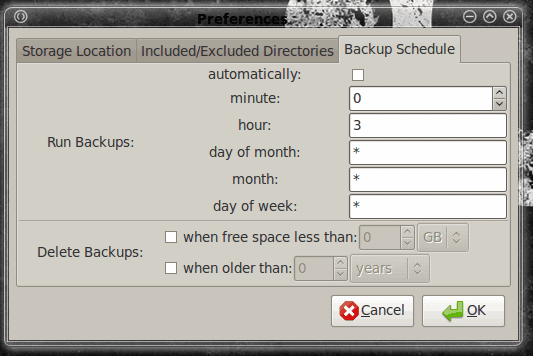
After you have your directories set up, you can either click OK and then click the Backup button on the main window, or you can set up a scheduled backup from within the Backup Schedule tab (see Figure 3).
In order to set this up as an automatic backup click the "automatically" check box and then set up the time you want to run the backup.
From this same window you can configure Flyback to delete backups when space is need or when a backup is older than a defined time period.
One thing to note. If you are setting up a regular, automatic backup, you need to make sure the location you are backing up to will be available. For instance, if you backup to a thumb drive, that thumb drive best be inserted when the backup is set to run.
Final thoughts
That's it. A very simple backup solution that is somewhat flexible, but very user-friendly. Although not the most advanced solution, but a solution that should meet most of your desktop backup needs.




I’ve been happy with my experiences using this backup method. Maybe I don’t use it to the extent of Alejandro, but I have yet to experience any major problems with Flyback.
@Alejandro:
Good that you mentioned this your point. Thanks.
These days the quality of (tech) journalism is really questionable. With lack of any liabilities the content is always questionable. Internet has become more of garbage can than a library ;(
@kap4lin: Don’t you think that is a bit of an unfair judgment? I was actually suggested this topic by a reader, so I went with it. Yes, the tool has bugs. Yes the tool has not had any work done for a while, but the tool still works and serves a purpose. And remember, this is an open source project – I took a read of the comments on the flyback page and have already noticed some of the comments mention users have made changes to the tool.
One of the advantages of the open source license is that, should the developer of flyback drop the ball, someone will most likely pick it up. That’s why it’s never really a bad thing to cover a tool that hasn’t been worked on for a while – just give it some time and someone will work on it. I can mention a dozen or so projects this has has happened with.
Flyback development seems to have stopped months ago. There are plenty of bugs that may never get addressed. I found a similar and active project that replaced my aging Flyback.
http://backintime.le-web.org/