You can add custom ROMs to your SNES Classic Mini
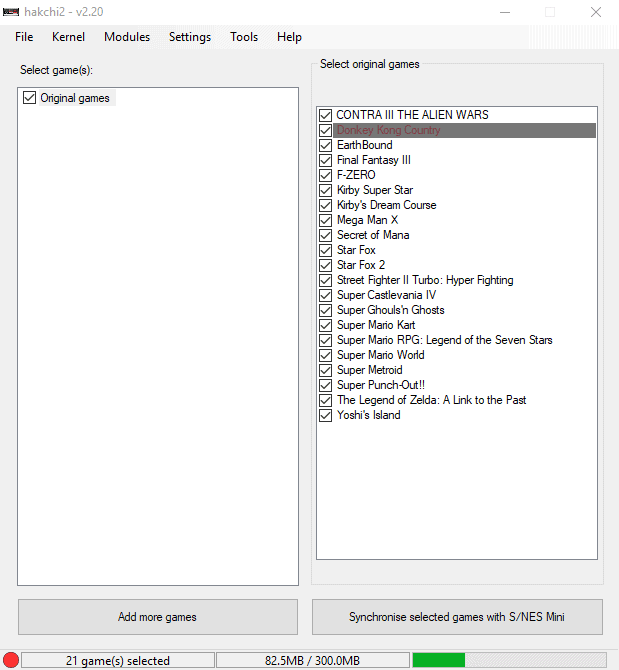
The SNES Classic Edition, or Super Nintendo Entertainment System Nintendo Classic Mini, comes with 21 games that you can play. The device is not extensible, which means that you cannot play your original SNES game cartridges on it, nor purchase additional games online or in stores.
While the selection is quite good for the price, especially when compared to how much an original SNES would cost with all the games included, you may at one time have a thirst for more games, apps or demos.
The most recent version of hakchi2, a GUI for hakchi, a tool that allowed you to hack the NES Classic Mini to add custom ROMs to the device, supports the SNES Classic Mini now as well.
Basically, what you can use it for is to prepare the SNES Classic Mini so that you can load custom ROMs on the device using Windows Explorer. The process requires no soldering or opening of the device.
Note: The process is not without dangers. While it is difficult to brick the device, it is certainly possible that this may happen.
The process
The process of hacking the SNES Classic Mini is straightforward. Here are the steps that you need to undertake:
- Make sure you have the SNES Classic Mini and a USB cable to connect it to a Windows PC, and at least one ROM file that you want to upload to the device.
- Download the latest version of hakchi2 and unpack the archive of the download to the device.
- Run hakchi2. Depending on the version of Windows on the device and its state, you may get a prompt to install a Microsoft .Net Framework version on the device.
- Select File > Add more games to get started. Note that you can add games, apps or demos, not only games.
- ROMs come without any cover image. Select an item, and pick either Google to search for a cover image online, or browse the local system to add one instead. Repeat that for each item in the listing.
- Once you have added at least one ROM file, click on the "synchronize selected games with S/NES Mini" button.
- The following steps are a one-time process. If you have done so already, go to 12 to continue.
- The application prompts you to connect the SNES Classic Mini to the PC at this point.
- Hold down the Reset key on the SNES Classic Mini and power it on. Keep on doing that for a couple of seconds.
- Release the Reset key, the power LED should not turn on.
- You need to install a driver at this point. This may work automatically, but if it does not, may require that you disable driver signing to do so.
- The program will upload the selected ROMs to the SNES Classic Mini at this point in time. Uploads should not take long, and a success message should be displayed in the end.
The SNES Classic Mini has about 300 Megabytes of storage, of which about 80 Megabytes are occupied already by the included games, save games and other things the system ships with.
ROMs range anywhere from a couple Kilobytes to several Megabytes so that you can add quite a few ROMs to the device without impacting functionality (if you fill it to the brim, space to save the state may not be available anymore).
That's all there is to the process. You can access the custom ROMs that you added to the device during the process like any of the games the system ships with.
Check out the FAQ for additional information.








Where can I find roms for the snes classic mini?