How to analyze and reduce battery use on Windows 10 PCs
Whenever a new operating system is released, regardless of whether it is a new version of Windows or a mobile operating system, it is almost a given that battery performance improvements are highlighted in press releases and during presentations.
The release of Windows 10 was not different in this regard, with Microsoft promising battery use improvements across the board.
Microsoft added new tools to the Windows 10 operating system that help you analyze, troubleshoot and improve battery use when using a device running the operating system.
The new feature, Battery Use, is a new addition that was not part of previous versions of the Windows operating system (but part of Windows Phone).
Battery Saver
Battery Saver is the new entry point for battery related information and preferences. It is part of the Settings application and you won't find most of the information it displays in the classic Control Panel.
- Tap on Windows-I to open the Settings application on your Windows 10 device.
- Navigate to System > Battery Saver to open the menu.
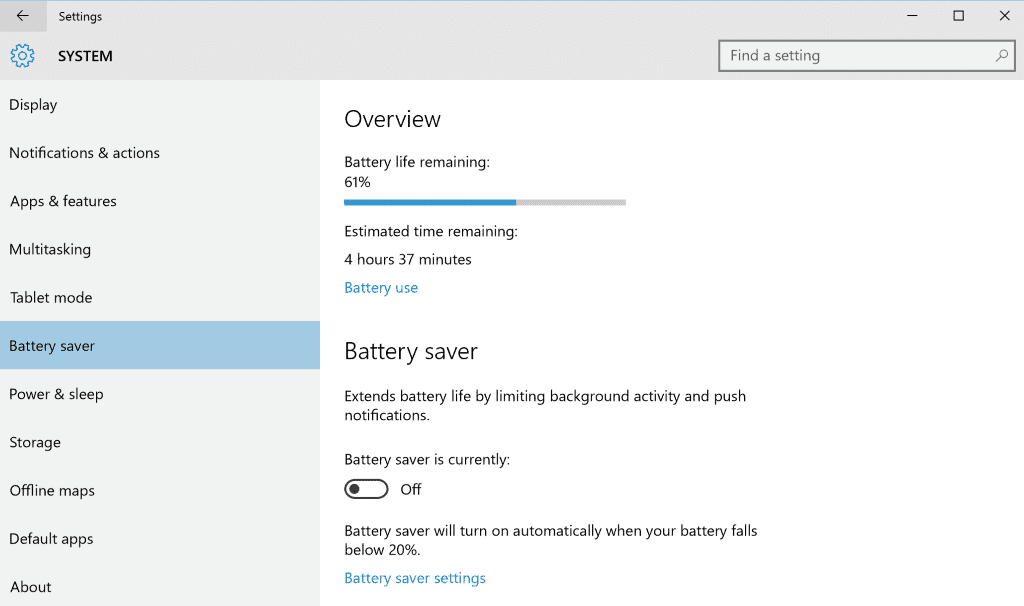
Battery Saver displays how much battery life is remaining both in percent and also in hours and minutes.
It lists an option to save battery by turning the Battery Saver feature on which you can do with a flick on the slider in the interface.
Windows 10 will turn the feature on automatically when battery falls below the 20% mark.
Battery Saver Settings
A click on "battery saver settings" displays the following options to you on a new screen:
- Change the 20% threshold to a different one using a slider, e.g. enforce battery saving at 50% or 35%.
- Enable "allow push notifications from any app while in battery saver".
- Disable "lower screen brightness while in battery saver".
- Add applications to a whitelist. These apps are allowed to run in the background, and to send and receive push notifications, even if battery saver mode is enabled.
Those settings pale in comparison to what the classic Power Options menu offers, and it is highly recommended to go through the options as well to optimize battery use on Windows 10 devices further.
- Press Windows-Pause to open the classic Control Panel. If your laptop or device has no Pause-key, tap on the Windows-key instead, type Control Panel and hit enter.
- If you used Windows-Pause, click on "Control Panel Home", and select Power Options from the list that opens.
The power options display all plans available (you may need to click on "show additional plans" to display them all.
Pick any of the plans, and select "change plan settings" afterwards. If you don't have time, select the "power saver" plan directly, and go through the plan's settings afterwards.
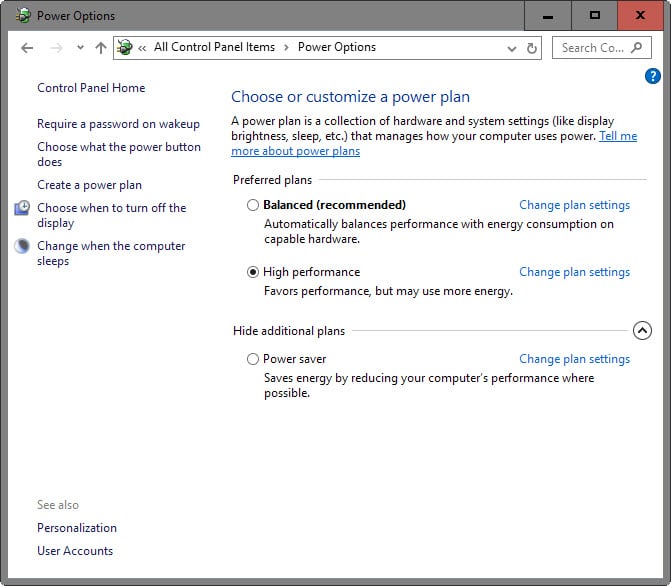
The page that opens displays only basic options. You may change the idle time for turning off the display and putting the computer to sleep (or turn those off).
A click on "change advanced power settings" however gives you far more control over the power plan.
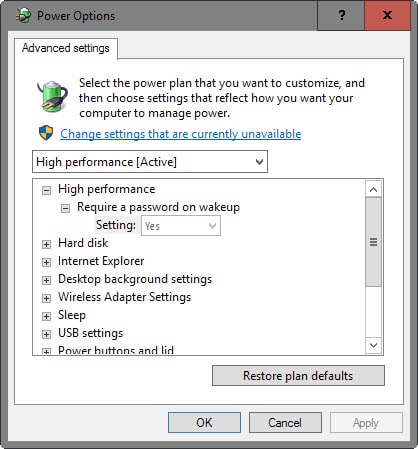
You can make the following adjustments in the advanced power options menu:
- Require a password on wakeup.
- Turn off hard disks after x minutes, or turn the feature off.
- Change Internet Explorer's JavaScript timer frequency (maximum performance or maximum power savings).
- Turn desktop background slideshows off or on.
- Set the power saving mode of the Wireless Adapter to maximum performance or low/medium/maximum power savings.
- Set an idle sleep timer and wake timers.
- Configure USB selective suspend.
- Configure the power button action (on the PC case).
- Configure PCI Express Link State Power Management.
- Configure processor power management (minimum processor state, system cooling policy and maximum processor state).
- Enable adaptive brightness and when to turn off the display (after the PC has been idle for x-minutes).
- Configure multimedia settings.
Battery Use
A click on "battery use" in the Settings application (not the Control Panel applet), lists battery performance information for the last 24 hours.
You can change the time period to 48 hours or 1 week using the dropdown menu at the top.
The Battery Use menu displays aggregate information at the top which highlight how much power the system, display and Wi-fi used in the selected time period, and how much background activities used.
Below that are the apps and programs that used the most power which can reveal useful information. Allowed underneath an application indicates that it has permission to run in the background.
You may click on an application and select the details button afterwards to display app-specific battery use information.
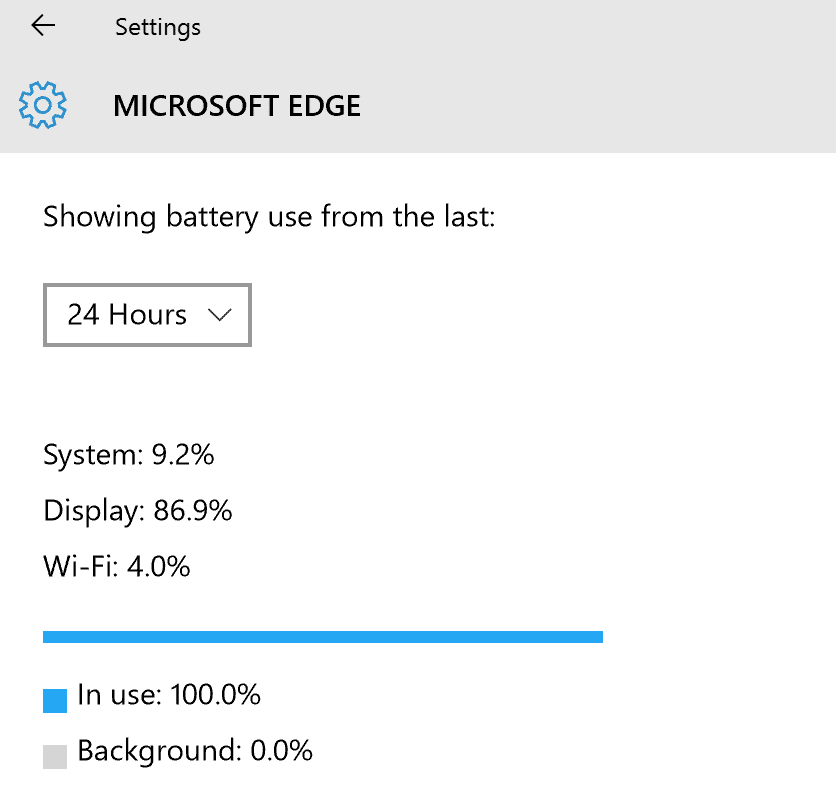
What may be most interesting here is the "in use" to "background" ratio. If you notice that an application or program uses lots of battery while running in the background, you may want to terminate it once you are done using it instead of letting it run in the background.
This works only if you don't require its notification functionality or want to keep it up of course.
Two app-specific preferences are displayed here as well:
- Allow this app to run in the background (turned on by default).
- Allow this app to run in the background, even when battery saver is on (turned off by default).
The Battery Use menu links to background app settings which you can use to control which (Windows apps) applications are allowed to run in the background.
It is easier to control this here as you can flip switches for all installed apps right away on the page saving time.
It makes sense to disable background running permissions for apps that you are not using. For instance, if you don't use Messaging, Skype or Photos, you may want to turn off the apps' ability to run in the background as it may drain battery when it does so.
Battery Saver affects other processes or apps
Battery Saver, when enabled, turns off other features when enabled:
- Mail, People and Calendar applications don't sync.
- Non-critical Windows Updates are blocked, but scans are still performed for updates.
- The display brightness is reduced to 30%.
- The majority of Telemetry data is blocked. According to Microsoft, only critical telemetry is uploaded including census data.
- Windows Task Scheduler tasks trigger only under certain circumstances (task does not use IdleSettings, MaintenanceSettings, is set to "run only when user is logged on).
Background apps power drain
The power use of background apps may vary largely depending on how you are using your Windows 10 device. Background apps accounted for only 0.2% of power on my Surface 4 Pro system for instance which means that Battery Saver's option to prevent apps from running in the background won't help much.
It is still useful though if the option to lower the screen brightness is enabled. But that can also be configure directly using the power options of the classic control panel.
Reducing power use
So what can you do to reduce the power use of the Windows 10 device?
- You could enable Battery Saver mode permanently, especially if you don't use any of the features that it limits (app syncing). Since it affects brightness, limits background apps and activity, it will reduce power use.
- You may also want to configure disk and display idle times in the classic Power Options. Since the display is usually one of the main factors for battery drain, it may be a good idea to set it to a low value so that it is turned off after a short period of no use.
- Programs and apps that you run will drain battery, and there is nothing you can do about that. You may change your behavior however, for instance by avoiding to run select applications that you don't require at that point in time. So, instead of opening the Facebook app or Facebook in Microsoft Edge to check what is new, you'd postpone that to a later point in time when the device is connected to a power source.
Now You: Got power saving tips? Feel free to share them in the options below.






Is there any way to also see some of the battery stats like iOS shows it? I.e. how much time it’s passed since last full charge, and how much of this time was spent with the device powered on, how much on standby, and how much on off/hibernate (ok, iOS doesn’t have this last one, but still…).
here’s a different way to keep a Windows 10 based laptop battery run longer: disable all other unused items from running w/ the system, check out the Startup (* run Task Manager, simply), manually modify the Services list (for advanced users only), exit an unused app in time, and had better prevent d system from installing bloatware. Learn more tips for stopping foistware infection@ https://removeunwantedprograms.wordpress.com/
10 really does brings some features from windows phones to the desk but still, all this data collection stuffs are backing me from it.