How to Create a Master Document in Word 2010

Word 2010 features a master document feature that enables you to collect multiple Word documents into a single Word file. With older versions of Microsoft Word you may sometimes run into problems with unusually long documents. In that case it is best to split the document into multiple Word files. This creates difficulties with page numbering and it is difficult to create an appropriate table of contents and index.
The master document holds links to sets of other Word files. These sub-document contents are not inserted in the master document as such. Rather, the master document creates links to the various sub-documents. You are able to make changes to the sub-documents separately while all of these changes are added to the master document as a default. This works well for integrating separate Word documents of related subject matter. By creating a table of contents and an index in the master document, you end up with an integrated document.
Also, when several different people are writing a single document on separate computers, the master document offers the perfect solution to deliver various sections of the document to the individuals working on the project.
This article demonstrates the basics of creating a master word document as well as sub-documents. Begin creating the master document by opening a new blank document.

Title it as a master document and then save it. You can include the file name and then append with “Master Documentâ€. Next, go to the View tab above the Ribbon and select Outline, found in the Document Views section. This opens a Navigation panel to the left of the blank document. Here you can start to enter the various headings for the document.
In the Outline Tools section in the Outlining tab, utilize the dropdown menu of Level styles and then use the green arrows to alter the headings.

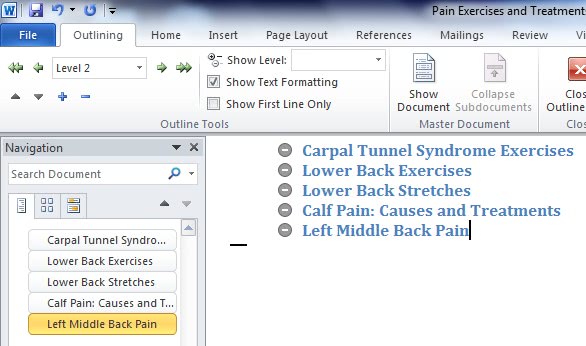
After entering all of the desired headings, click Show Document. You can find this in the Master Document section in the Outlining tab.

There are several different options to access in the Master Document section. Select the entire outline and click Create in the Ribbon. It will look something like the screenshot below. Each one is a separate file attached to the master document. If you have the documents on the desktop, they are automatically added as sub-documents.
Click Collapse Subdocuments to see the links to each subdocument. Ctrl+Left-click on the link and it will open the title to the document just as you placed it in the master document outline. You can then add the content from scratch or, if the document is already created, simply cut and paste.
Do this for each subdocument heading and link and you have created a master document. This is simply the basic approach. There are options to create chapters under the headings, a table of contents or an index. Word will automatically insert a continuous section break within the master document. These section breaks will be inserted before and after each subdocument. There are a variety of different options for master documents in Word 2010. This demonstration relates more to existing documents in a simple master document format. The rest of the features are a different subject. You can always explore the user manual or look out for future articles.
Advertisement


Thanks for this description. After 10 minutes, all my modules (sub-doc’s) were inserted into the master. That’s great. Your description is good enough for a primer, now I have to digg into for more functionalities. At least, I’m in.
Regards,
PhV-
Its very helpful for the students and officials as well because all type of documentation is done on Word and Excel mostly. New window carries some specifications in it so knowledge about it is very necessary to make its best use.