Creating your header.inc.php for eGroupware

My past post instructed you (minus the "j" - thank you Simon) how to begin the process of installing eGoupware. That article was primarily about getting the requirements out of the way so you can begin the real installation process. That time is nigh, and in this article I am going to continue on with what I started.
But what is the header.inc.php you ask? That file is the configuration file eGroupware uses for the server and the database information. It is not, however, the only configuration necessary for this groupware tool. But it is one of the most important as it dictates the very foundation of the system. Without this file, eGroupware can not, and will not, work. So...now that you've all the requirements met, let's set about to work on the header admin section.
Getting to this section
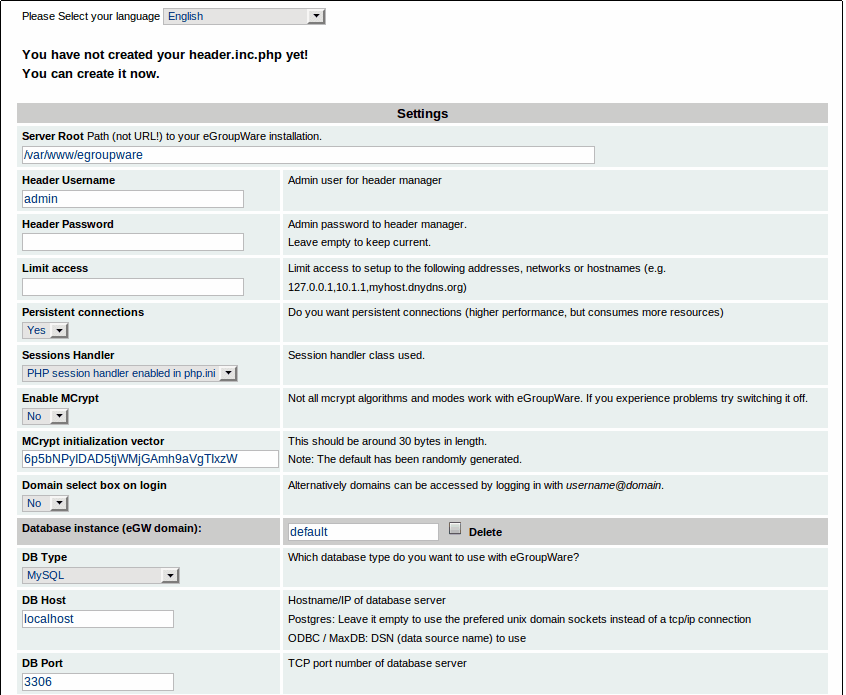
Once you have passed all the tests you need to pass (remember, there may be some you do not need - say, for example, you are using MySQL and you don't need any of the PostgreSQL extensions) all you need to do is to click on the Continue on to the Header Admin button. When you get to this page you will notice number configuration options (see Figure 1 for the top portion of this page).
At minimum these are the options you need to configure (in order to continue with the eGroupware installation):
1. Server root path. This is where you have unpacked the tar file. Most likely this will be in a sub-folder of your web servers' document root (i.e. /var/www/egroupware).
2. Header username. This can be the same as the admin user name you will select later on. You can leave this as admin if you like.
3. Header password. You MUST add this and you MUST remember it. It will be wise to also create a password that is strong.
4. Database type. This will be dictated by the type of database you are going to use.
5. DB Host. If you are using the same server which is housing eGroupware as database server, this can be left as localhost.
5. DB Port. Unless you are using a non-standard port for your database, leave this as the default - 3306.
6. DB Name. The name of the database you created before you began installation. If you have not created the database, now would be a good time to do so.
7. DB User. This will, most likely, be root. At least by default that is the easiest way to make sure eGroupware can communicate to your database. If you configure a user other than root, make sure that user has full access to the database you use.
8. DB Password. This is the password used by your DB User to connect to the database. I hope you have not left this blank, because that is just not secure.
9. Configuration user. This will be the user you use for the domain configuration. This can be the same as the header admin you configured earlier.
10. Configuration password. The password you will use for the Configuration user. Again, this password needs to be remembered and strong.

Now, if you notice at the bottom of this page the warning "Cannot create the header.inc.php due to file permission restrictions." that means the eGroupware installer does not have write access so it can write the configuration file. This is not a problem. What you can do is download the file (by clicking the Download button) and then moving that file to /var/www/egroupware. To be safe change the permissions of that file with the command sudo chmod 777 header.inc.php and then click the Add new Database Instance. This will then take you to the Setup/Config login page (see Figure 2), where you can then log into as the Setup/Config administrative user. The next phase - installing the eGroupware applications...stay tuned for the next entry.
Advertisement


