How to use Autotrash to totally forget about the trash

The trash (or "Recycle bin") is a sane concept of our operating systems. A file sent to the trash can be recovered if the user realizes the file was still needed after all. Now, the problem is: when should you empty the trash?
- If you never empty it, it grows and wastes valuable disk space
- If you empty it frequently, you lose its buffer benefits for recovery. Plus, who likes frequently doing this highly manual task?
- Finally, if like me, you get bored by this nonsense, you end up permanently bypassing the trash (with systematic Shift+Delete instead of Delete), which is of course very dangerous
Linux users, rejoice! Enter Autotrash. The name may sound a little scary, but this tiny command-line Python application is actually very friendly and fully solves the problems I just exposed. Its humble task is to selectively purge your trash based on certain criteria that you specify, like Deletion date, Remaining disk space, or Regular expressions.
Edit 2010/04/14: Windows users, Martin found a great app for you, read his followup article.
For example, you can tell Autotrash to delete files that have been in the trash for more than 7 days ago, and to ensure that at least 10GB remain available:
This means our three problems are solved:
- The trash never gets too big
- It always contains a reasonable recent backlog of deleted items, ready for the occasional recovery
- Geeks like me can come back to sane Delete practices
The next question you'll probably ask is: "Great, but I don't want to have to run Autotrash manually, how do I setup a schedule?". In typical GNU style, Autotrash doesn't do that, and it's okay because it's not its job. To do the scheduling, I suggest that:
- Either you setup a cron task running every n hours
- Or, if you are as lazy as I am, you can simply add Autotrash to the Startup programs:
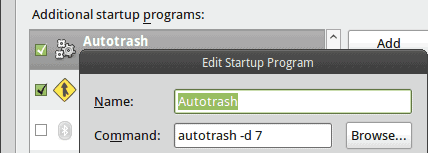
In my case, I generally shut down my computer for the night, so launching Autotrash at startup is a satisfying "good enough" tradeoff.

The most straightforward way to install Autotrash on an Ubuntu machine is to use its PPA. Inside a terminal, enter:
sudo add-apt-repository ppa:bneijt/ppa && sudo apt-get update && sudo apt-get install autotrash
Once the installation is done, open the manual page to see what it can do, and do your own setup:
man autotrash
Autotrash is free software licensed under the GPLv3, currently available as source or Ubuntu PPA. Special thanks to nekohayo who made me discover it.
Ronan is a geek and musician living in Montreal. He enjoys days when his hard drive doesn't evaporate because of an accidental keystroke and rambles about software, music and life at flying molehill.
Advertisement


One small tweak to the install to get it working: you need to do a ‘sudo apt-get update’ between adding the PPA & install autotrash.
Thanks for reviewing a handy little utility! I look forward to using it.
Thanks Lance, I fixed it.
Feel free to share your Autotrash tips here once you’ve used it a bit.